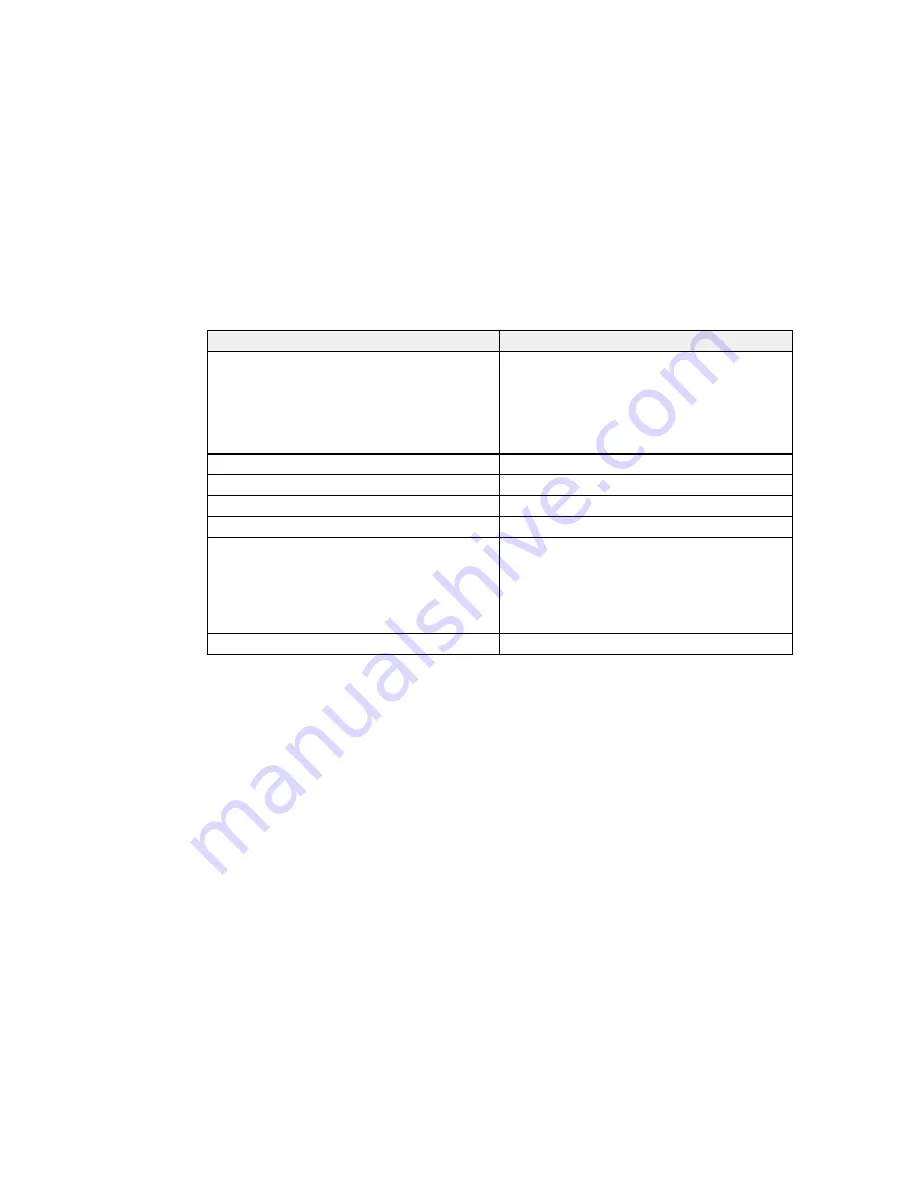
Paper or Media Type Settings
For this paper
Select this paper Type or Media Type setting
Plain paper
Plain Paper/Bright White Paper
Epson Bright White Paper
Epson Presentation Paper Matte
Epson Photo Quality Self-adhesive Sheets
Epson Iron-on Cool Peel Transfer paper
Epson Ultra Premium Photo Paper Glossy
Ultra Premium Photo Paper Glossy
Epson Premium Photo Paper Glossy
Premium Photo Paper Glossy
Epson Photo Paper Glossy
Photo Paper Glossy
Epson Premium Photo Paper Semi-gloss
Premium Photo Paper Semi-Gloss
Epson Premium Presentation Paper Matte
Premium Presentation Paper Matte
Epson Premium Presentation Paper Matte Double-
sided
Epson Ultra Premium Presentation Paper Matte
Epson Brochure & Flyer Paper Matte Double-sided
Envelopes
Envelope
Note:
The settings listed here are available only when printing from your computer; they do not apply to
your product's control panel settings.
Parent topic:
Loading Paper
Selecting the Paper Settings - Control Panel
You can change the default paper size and paper type using the control panel on the product.
1.
Press the up or down arrow button, select
Setup
, and press the
OK
button.
2.
Select
Paper Setup
and press the
OK
button.
3.
Press the
OK
button again.
4.
Select the paper size you loaded and press the
OK
button.
60
Summary of Contents for WF-2650
Page 1: ...WF 2650 User s Guide ...
Page 2: ......
Page 12: ......
Page 20: ...1 Document cover 2 Scanner glass 3 Control panel Parent topic Product Parts Locations 20 ...
Page 31: ...Related topics Wi Fi Networking 31 ...
Page 67: ...Related topics Faxing Scanning Copying 67 ...
Page 122: ...You see this window 122 ...
Page 142: ...DSL connection 1 Telephone wall jack 2 DSL filter 3 DSL modem 142 ...
Page 143: ...ISDN connection 1 ISDN wall jack 2 Terminal adapter or ISDN router 143 ...
Page 168: ...You see this window 4 Select Speed Dial Group Dial List 168 ...
Page 202: ...You see a window like this 4 Click Print 202 ...
Page 216: ...Print Head Alignment 216 ...
Page 234: ...5 Carefully remove any jammed paper stuck inside 6 Reattach the duplexer 234 ...
Page 236: ...4 Carefully remove any jammed pages 236 ...
Page 237: ...5 Close the ADF cover then open the document cover 237 ...
Page 238: ...6 Carefully remove any jammed pages in the direction shown 7 Close the document cover 238 ...


