Troubleshooting by Error Code
SiUS371901EB
375
Part 6 Service Diagnosis
Note(s)
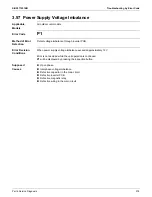
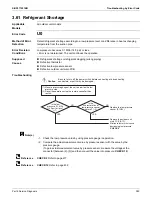
Troubleshooting
Is supply
voltage imbalance over
approximately
12 V? (
1)
Correct the open phase of
power supply.
Open phase?
Is the
imbalance of voltage
applied to the inverter over
approximately
12 V? (
2)
Rectify the power supply
voltage imbalance.
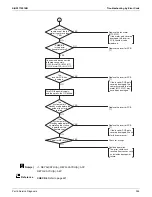
Take countermeasures (listed
below).
YES
YES
NO
NO
NO
Take countermeasures.
Defective noise filter, magnetic
relay, or wiring
Turn OFF the power supply,
and then check and repair
wirings in the main circuit and
defective components.
(1) Loose contact and wiring
disconnection between the
power supply and the
inverter
(2) Adhesion, meltdown, or
loose contact of magnetic
relay
(3) Wiring disconnection in or
loose contact of noise filter
Replace the inverter PCB.
(*3)
YES
Explanation to users
Use the document “Notice of Inspection Results” attached to spare part.
Hand the “Notice of Inspection Results” to user to ask
him/her to rectify the imbalance.
Be sure to explain user that “power supply
voltage imbalance” will occur and Daikin
accepts no responsibility for the imbalance.
Use equipment capable of constantly
recording power supply voltages (e.g.
Memory HiCorder) to record power
supply voltages between phases (R-S,
S-T, and R-T) for a period of
consecutive 1 week.
Power supply voltage imbalance
Even though power supply voltage
remains balanced when making
measurement, it often becomes
imbalanced during night-time (from
6:00 PM to 10:00 PM).
Even though the power
supply voltage is normal, the
error recurs.
<If voltage can be monitored>
Caution
Be sure to turn off the power switch before connecting or disconnecting
connectors, or parts may be damaged.
∗
1. Make measurement of voltage at the power supply terminal block (X1M).
∗
2. Make measurement of voltage at the L1, L2 and L3 terminals of diode module
located on the inverter PCB during the compressor is in operation.
∗
3. REYQ-XATJU(A): A3P
REYQ-XAYDU(A): A3P
REYQ-XAYCU(A): A4P
Summary of Contents for REYQ72-432XAYCU
Page 455: ...SiUS371901EB Wiring Diagrams Part 7 Appendix 448 REYQ144 168XATJU REYQ144 168XATJA 2D119206B ...
Page 457: ...SiUS371901EB Wiring Diagrams Part 7 Appendix 450 REYQ144 168XAYDU REYQ144 168XAYDA 2D119208C ...
Page 461: ...SiUS371901EB Wiring Diagrams Part 7 Appendix 454 FXZQ05 07 09 12 15 18TAVJU 3D110443A ...
Page 463: ...SiUS371901EB Wiring Diagrams Part 7 Appendix 456 FXEQ07 09 12 15 18 24PVJU 3D098557A ...
Page 464: ...Wiring Diagrams SiUS371901EB 457 Part 7 Appendix FXDQ07 09 12 18 24MVJU C 3D050501C ...
Page 468: ...Wiring Diagrams SiUS371901EB 461 Part 7 Appendix FXHQ12 24 36MVJU 3D048116C ...
Page 469: ...SiUS371901EB Wiring Diagrams Part 7 Appendix 462 FXAQ07 09 12 18 24PVJU 3D075354F ...
Page 475: ...SiUS371901EB Wiring Diagrams Part 7 Appendix 468 VAM1200GVJU 3D073270D ...
Page 478: ...Wiring Diagrams SiUS371901EB 471 Part 7 Appendix BS6 8Q54TVJ 2D089122B ...
Page 479: ...SiUS371901EB Wiring Diagrams Part 7 Appendix 472 BS10 12Q54TVJ 2D089121B ...
Page 481: ...SiUS371901EB Wiring Diagrams Part 7 Appendix 474 BSF6 8Q54TVJ 2D123905A ...


