SiUS371901EB
Troubleshooting by Error Code
Part 6 Service Diagnosis
280
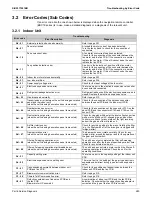
3.2 Error Codes (Sub Codes)
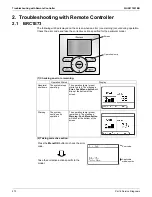
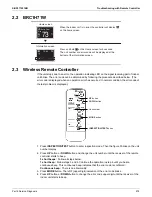
If an error code like the one shown below is displayed when the navigation remote controller
(BRC1E series) is in use, make a detailed diagnosis or a diagnosis of the relevant unit.
3.2.1 Indoor Unit
Error code
Troubleshooting
Error Description
Diagnosis
A0 - 01
External protection device abnormality
Refer to page 291.
A6 - 01
Fan motor locked
A locked fan motor current has been detected.
Turn the fan by hand to check for the connection of
connectors.
A6 - 10
Fan overcurrent error
A fan motor overcurrent has been detected.
Check for the connection of the connector between the
fan motor and the fan PCB. If the connection is normal,
replace the fan motor. If this still cannot solve the error,
replace the fan PCB.
A6 - 11
Fan position detection error
An error in the detection of position of the fan motor.
Check for the connection of the connector between the
fan motor and the fan PCB. If the connection is normal,
replace the fan motor. If this still cannot solve the error,
replace the fan PCB.
A6 - 20
Indoor fan motor status abnormality
Refer to page 303.
A6 - 21
Low indoor airflow
Refer to page 304.
A8 - 01
Power supply voltage error
Check for the input voltage of the fan motor.
A9 - 01
Electronic expansion valve error
There is an error in the electronic expansion valve coil or
a connector disconnected.
A9 - 02
Refrigerant leakage detection error
Refrigerant leaks even if the electronic expansion valve is
closed. Replace the electronic expansion valve.
AA - 03
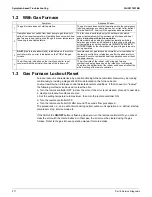
Gas furnace abnormality
Refer to page 310.
AH - 03
Transmission error (between the self-cleaning decoration
panel and the indoor unit)
(when the self-cleaning decoration panel is mounted)
Check for the connection of the harness connector
between the panel PCB and the indoor unit PCB.
AH - 04
Dust detection sensor error
(when the self-cleaning decoration panel is mounted)
Check for the connections of the connector X12A on the
panel PCB and the connectors X18A and X19A on the
sensor PCB.
AH - 05
Dust collection sign error
(when the self-cleaning decoration panel is mounted)
Check for clogging with dust at the dust collection port as
well as in the brush unit, S-shaped pipe, and dust box.
Furthermore, check for any stains of the light receiving
and emitting parts of the infrared unit.
AH - 06
Air filter rotation error
(when the self-cleaning decoration panel is mounted)
Check for anything getting in the way of rotating the filter
(e.g. the filter comes off or the drive gear is clogged with
foreign matter).
AH - 07
Damper rotation error
(when the self-cleaning decoration panel is mounted)
The damper does not rotate normally. Check for any
foreign matter around the damper and for the operation of
the gear and limit switch.
AH - 08
Filter self-cleaning operation error
(when the self-cleaning decoration panel is mounted)
The unit has not yet completed the filter self-cleaning
operation even after the lapse of specified period of time.
Check for any external noise, etc.
AH - 09
Filter self-cleaning operation start disabled error
(when the self-cleaning decoration panel is mounted)
The unit has been put into a state in which the filter self-
cleaning operation is disabled. Check the unit for the
operating conditions.
AJ - 01
Capacity setting error
There is an error in the capacity setting of the indoor unit
PCB.
AJ - 02
Electronic expansion valve setting error
There is a fault in the setting of the gear type electronic
expansion valve/direct acting type electronic expansion
valve.
C1 - 01
Transmission abnormality between indoor unit
PCB and fan PCB
Check for the conditions of transmission between the
indoor unit PCB and the fan PCB.
C1 - 07
Blower motor communication error
Refer to page 315.
C1 - 08
Climate Talk Communication error
Refer to page 316.
C6 - 01
Defective combination of indoor unit PCB and
the fan PCB
Blower motor HP mismatch
A combination of indoor unit PCB and the fan PCB is
defective. Check whether the capacity setting adaptor is
correct and the type of the fan PCB is correct.
Summary of Contents for REYQ72-432XAYCU
Page 455: ...SiUS371901EB Wiring Diagrams Part 7 Appendix 448 REYQ144 168XATJU REYQ144 168XATJA 2D119206B ...
Page 457: ...SiUS371901EB Wiring Diagrams Part 7 Appendix 450 REYQ144 168XAYDU REYQ144 168XAYDA 2D119208C ...
Page 461: ...SiUS371901EB Wiring Diagrams Part 7 Appendix 454 FXZQ05 07 09 12 15 18TAVJU 3D110443A ...
Page 463: ...SiUS371901EB Wiring Diagrams Part 7 Appendix 456 FXEQ07 09 12 15 18 24PVJU 3D098557A ...
Page 464: ...Wiring Diagrams SiUS371901EB 457 Part 7 Appendix FXDQ07 09 12 18 24MVJU C 3D050501C ...
Page 468: ...Wiring Diagrams SiUS371901EB 461 Part 7 Appendix FXHQ12 24 36MVJU 3D048116C ...
Page 469: ...SiUS371901EB Wiring Diagrams Part 7 Appendix 462 FXAQ07 09 12 18 24PVJU 3D075354F ...
Page 475: ...SiUS371901EB Wiring Diagrams Part 7 Appendix 468 VAM1200GVJU 3D073270D ...
Page 478: ...Wiring Diagrams SiUS371901EB 471 Part 7 Appendix BS6 8Q54TVJ 2D089122B ...
Page 479: ...SiUS371901EB Wiring Diagrams Part 7 Appendix 472 BS10 12Q54TVJ 2D089121B ...
Page 481: ...SiUS371901EB Wiring Diagrams Part 7 Appendix 474 BSF6 8Q54TVJ 2D123905A ...


