background image


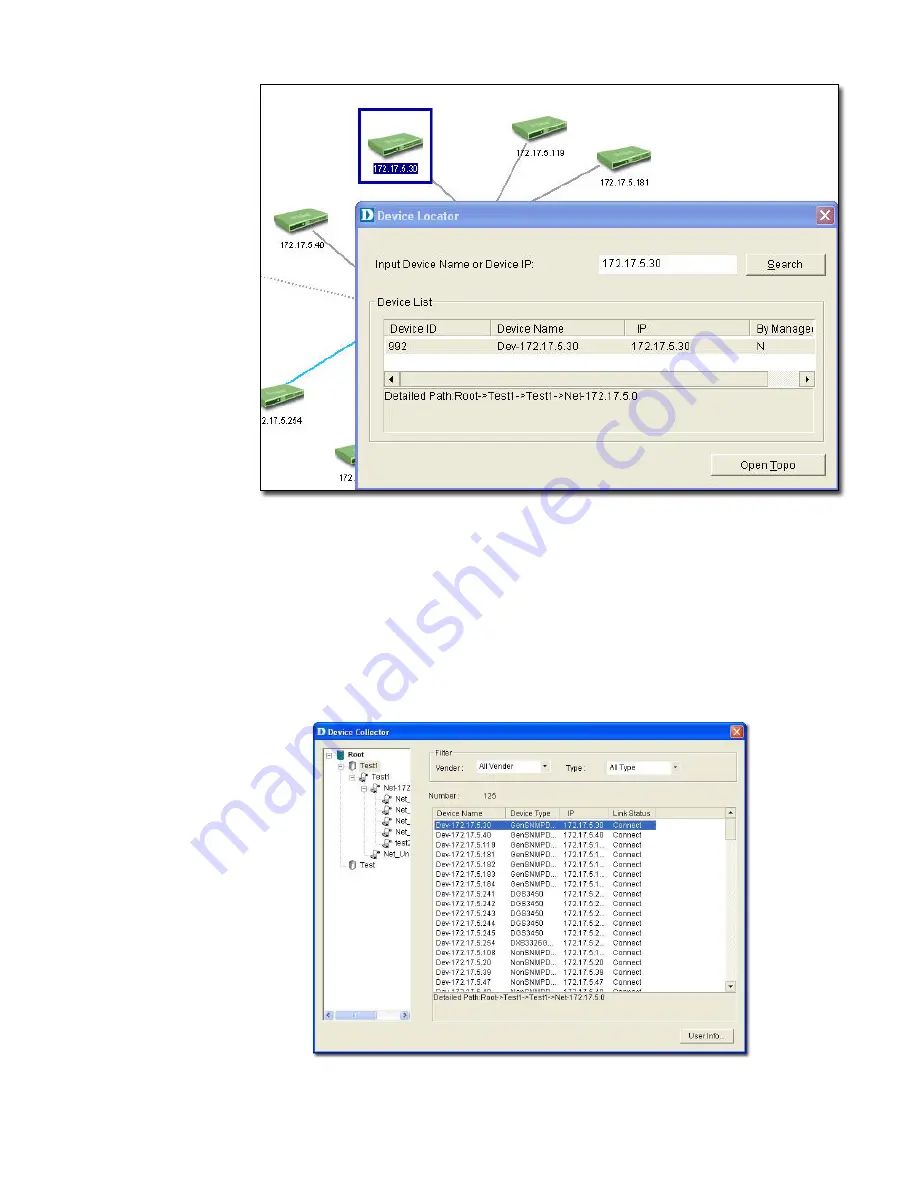
Figure 94:


The Topology indicates the device located after using Device Locator tool 

Entering User Information 

In D-View, you can use the 

Device Collector

 tool to enter 

User Information

To enter user information: 

1.


Go to 

System 

>

 Resource Manager 

>

 Device Collector

. The 

Device 

Collector

 screen displays.   

2.


Use filter options to select the vendor’s name and device type. A list of 
devices is displayed. 


Figure 95:


Device Collector screen 

Summary of Contents for D-View 6 Professional

Page 1: ...NETWORK MANAGEMENT SYSTEM VER 1 00 Standard Professional User Manual ...

Page 2: ...ectual property rights covering subject matter in this document Except as expressly provided in any written license agreement from D Link the furnishing of this document does not give you any license to these patents trademarks copyrights or other intellectual property 2007 D Link Corporation All rights reserved For additional information contact D Link Corporation No 289 Sinhu 3rd Road Neihu Dist...

Page 3: ...dition 21 D View 6 0 Licensing 25 Trial Version 25 Obtaining the Activation Code 25 3 Understanding the Architecture 27 Modular Architecture 28 Features 29 Functions 30 4 Understanding the Interface 31 Introduction 32 Context sensitive Menus 33 Main Menu 35 File 35 View 36 Application 37 System 37 NetTools 38 Advanced 39 Help 39 5 Using D View 40 Getting Started 41 Login D View 41 System Configura...

Page 4: ...ion 74 Using Device Type Check 76 Using Safeguard Check 77 Labeling Devices 79 Editing Device Information 80 Managing Events 83 Setting Poll Parameters 83 Setting the Devices to Poll 84 Viewing the Poll Device List 85 Grouping Devices using Device Manager 85 Configuring Device Events 87 Retrieving Device Event Logs 90 Defining Trap Information 92 Locating the Switch Port 93 Monitoring the Link Sta...

Page 5: ...Net Toolbox 115 Port Packet Monitor 116 Performance Monitor 118 9 Index 123 Index 124 10 Technical Support 125 ...

Page 6: ... The Installation Guide provides installation procedures for both Standard and Professional Editions of D View Document Conventions The following conventions are used in this guide Reader Alert Conventions Reader alerts are used throughout this document to notify you of essential information The following table explains the meaning of each alert READER ALERT MEANING Tip Alerts you to supplementary...

Page 7: ...ers that you type into the interface For example Hierarchy Topology Workplace and type http 192 168 1 1 Italic font Variables for which you supply a specific value For example Filename ext can refer to any valid file name Courier New font Samples of code and file paths and names Command A command that is typed at the command prompt For example ipconfig ...

Page 8: ...Introducing D View 7 ...

Page 9: ...ent tool designed to centrally manage critical network characteristics such as availability reliability and resilience in a consistent manner D View accommodates a wide range of devices including Wireless bridges Access points SNMP capable Smart Managed switches SNMP capable routers OLT ONU devices Broadband CO devices Windows Server This guide does not discuss network design management concepts o...

Page 10: ... Hard Drive Space at least 200 MB Ethernet Adapter D View supports the following D Link Switch DES 3526 DES 3550 DES 3828 DES 3828DC DES 3828P DES 3852 DES 6500 DGS 3308FG DGS 3324SR DGS 3426 DGS 3427 DGS 3450 DGS 3612 DGS 3612G DGS 3627 DGS 3627G DGS 3650 DXS 3326GSR DXS 3350SR DGS 3200 10 D Link Wireless AP DWL 2100 AP DWL 2700AP DWL 3200AP DWL 3260AP DWL 7100AP DWL 7700AP DWL 8200AP Software Re...

Page 11: ...technology D Link recommends using a display with 1024 x 768 resolution Client Server Architecture Professional Edition By using the remote access feature of SQL Server D View 6 0 Professional Edition implements Client Server architecture allowing workstations to share database information Given below is an illustration of the SQL Server Remote Access chart Figure 1 SQL Server Remote Access To con...

Page 12: ...anagement Functions SNMP v3 covering security functions such as packet encryption decryption user levels for different classes of access right MPD RFC 2572 TARGET RFC 2573 USM RFC 2574 and VACM RFC 2575 SNMP v3 Configuration Device Module Access Right Control NMS System Access Control NMS System Function Module Access Right Control Local and Radius Authentication Modes when Login System Management...

Page 13: ...itor Fault Management Tools Trap Filter Trap Log Ping Poll Filter Ping Poll Log SNMP Poll Filter SNMP Poll Log Event Config Manager Event Viewer Supported Devices D Link Devices SNMP capable Smart Managed switches OLT ONU devices Wireless bridges and access points SNMP capable routers Multi tenant broadband CO devices Windows Workstation DC and Server Device Panel Simulation ...

Page 14: ...Installing D View 13 ...

Page 15: ...ettings Click Microsoft SQL Server SQL Server Group Local Windows NT Right click on Local Windows NT and select Security Configure Authentication as SQL Server and Windows 1 Insert the CD and navigate to D View Standard exe D View Professional exe If the installer does not start automatically start the installer by double clicking the D View Standard exe D View Professional exe The InstallShield W...

Page 16: ...Figure 4 Choose Destination Location screen 3 By default D View is installed in C Program Files D Link D View Alternately you can choose to install D View in your preferred designated folder Click Browse to select the target location and then click Next to continue The Select Program Folder screen displays ...

Page 17: ...will add program icons into the Program Folder 4 Click Next to continue The Start Copying Files screen displays Figure 6 Start Copying Files screen 5 Verify the settings before clicking Next To make changes click Back The Setup Status screen displays ...

Page 18: ...indicates that D View installation is in progress To stop the installation click Cancel Figure 8 Setup Status screen Once D View installation is successfully completed the Welcome to the Microsoft XML Parser and SDK Setup Wizard window displays ...

Page 19: ... to continue installing Microsoft XML Parser and SDK on your server The End User License Agreement screen displays Figure 10 End User License Agreement screen 8 Select I accept the terms in the License Agreement and click Next to continue The Customer Information screen displays ...

Page 20: ...Name and the name of your Organization Click Next to continue The Choose Setup Type screen displays Figure 12 Choose Setup Type screen 10 Use the Customize option to select the program location Click Install Now to continue with the installation recommended ...

Page 21: ...zard screen 11 Click Finish to exit and complete the installation Figure 14 Setup Complete screen The screen indicates that D View 6 0 and Microsoft XML Parser and SDK software have been installed 12 Click Complete to close this window 13 Restart your computer to complete the installation 14 To start D View double click the on the desktop ...

Page 22: ...installation is complete create a database for D View To create a database SQL 2000 server must be installed with SQL service running on the server To create a database follow the steps below 1 Copy the following files to a folder Make DB exe Task SQL DBCreate SQL As seen in the following figure the files are stored in E D View 6 0 SQLDBScript SQLDBScript Figure 15 MakeDB screen 2 Double click Mak...

Page 23: ...Database Tool screen D View Database Tool is in the process of creating a database Figure 17 MakeDB screen 3 Click OK to close the window 4 To edit information in the hosts file go to C WINNT system32 drivers etc hosts ...

Page 24: ...e hosts file Figure 19 Hosts File screen 6 Update the host file with the following information for example 127 0 0 1 localhost dview test 10 90 90 101 10 90 90 101 SQL Server To implement the client server architecture ensure to install D View 6 0 professional edition in required servers to connect with the SQL database 7 Click Save to save the file ...

Page 25: ...the same as the alias name Ensure to add the IP address of your server in the hosts file Check with the system administrator for the correct IP address of your server 8 Restart your computer to complete the installation The Login D View screen displays Refer to Getting Started to continue working with D View ...

Page 26: ...orking with D View During the trial period every time D View is started a message is displayed indicating the time remaining before the trial version will expire Obtaining the Activation Code If you opt to buy D View there are three ways to request for your activation code which are as follows OPTION A To register go to http dview dlink com tw and enter user related information such as license key...

Page 27: ...lays Figure 21 Input Activation Key screen 3 Click Register to open the registration website and update the information on line OPTION C Start D View go to Help D View Activation Wizard Follow the steps accordingly to register for D View ...

Page 28: ...Understanding the Architecture 27 ...

Page 29: ... DBMS access basic and plug in modules Figure 22 D View System Architecture D View follows three tier architecture that is client server architecture in which an application is executed by more than one distinct software agent For example an application that uses middleware to service data requests between a user and a database employs three tier architecture ...

Page 30: ...ices to integrate with D View Define trap events using the Trap Editor Manage multiple identical devices at the same time using Batch Configuration Firmware updates Save config RMON Enable and more Manage third party devices using the MIB Compiler and MIB Browser Supports SNMPv3 for major MIBs Monitor the status of network devices by polling network devices periodically View and check the status o...

Page 31: ...e mechanism to retrieve SNMP OID information For example using Performance Monitor function the administrator can monitor data ratio per port Syslog Management Maintain user action log information System Config Configure global parameters of the network for example Local and Radius Authentication SNMP v3 Support For major MIBs including MIB II IF MIB RFC2233 Entity MIB RFC2737 Bridge 802 1D RFC149...

Page 32: ...Understanding the Interface 31 ...

Page 33: ... it as a network topology map Menu Toolbar Access different functional modules from the Menu toolbar Hierarchical Topology Workplace Displays a tree like structure of the topology Main Toolbar Use the Main toolbar for quick access of the functional modules Topology View Window Displays the net cells that include devices links and netmaps Message Board View event messages of various devices in the ...

Page 34: ...s context sensitive information about the current state of what you are viewing in the window Refer to Main Menu for the different functional modules Drag and drop the toolbar to rearrange elements around the user interface to suit your working model Context sensitive Menus Most items in D View have context sensitive menus Select an item and then right click the mouse to view additional details To...

Page 35: ...Topology View Window Figure 25 Context sensitive menu accessed from the Topology View Window Hierarchy Topology Workspace Figure 26 Context sensitive menu accessed from the Hierarchy Topology Workspace ...

Page 36: ...ON Save Save the current topology Startup Wizard The wizard guides you to create a topology Refer to Startup Wizard for more information Close Close the current Topology View window Print Print the current topology Preview Preview the current topology Page Setup Set printer options properties and paper size Lockup Locks D View only the current user or an administrator can unlock the system Logout ...

Page 37: ...vent Viewer by IP Device Group Manager Device Event Configure System Config Administrator Management and Change Password Application Toolbar Access Batch config Run Batch Program Topo Export Import Device Customization Access Select netmap Add netmap Edit netmap Delete netmap Select device Add device Edit device Delete device Select link Add link Edit link Delete link Topo Manager Toolbar Main too...

Page 38: ...nce of operations in D View For example Save Configuration Retrieve Port Status and so on Refer to Batch Configuration for more information Topo Export Import Restore and backup D View Refer to Using Topo Export Import for more information Device Customization Add modify and delete devices Refer to Customizing Devices for more information System The following table lists the System menu items and ...

Page 39: ...ator Manager for more information Change Password Change password after login Refer to Changing Password for more information NetTools The following table lists the NetTools menu items and their descriptions MENU ITEM DESCRIPTION Device Discovery Search devices using IP address Refer to Device Discovery for more information Trace Route Lists all the intermediate routers a connection must pass thro...

Page 40: ... Link Capacity Check Monitor and modify the link status Refer to Monitoring the Link Status for more information Device type Check Check the network for new and updated devices Refer to Using Device Type Check for more information Safeguard Check Check the safeguard status of devices Refer to Using Safeguard Check for more information All of ARP info Retrieve ARP information from devices in the to...

Page 41: ...Using D View ...

Page 42: ...n and the default Password is 111111 Figure 27 D View Login screen Click Option to login to D View by using different domain specific administrator accounts to view different topology maps System Configuration D View supports two modes of authentication Local and Radius Authentication To configure the root domain name management station and authentication information go to System System Config By ...

Page 43: ...administrator needs to create a domain before working on any topology When creating a new domain the administrator should allocate IP address of the workstation Use Domain Manager to create delete and modify the domain information After logging in D View by default creates a Super Domain and the IP address of the workstation A super domain is a virtual domain which manages the topologies of all th...

Page 44: ...Figure 29 Startup Wizard screen 2 Click Next The Domain Manager screen displays Figure 30 Domain Manager screen 3 Enter the name of your new Domain 4 Click Next The Add Netmap screen displays ...

Page 45: ...r the Netmap Name and Description 6 Click Next The Select Network Adapter screen displays Figure 32 Select Network Adapter screen 7 Select a network adapter to build the topology 8 Click OK The Topology Generator Wizard screen displays ...

Page 46: ...Network Local Network accesses devices in the local network and Designated Network accesses devices by specifying the IP range 10 Enter a name for Topology Generator analysis 11 Click Next The Topology Analysis Configuration screen displays Figure 34 Topology Analysis Configuration screen ...

Page 47: ... in D view 13 Click Finish to generate the topology The Topo Export screen displays Figure 35 Topo Export screen 14 Click Export to export the generated topology to the Netmap D View displays the status of the export After completing the startup wizard s initial process you can manage and monitor devices as described in the following chapters ...

Page 48: ...Working with Topologies 47 ...

Page 49: ... a topology manually To manually create a topology 1 Go to System Domain Manager and create a new Domain to manage the topology Super Domain is by default is a virtual domain from which the topologies of all other existing domains can be managed Figure 36 Domain Manager screen 2 Create a netmap To create a netmap right click on the domain in the Hierarchy Topology Workplace and select Add Netmap ...

Page 50: ...iption for the Netmap 5 Click OK the database before you proceed Make sure to save the changes made to 6 een the devices Refer to Device Discovery for more information There are three ways to accomplish the next task They are Go to NetTools Device Discovery to search for and add devices into the Netmap manually Then create links betw ...

Page 51: ...covery screen From the Topo Manager Toolbar Click Add Devices OR use the Copy Paste function Refer to Copy Paste for more information Continue to Export your topology Refer to Using Topo Export Import for more information ...

Page 52: ...in can manage the entire network To create multiple topologies with Domain Manager 1 Login to D View with Super Domain administrator access 2 Go to System Domain Manager and then create two domains For example Domain_1 Domain_2 Figure 40 Domain Manager screen 3 Select a domain update the Workstation information and then click Create to define the management workstation in D View For example Domain...

Page 53: ...5 Create a topology for each domain Figure 42 Hierarchy Topology Workplace 6 Login to D View by using different domain specific administrator accounts to view different topology maps For example Click Option to login with Domain_1 administrator account by using Domain_1 Station 172 231 255 11 ...

Page 54: ...Figure 43 Login screen 7 This administrator can view only the Domain_1 topology Figure 44 Domain_1 window ...

Page 55: ... Import The Topo Export Import screen displays Figure 45 Topo Export Import screen 2 Select either Export or Import Export Backup save topology data to an external XML file Import Restore topology data from an XML file 3 Select the Domain 4 Select the Netmap 5 Browse to select the file to export to or import from 6 Click Apply Refer to Restoring and Backing Up D View to restore and backup D View ...

Page 56: ... devices and identifies the relationship among devices by their MAC or IP address 2 Identifies the device type 3 Retrieves the forwarding table information in switches to obtain the relationship among switch ports and MAC address of the devices 4 Creates a Topology The generated Topology can be incorrect if the switches forwarding table information is incorrect or incomplete The Topology created b...

Page 57: ...pology Generator Wizard screen displays Figure 46 Topology Generator Wizard screen 4 k The SNMP Community String Setting is by default defined in D View 2 Select the Analysis Mode 3 Enter the Topology Name Click Next The Topology Analysis Configuration screen displays The topology generator analyzes the local network for the IP address and Subnet Mas ...

Page 58: ...reen 5 Click Finish to generate the topology The new topology displays in the window For a designated Network enter the IP address and ensure that the D View management console can access the designated subnet Figure 48 Generated Topology window ...

Page 59: ...6 Go to Topology Topo Export or select and right click on the netmap of the generated Topology to select Topo Export Figure 49 Topo Export screen 7 Click Export to export the generated topology ...

Page 60: ...opology Go to Topology Rearrange Totally The system will rearrange the linked devices in hierarchy considering the selected device as the topmost device Using Rearrange by step Open and select a device in the topology Go to Topology Rearrange by step The system will rearrange the linked devices in hierarchy considering the selected device as the top device Before Rearranging After Rearranging Figu...

Page 61: ...tore the saved topology that was created initially from the database To Rollback a Topology Go to Topology Topology Rollback The Topology reverts to the previous settings The following screenshots displays the sequence of steps by using the Topology Rollback function ...

Page 62: ...Figure 51 Sequence of steps displaying the Topology Rollback function ...

Page 63: ...Managing and Monitoring Devices 62 ...

Page 64: ...d devices is displayed D View by default supports all D Link devices that have been added to D View If you cannot find the device modules in the list download and install the device management modules from the D Link Website Figure 52 Devices Supported screen Refer to Customizing Devices to extend the device module list ...

Page 65: ...ompiler translates the MIB from its normal ASN 1 format to a format that is comprehensible by other applications Refer to Managing Devices with MIB Compiler for more information Telnet Web management tools Refer to Management Methods for more information Monitoring performance status by ICMP SNMP Refer to Setting the Devices to Poll for more information Extension of supported device types with Dev...

Page 66: ...drop down list Logo Select a logo for the device module Device Type Select enter the device type Max Ports Enter the maximum number of ports depending on the device Alias Enter an alias name for the device System OID Enter the OID value of the device Refer to Retrieving OID of the device to obtain the OID of a device Up Down Unpoll icons Browse to define and customize the device icons Program Spec...

Page 67: ...piler are that you can query data and configure the settings for a third party device with the help of D View To manage devices with MIB Compiler 1 Go to NetTools MIB Tools and then select MIB Complier The D Link MIB Compiler screen displays Figure 54 D Link MIB Compiler screen 2 Open the rfc1213 file for modification D View loads the compiled MIB file Typically D View identifies the device type b...

Page 68: ...Figure 55 Loading compiled MIB Module screen 3 For example right click on sysLocation and select Info in the MIB tree Figure 56 MIB Tree screen The Browse Result Node sysLocation screen displays ...

Page 69: ...6 Make a note of the OID value of the device Use MIB Browser to browse MIB files after compilation Setting Up SNMP Configuration to Retrieve Device Information 1 Click SNMP Configuration from the MIB Complier screen The SNMP Configuration screen displays Figure 58 SNMP Configuration screen 2 Select the SNMP Protocol Version ...

Page 70: ...nter the community string to access devices through SNMP If you select SNMPV3 update the SNMPV3 specific fields and access devices respectively 4 Click OK and manage the selected device using MIB Compiler ...

Page 71: ... address 3 Set the SNMP Configuration Refer to Setting Up SNMP Configuration to Retrieve Device Information from devices 4 Compile the RFC1213 MIB File and select sysObjectID from the MIB tree 5 Right click sysObjectID and select Info The Browser Result screen displays 6 Make a note of the OID value of the device OR 1 For a non designated device module D View will identify the device as GenSNMPDev...

Page 72: ...he dialog Name Enter the name of the device Contactor Enter the name of the user responsible for managing the device Location Enter the location of the device Run Time Displays the run time of the device Service Displays the OSI layers the device supports 5 Click Apply to save the changes 6 Click Refresh to view the updated information ...

Page 73: ...The Advanced Option screen displays Figure 61 Advanced Option screen 2 D View supports a list of batch function templates They are FIRM Download firmware from the switch to the TFTP server or upload firmware to the device CONFIGURE Download Upload config information in the device RESOURCE Retrieve Set the information about name location contact of the device PORTSTATUS Retrieve Set the Port Enable...

Page 74: ...ick Property to configure the OID properties of a device type The OID Config screen displays Figure 63 OID Config screen 6 Enter the values of the OID Config information 7 Enter the values of the OID Value Config for each OID 1 Other 2 Disable 3 Enable 8 Click Add to configure the OID value of Safeguard Engine ...

Page 75: ...ance Safeguard Engine Enable Disable safeguard status Refer to Using Safeguard Check for more information Spanning Tree Enable Disable the status to prevent undesirable loops in the network Firmware Update Upload download firmware through TFTP server Resource Select to update the resource information for a specific device Config File Manager Update and backup configuration files from the TFTP serv...

Page 76: ...rver Figure 65 D Link TFTP Server screen 5 The Config File Manager enables uploading of the configuration files to the device through TFTP server Administrators can make the required changes to the file and then upload this file to the device It reduces the administrators time when a similar configuration has to be made to several similar devices The status displays OK when the transaction is succ...

Page 77: ... device that needs to be monitored Figure 66 Generated Topology window 2 Go to Advanced Device Type Check D View scans the devices in the open topology Figure 67 Device Type Check screen 3 Click Check to manually scan the device 4 Select one or more devices and click Update D View refreshes the information of the selected devices ...

Page 78: ...afeguard status of all devices is disabled To configure the safeguard status 1 Go to Application Batch Config Run Batch Or In the opened topology select the device and right click and select Run Batch The Run Batch screen displays You can now enable or disable the devices Safeguard Engine Figure 68 Run Batch Safeguard Engine screen 2 Check the devices and then select ENABLE from the Option drop do...

Page 79: ...updated information 7 Click Close to exit the window The Safeguard Engine icon is displayed on the top left hand corner of the device in the topology Figure 70 Topology indicating the Safeguard Engine enabled for certain switches The safeguard status is not saved into the database the status value is only for the opened topology ...

Page 80: ...Device Labels e Label To change the Device Label go to Topology Device Label and select a type EXAMPLE DEVICE LABEL DESCRIPTION Device Name The device name is displayed under the device icon Device IP The device IP address is displayed under the device icon Device Type The device type is displayed above the device icon Safeguard Engine ft uard status Using Safeguard Check function module The Safeg...

Page 81: ... connection speed between the two devices Editing Device Information D View can store device related information such as name of the device the port it uses interface configuration details vendor and so on To edit device information 1 Select the device from an open topology and then go to Topology Device Manager Edit Device The Edit device screen displays OR Right click on the device and select Pr...

Page 82: ...rface IP 4 Enter the Detailed Information for the device Detailed Information comprises the Location Buyer Modules Serial No Buy Date Port Num and Firmware of the device 5 Configure the Management Method Refer to Management Methods for more information 6 Click Apply Management Methods D View allows administrators to manage multiple device modules simultaneously using different management methods W...

Page 83: ... support SNMP v1 v2c to manage the device SNMP v3 D View will use device modules that support SNMP v3 to manage the device TELNET D View will use the telnet tool embedded in the OS to manage the device WEB D View will use web browser IE tool imbedded in the OS to manage the device Customize D View will use the designated program to manage the device ...

Page 84: ...ll discuss Events in detail Setting Poll Parameters Parameters for the polling include poll interval and poll timeout To set the Polling Parameters 1 Go to System Event Manager Polling Config Set Parameter tab Figure 73 Set Parameter screen 2 Set the Poll Interval in seconds D View polls the devices at the set time interval 3 Set the Poll Timeout in seconds D View stops polling the device after th...

Page 85: ... Device tab Figure 74 Select Poll Device screen 2 Select the Device Group Refer to Grouping Devices using Device Manager for more information on grouping devices 3 Select the Poll Protocol The two options to poll the network devices periodically are SNMP Simple Network Management Protocol and ICMP Internet Control Message Protocol The default poll protocol is ICMP 4 Select devices and then click A...

Page 86: ...t Manager Polling Config Poll Device List tab Figure 75 Poll Device List screen 2 From here you can delete devices you ve added to the list From the topology select the device and right click to select Add to Poll List or Delete from Poll List from the popup menu Grouping Devices using Device Manager For monitoring similar devices you can group devices of the same type using the Device Group Manag...

Page 87: ...creen displays Figure 77 Add Group screen 3 Enter the name of the Group 4 Enter a brief Description of the group 5 Click Add The group is created 6 Next select devices from the device list you want to add to this group and click Add To Group The Add Device to a group screen displays ...

Page 88: ... The devices are added to the group Figure 79 Device Group screen 9 Click Set Community to change the read write community of devices Configuring Device Events After defining the poll list configure the event process mechanism for a device or a group of devices when an event occurs ...

Page 89: ...s Cold Start trap message when the device is powered off on Warm Start Device sends Warm Start trap message when the device has been rebooted Link Down Device sends Link Down trap message when the status of an attached communication interface has changed from up to down Link Up Device sends Link Up trap message when the status of an attached communication interface has changed from down to up Devi...

Page 90: ...es the event into database Set the color of the Log messages displayed in the message board Flash The netmap icon in the Hierarchy Topology Workplace will flicker a warning sign EMail D View notifies administrators of an event through an e mail Mail Server Config Click to configure the mail Figure 81 Email Configuration screen o Sender Update the Sender s information by entering the name email aut...

Page 91: ...nt information 1 Event Viewer by Netmap To view events occurred for a selected Netmap go to System Event Manager Event Viewer by Netmap Figure 82 Event Viewer by Netmap screen 2 Event Viewer by IP To view events occurred for a selected IP address go to System Event Manager Event Viewer by IP Figure 83 Event Viewer by IP address screen ...

Page 92: ...t the time interval at which the event has occurred o Event Source Select the source of the event saved in the database or stored in a file 4 Save the settings and click Query to query the database and a list of devices are displayed depending on the filter setting 5 Click Statistic to view event statistics by event type manufacturer severity and device type Figure 84 Event Statistics Bar Chart sc...

Page 93: ...ely and using Trap Editor to retrieve trap information passively D View retrieves and parses trap information from devices In order to receive and parse the private trap information from a designated device administrators need to customize the private trap information To customize the trap information retrieve the definition format from the device vendor To define trap information 1 Go to System E...

Page 94: ... enterprise OID is 1 3 6 1 2 1 10 166 11 The specific number 6 here represents mplsL3VpnNumVrfRouteMaxThreshCleared trap message Locating the Switch Port D View provides an easy and effective way to inspect and report which network devices are connected to each switch port Therefore it solves the problem of having to trace cables in order to see which port a network device is connected to making i...

Page 95: ...Figure 87 MAC Locator screen 2 Enter the MAC or IP address Click Locate D View locates the specified device if found Figure 88 Specified device located in the Topology using MAC Locator ...

Page 96: ... Link Speed The status of the links is displayed Figure 89 The Topology displays the Link status of the devices 3 Go to Advanced Link Capacity Check to monitor the link status of all the devices in a table Figure 90 Link Capacity Check screen 4 Click Check D View checks the capacity of each device link port and displays the minimum capacity value of the link as seen in figure below ...

Page 97: ... 1 Go to Topology Link Manager Edit Link The Edit Link screen displays OR In a topology right click on a link and then select Property The Edit Link screen displays Figure 92 Edit Link screen 2 Update the Capacity Select from 10M 100M 1000M or 10G 3 Click OK In order to obtain accurate results from the link capacity ensure the port numbers between the devices are entered correctly ...

Page 98: ...gies by entering the Device Name or IP address 1 Go to System Resource Manager Device Locator The Device Locator screen displays Figure 93 Device Locator screen 2 Enter the name or IP address of the device to be located 3 Click Search to locate the device The results are displayed 4 Click Open Topo to locate the device in a topology ...

Page 99: ... D View you can use the Device Collector tool to enter User Information To enter user information 1 Go to System Resource Manager Device Collector The Device Collector screen displays 2 Use filter options to select the vendor s name and device type A list of devices is displayed Figure 95 Device Collector screen ...

Page 100: ...w you can locate users using the User Locator tool Use User Locator to find users connected with a particular device To Locate Users 1 Go to System Resource Manager User Locator The User Locator screen displays Figure 97 User Locator screen 2 Enter the user s name Separate multiple entries with a comma 3 Click Search The search results are displayed 4 Click Open Topo to locate the device in a topo...

Page 101: ...atistics Figure 98 User Statistics screen 2 The users are displayed Device Statistics Device Statistics can display information related to a vendor buyer or buyer date For example you can view all the devices sold by a particular vendor To view Device Statistics 1 Go to System Resource Manager Device Statistic The Device Statistic window displays ...

Page 102: ...Figure 99 Device Statistic screen 2 View the devices in the domain You can sort them by Vendor Buyer or Buy Date ...

Page 103: ...Basic Operations 102 ...

Page 104: ...e direction of link in the topology Display Redundancy Display the redundant link in the topology map Copy Paste Use Copy Paste function to add devices to the topology Figure 101 Device Name Conflict and IP Address Conflict Copy Select a device and then go to Topology Copy to copy the device icon from the topology map Paste Select a device and then go to Topology Paste to paste the device icon int...

Page 105: ...ogy Go to Topology Zoom Fit to fit the topology map in the current window und Go to To color of the topology pology Set Background to modify the background d screen Upper Layer Figure 102 Set Backgroun Use Upper Layer to move to the parent level Go to Topology Upper Layer or click from the Main Toolbar to get back to the first layer of the topology For example if you are in the topology level and ...

Page 106: ......

Page 107: ...Figure 103 Sequence of steps navigating from the topology level to the domain ...

Page 108: ... From and To date to view the events occurred in that time interval 2 Select the type of log Operation or Error Log or both 3 Click Query to find the events that match the search criteria 4 Click Clean to clear log messages Administrator Manager Using the Administrator Manager authorized administrators can create user groups Administrator s define the access rights for each user group and then add...

Page 109: ... 2 Select the domain for which you want to add a group 3 Click Add Group The Add Group screen displays Figure 106 Add Group screen 4 Type the name of the group with description to which you want to assign this right and click Add to continue ...

Page 110: ...r to provide access rights to the user The Add Administrator screen displays Figure 108 Add Administrator screen 6 Update the fields and then click Add to create an administrator account 7 Click Set Rights in the Administrator Management screen The Set Rights screen displays ...

Page 111: ... changes The changes made are reflected in the System Log Changing Password D Link recommends changing the password immediately after logging on for the first time and also on a frequent basis after that To change the password 1 Go to System Change Password Figure 110 Change Password screen 2 Enter the old password and then type your new password ...

Page 112: ...3 mdb b D View 6 0 Professional Edition o Backup Dvision3 mdf and Dvision3_Log ldf files in the SQL Server 2000 installation folder Example C Program Files Microsoft SQL Server MSSQL Data o Re install SQL Server 2000 and run MakeDB exe to create D View database o Go to Start Program Adminitrative Tool Services and then select MSSQLSERVER from the Services list o Right click or double click on MSSQ...

Page 113: ...vice Discovery The Device Discovery screen displays Figure 111 Device Discovery screen ocate devices me ria 6 Select and click Add Topo to add devices to the topology Trace Route sit e the number of hops necessary for that packet to reach its To Trace Routers 2 Enter the IP address range to l 3 Enter the Community na 4 Select the device Type 5 Click Search to locate the devices based on the search...

Page 114: ...er the host address and click Run to trace the routers 2 Select Option to configure the ICMP parameters Figure 113 Option screen 3 Modify and customize the Ping Buffer Size Ping Timeout and Max Hops parameters according to your requirements 4 Click CLS to clear the list 5 Click Stop to stop the search ...

Page 115: ... Put action of the configuration files TFTP File Name The uploaded or downloaded files through the TFTP server Status Displays the file transfer status 2 Click Clear to erase the actions Retrieving ARP information D View provides a tool to retrieve the ARP Address Resolution Protocol information from devices and then create a table for the network The table lists the IP and MAC addresses of all th...

Page 116: ...Using Net Toolbox administrators can configure the method of management for each device Net Toolbox also allows administrators to ping device from the topology To select the management method 1 Select the device you want to manage 2 Go to NetTools Net Toolbox to open the Toolbox Figure 116 Net Toolbox screen 3 Enter the IP address of the device to manage 4 Click Telnet or Web You can also Ping the...

Page 117: ...n from the toolbar The formula to calculate the port percentage usage Utilization InOctets OutOctets 8 Port Speed Time Interval InOctets The total number of octets received including framing characters OutOctets The total number of octets transmitted including framing characters 3 Set the Port Packet options These values are calculated tracking the number of packets received and or transmitted ove...

Page 118: ...k Clear C to clear the current data on the graph Line Chart The statistical graph X Y shows the usage of packets of a specified device in real time Port Index Displays the number of ports of a specific device Port Speed Displays the link speed between devices Max Min Value Displays the maximum minimum number of packet flow in real time Max Min Value X Displays the current time stamp of the packet ...

Page 119: ...width performance nitor management application that allows you to directly view the real time statistics of your network D View s Performance Monitor tool will mo and collect data from routers switches servers and any other SNMP enabled device Ensure the RMON status of the devices is enabled to start monitoring devices To monitor the performance of devices 1 he Performance Monitor Go to NetTools P...

Page 120: ...or UndersizePkts Represents the total number of packets received that are less than 64 octets in length OversizePkts Represents the total number of packets received that are longer than 1518 octets in length Segments Represents the total number of packets received that are less than 64 octets in length These include packets of either a bad Frame Check Sequence FCS with an integral number of octets...

Page 121: ...s the maximum minimum number of packet flow in real time Max Min Value X Displays the current time stamp of the packet flow graph Chart Case Filter options to monitor the packet flow Time Interval Enter the time period to refresh the packet flow Bar Chart The Bar Chart displays the percentage of packet flow in real time Figure 121 Performance Monitor Bar Chart screen Grid Data The Grid Data shows ...

Page 122: ...n Chart screen displays Figure 123 Performance Monitor Data Distribution Chart screen 2 The packets are classified by its length 0 64Octets Total number of packets received that are 64 octets in length 65 127Octets Total number of packets received between 65 and 127 octets in length 128 255Octets Total number of packets received between 128 and 255 octets in length 256 511Octets Total number of pa...

Page 123: ...designated ports performance status 1 Click the Port Flow button from the toolbar The Port Flow screen displays Figure 124 Performance Monitor Port Flow Data screen The different types of packets displayed in the graph are Octets Total number of octets received Packets Total number of packets received BroadcastPkts Total number of packets received and directed to the broadcast address MulticastPkt...

Page 124: ...Index ...

Page 125: ...up 35 Mac Locator 93 Mail Server Config 89 Management Method 81 MIB Compiler 66 Modular Architecture 28 Multi vendor Support 64 Net Toolbox 115 NetTools 112 OID Config 73 Performance Monitor 118 Poll Parameters 83 Port Packet Monitor 116 Port Status 74 PORTSTATUS 72 Query 91 Radius Authentication 42 Rearranging the Topology 59 RMON 72 Run Batch 74 Safeguard Check 77 Safeguard Engine 78 SNMP v1 v2c...

Page 126: ...Technical Support ...

Page 127: ...p www dlink co in support productsupport aspx Indonesia Malaysia Singapore and Thailand Tel 62 21 5731610 Indonesia Tel 1800 882 880 Malaysia Tel 65 66229355 Singapore Tel 66 2 719 8978 9 Thailand Monday to Friday 9 00am to 6 00pm http www dlink com sg support E mail support dlink com sg Korea Tel 82 2 890 5496 Monday to Friday 9 00am to 6 00pm http www d link co kr E mail lee d link co kr New Zea...

Page 128: ...l support E mail support dlink co il Pakistan Tel 92 21 4548158 or 92 21 4548310 Sunday to Thursday 9 00am to 6 00pm http support dlink me com E mail support pk dlink me com South Africa and Sub Sahara Region Tel 27 12 665 2165 08600 DLINK for South Africa only Monday to Friday 8 30am to 9 00pm South Africa Time http www d link co za Turkey Tel 90 212 2895659 Monday to Friday 9 00am to 6 00pm http...

Page 129: ...Link D Link предоставляет бесплатную поддержку для клиентов в течение гарантийного срока Клиенты могут обратиться в группу технической поддержки D Link по телефону или через Интернет Техническая поддержка D Link 495 744 00 99 Техническая поддержка через Интернет http www dlink ru E mail support dlink ru ...

Page 130: ...p Desk Colombia Teléfono 01800 9525465 Lunes a Viernes 07 00 am a 20 00 pm Soporte Técnico Help Desk Ecuador Teléfono 1800 035465 Lunes a Viernes 07 00 am a 20 00 pm Soporte Técnico Help Desk El Salvador Teléfono 800 6335 Lunes a Viernes 06 00 am a 19 00 pm Soporte Técnico Help Desk Guatemala Teléfono 1800 8350255 Lunes a Viernes 06 00 am a 19 00 pm Soporte Técnico Help Desk Panamá Teléfono 00800 ...

Page 131: ...brasil com br A D Link fornece suporte técnico gratuito para clientes no Brasil durante o período de vigência da garantia deste produto Suporte Técnico para clientes no Brasil Telefone São Paulo 11 2185 9301 Segunda à sexta Das 8h30 às 18h30 Demais Regiões do Brasil 0800 70 24 104 E mail E mail suporte dlinkbrasil com br ...

Page 132: ...與D Link台灣 地區技術支援工程師聯絡 D Link 免付費技術諮詢專線 0800 002 615 服務時間 週一至週五 早上8 30 到 晚上9 00 不含周六 日及國定假日 網 站 http www dlink com tw 電子郵件 dssqa_service dlink com tw 如果您是台灣地區以外的用戶 請參考D Link網站 全球各地 分公司的聯絡資訊以取得相關支援服務 產品保固期限 台灣區維修據點查詢 請參考以下網頁說明 http www dlink com tw 產品維修 使用者可直接送至全省聯強直營維修站或請洽您的原購買經銷商 ...

Page 133: ...okumentasi pengguna dapat diperoleh pada situs web D Link Dukungan Teknis untuk pelanggan Dukungan Teknis D Link melalui telepon Tel 62 21 5731610 Dukungan Teknis D Link melalui Internet Email support dlink co id Website http support dlink co id ...

Page 134: ... The United Kingdom Ireland D Link UK Ireland Technical Support over the Internet http www dlink co uk ftp ftp dlink co uk D Link UK Ireland Technical Support over the Telephone 08456 12 0003 United Kingdom 1890 886 899 Ireland Lines Open 9 00 am 06 00 pm Mon Fri 10 00am 02 00 pm Sat Closed on Sun For Customers within Canada D Link Canada Technical Support over the Telephone 1 800 361 5265 Canada ...

Page 135: ...upport dlink de Telefon 49 1805 2787 0 12 Min aus dem Festnetz der Deutschen Telekom Telefonische technische Unterstützung erhalten Sie Montags bis Freitags von 09 00 bis 17 30 Uhr Unterstützung erhalten Sie auch bei der Premiumhotline für D Link Produkte unter der Rufnummer 09001 475767 Montag bis Freitag von 6 22 Uhr und am Wochenende von 11 18 Uhr 1 75 Min aus dem Festnetz der Deutschen Telekom...

Page 136: ...Assistance technique D Link par téléphone 0820 0803 03 N INDIGO 0 12 TTC min Prix en France Métropolitaine au 3 mars 2005 Du lundi au samedi de 9h00 à 19h00 Assistance technique D Link sur internet http www dlink fr E mail support dlink fr Support technique destiné aux clients établis au Canada Assistance technique D Link par téléphone 800 361 5265 Lun Ven 7h30 à 21h00 HNE Assistance technique D L...

Page 137: ...a Viernes de 9 00 a 14 00 y de 15 00 a 18 00 Asistencia Técnica de D Link a través de Internet http www dlink es support E mail soporte dlink es Supporto tecnico Gli ultimi aggiornamenti e la documentazione sono disponibili sul sito D Link Supporto tecnico per i clienti residenti in Italia D Link Mediterraneo S r L Via N Bonnet 6 B 20154 Milano Supporto Tecnico dal lunedì al venerdì dalle ore 9 00...

Page 138: ...herlands D Link Technical Support over the Telephone 0900 501 2007 Monday to Friday 9 00 am to 10 00 pm D Link Technical Support over the Internet www dlink nl Tech Support for customers within Belgium D Link Technical Support over the Telephone 070 66 06 40 Monday to Friday 9 00 am to 10 00 pm D Link Technical Support over the Internet www dlink be Tech Support for customers within Luxemburg D Li...

Page 139: ...iczna pomoc techniczna firmy D Link 0 801 022 021 Pomoc techniczna firmy D Link świadczona przez Internet URL http www dlink pl E mail dlink fixit pl Technická podpora Aktualizované verze software a uživatelských příruček najdete na webové stránce firmy D Link D Link poskytuje svým zákazníkům bezplatnou technickou podporu Zákazníci mohou kontaktovat oddělení technické podpory přes webové stránky m...

Page 140: ...yarország 1074 Budapest Alsóerdősor u 6 R70 Irodaház 1 em Tel 06 1 461 3001 Fax 06 1 461 3004 Email support dlink hu URL http www dlink hu Teknisk Support Du kan finne programvare oppdateringer og bruker dokumentasjon på D Links web sider D Link tilbyr sine kunder gratis teknisk support under produktets garantitid Kunder kan kontakte D Links teknisk support via våre hjemmesider eller på tlf Teknis...

Page 141: ...meside eller telefonisk D Link teknisk support over telefonen Tlf 7026 9040 Hverdager kl 08 00 20 00 D Link teknisk support på Internettet http www dlink dk Teknistä tukea asiakkaille Suomessa D Link tarjoaa teknistä tukea asiakkailleen Tuotteen takuun voimassaoloajan Tekninen tuki palvelee seuraavasti Arkisin klo 9 21 numerosta 0800 114 677 Internetin kautta Ajurit ja lisätietoja tuotteista http ...

Page 142: ...telefon 0770 33 00 35 Vardagar 08 00 20 00 D Link Teknisk Support via Internet http www dlink se Suporte Técnico Você pode encontrar atualizações de software e documentação de utilizador no site de D Link Portugal http www dlink pt A D Link fornece suporte técnico gratuito para clientes no Portugal durante o período de vigência de garantia deste produto Suporte Técnico para clientes no Portugal As...

Page 143: ...δωρεάν υποστήριξη στον Ελλαδικό χώρο Μπορείτε να επικοινωνείτε με το τμήμα τεχνικής υποστήριξης μέσω της ιστοσελίδας ή μέσω τηλεφώνου Για πελάτες εντός του Ελλαδικού χώρου Τηλεφωνική υποστήριξη D Link Τηλ 210 86 11 114 Φαξ 210 86 53 172 Δευτέρα Παρασκευή 09 00 17 00 E mail support dlink gr Τεχνική υποστήριξη D Link μέσω Internet http www dlink gr ftp ftp dlink it ...

Reviews: