Step 3
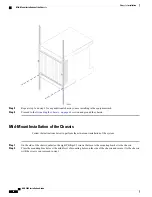
Repeat step 1 and step 2 for any additional chassis you are installing in the equipment rack.
Step 4
Proceed to the
Grounding the Chassis, on page 60
section and ground the chassis.
Mid-Mount Installation of the Chassis
Follow the instructions below to perform the mid-mount installation of the system.
Step 1
On the side of the chassis, unfasten the eight Phillips #2 screws that secure the mounting bracket to the chassis.
Step 2
Place the mounting bracket over the middle set of mounting holes on the side of the chassis and secure it to the chassis
with the screws you removed in step 1.
ASR 5000 Installation Guide
58
Chassis Installation
Mid-Mount Installation of the Chassis
Summary of Contents for ASR 5000
Page 16: ...ASR 5000 Installation Guide xvi About this Guide Contacting Customer Support ...
Page 64: ...ASR 5000 Installation Guide 48 Installation Procedure Overview Laser Notice ...
Page 100: ...ASR 5000 Installation Guide 84 Line Card Installation Installing the XGLC ...
Page 122: ...ASR 5000 Installation Guide 106 Cabling the Fast Ethernet 10 100 Line Card FLC2 Interfaces ...
Page 206: ...ASR 5000 Installation Guide 190 Removing and Installing SMC PC Cards Removing PC Cards ...
Page 212: ...ASR 5000 Installation Guide 196 Replacing the Chassis Air Filter Installing the Air Filter ...
Page 220: ...ASR 5000 Installation Guide 204 Replacing a Power Filter Unit What to do with the Failed PFU ...
Page 266: ...ASR 5000 Installation Guide 250 Safety Electrical and EMC Certifications Korean EMC ...
Page 270: ...ASR 5000 Installation Guide 254 Environmental Specifications Chassis Air Flow ...


