


Chapter II Operation Guide
16
The battery life is 4h generally. In order to ensure the battery life, the battery should be taken out
of the battery compartment before transportation and long-time storage. In order to facilitate the
long-time field test and prevent the test interruption arising from insufficient capacity of the
battery, the user can purchase the standby battery. It is recommended to purchase the battery of the
same model as the accompanying battery.
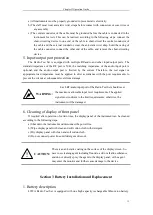
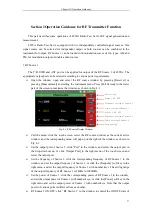
2. Battery installation and replacement
The battery of 4992A Radio Test Set can be easily installed or replaced. The user can install
or replace it according to the following diagram.
Push down the battery
cover
Remove the battery
cover
Insert/pull out
the battery
Push up the battery
cover
Install the
battery cover
Fig. 2-1 Steps of Battery Installation and Replacement
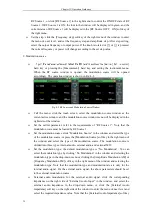
3. Battery status check
4992A Radio Test Set is provided with one battery. The user can check the battery status in
one of the following methods.
Observe the battery icon on the system status bar to roughly know the battery capacity.
If only one grid exists in the battery icon, replace or charge the battery promptly.
Take out the battery. Press the button at the white point of the battery end. Then the
indicators above the button will be ON, indicating the remaining electricity quantity. If
only one indicator is ON, charge the battery promptly.
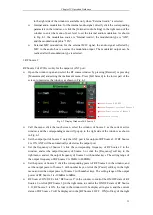
4. Battery charging
The battery can be charged in the shutdown or operation status of 4992A Radio Test Set.
Charging steps are as follows:
First place the battery to be changed into the instrument.
Connect the external power supply with the accompanying AC-DC adapter.
If charging is done in the shutdown status, the LED indicator in the lower left corner of
the front panel will flicker in yellow, indicating that the battery is being charged. After
Summary of Contents for 4992A
Page 1: ...I 4992A Radio Test Set User Manual China Electronics Technology Instruments Co Ltd...
Page 2: ......
Page 5: ......
Page 6: ......
Page 7: ......
Page 23: ...Article I Handling Instructions 11 Article I Handling Instructions...
Page 93: ...81 Article II Technical Specifications...
Page 132: ...Article III Maintenance Instructions 120 Article III Maintenance Instructions...


