


CalreC
Putting Sound in the Picture
43
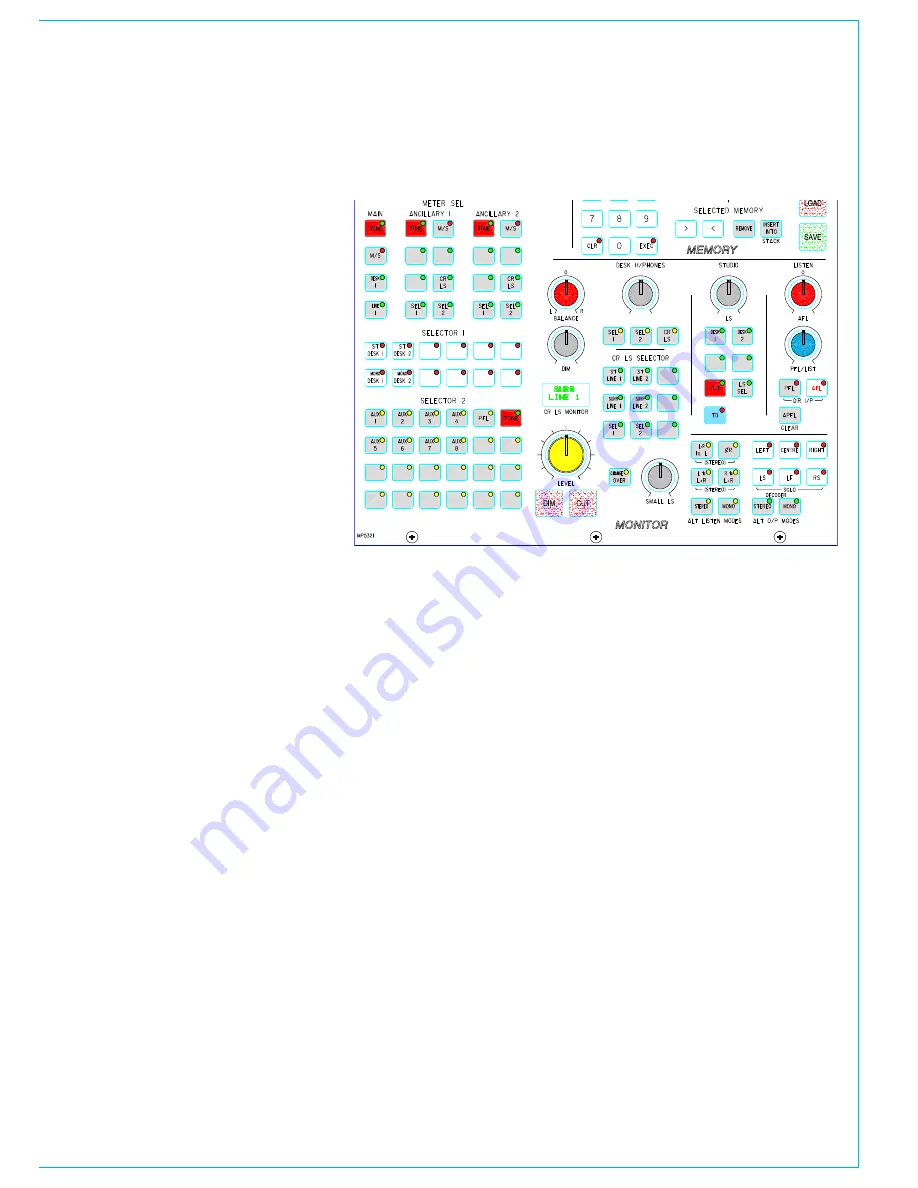
the monitor Selector is used to select
the source to monitor, and the meter
Selector is used to select what to
display on the meters.
If the loudspeaker system is surround,
stereo and mono sources will still be
heard in stereo and mono, with no signals
on the other speakers. Selector 1 and
Selector 2 are sub-selectors which feed
the other selectors. All selector external
inputs can be mono, stereo or 5.1. Mono
inputs are fed to L and R.
For surround signals to be monitored
using stereo loudspeakers or metering,
a stereo downmix is created in the
monitoring. If a main output is surround,
the stereo monitor buttons for that main
output will monitor the stereo (downmix)
output of that main output. The surround
monitor buttons for a stereo main output
will be disabled.
The Small LS level control is in series with
the Main LS level control. The “change
over” button diverts the monitor output to
the Small LS for near field, or domestic
check monitoring. Both Main and
Small LS can be stereo, 3 stereo, or 5.1
independently.
DIM, CUT and SOLO operate on both sets
of loudspeakers. DIM and CUT can be
externally operated and controlled from
the TB.
AFL (post the surround panning controls)
feeds the Control Room LS outputs ,
overriding the LS SEL. PFL is available
on Selector 2, or alternatively, there can
be a separate stereo PFL LS output. An
external RTB input can mix with PFL to
the PFL LS output. APFL CLEAR, clears
any latched buttons.
mOnItOrIng, meter and lS COntrOl
Alternative Listening Modes
All off indicates NORMAL (mono, stereo
or surround depending on the source
selected and the LS arrangement). ØR,
L+R to L, L to L+R, and R to L+R will work
in any mode, but are really designed for
use in STEREO mode or when monitoring
stereo sources. MONO feeds L, C, R, LS
and RS to Center.
User-Definable Buttons
Monitor sources can be allocated to the
user-definable buttons on this panel, using
the Options-MON, TB + Tone screen. This
can only be done in Technician Mode.
Main and Ancillary 1 Meters
The Main and Ancillary 1 Meters can each
be stereo only, surround only, or surround
plus stereo (displaying a downmix of the
surround signal). There can be a separate
M/S meter (fed from the same downmix).
They can be PPM’s, VU’s, Bargraphs,
Phase displays incorporating bargraphs,
third party meters or a mixture of these.
The Main Meters are fed from the Main
meter selector on the Monitor Selector
module. The two selection buttons can
be pre-set to either Main 1 or 2 Desk (pre
Tone and TB), or Main 1 or 2 Line (which
can be an external input). An M/S button
can be fitted if there is a stereo meter and
no separate M/S meter.
Ancillary 2 is stereo only.
All meters in the meter bridge, including
moving coil types, are fed directly from
the internal meter system, except for any
phase displays which will require audio
outputs from the I/O rack. The meter
bridge is continental height allowing
alternative European bargraph meters to
be fitted. These would need additional
audio outputs from the I/O Rack.
Summary of Contents for Zeta
Page 7: ...calrec com Putting Sound in the Picture ZETA Overview...
Page 16: ...16 ZETA Digital Broadcast Production Console...
Page 17: ...Fader Area calrec com Putting Sound in the Picture ZETA...
Page 22: ...22 ZETA Digital Broadcast Production Console...
Page 23: ...calrec com Putting Sound in the Picture ZETA Inputs And Outputs...
Page 28: ...28 ZETA Digital Broadcast Production Console...
Page 29: ...calrec com Putting Sound in the Picture ZETA Console Functions...
Page 46: ...46 ZETA Digital Broadcast Production Console...
Page 47: ...calrec com Putting Sound in the Picture ZETA Memory System...
Page 52: ...52 ZETA Digital Broadcast Production Console...
Page 53: ...Metering System calrec com Putting Sound in the Picture ZETA...
Page 60: ...60 ZETA Digital Broadcast Production Console...
Page 61: ...On Screen Patching calrec com Putting Sound in the Picture ZETA...
Page 75: ...Port List Management calrec com Putting Sound in the Picture ZETA...
Page 80: ...80 ZETA Digital Broadcast Production Console...
Page 81: ...Engineering Information calrec com Putting Sound in the Picture ZETA...
Page 99: ...calrec com Putting Sound in the Picture ZETA Hydra Audio Networking...
Page 112: ...112ZETA Digital Broadcast Production Console...
Page 113: ...calrec com Putting Sound in the Picture ZETA Programming Utility...
Page 118: ...118ZETA Digital Broadcast Production Console...
Page 119: ...calrec com Putting Sound in the Picture ZETA Setup Application...
Page 131: ...calrec com Putting Sound in the Picture ZETA Appendix A Offline Editor...
Page 139: ...calrec com Putting Sound in the Picture ZETA Appendix C Version Changes...
Page 143: ...CALREC Putting Sound in the Picture 143 Notes...


