


CalreC
Putting Sound in the Picture
21
this feature allows the user to
automatically fade channel and group
faders in or out under the control of
an external signal. Cross-fades may
be achieved by driving two or more
optos with one fader being faded out
while a second fader is being faded in.
32 assignable auto-faders are available.
Each auto-fader provides the ability for
one path to be faded up to and down from
the current fader level.
Assigning Auto-Faders to Opto
Inputs
Each auto-fader can be assigned to any
one opto input using the Options-GPI
screen.
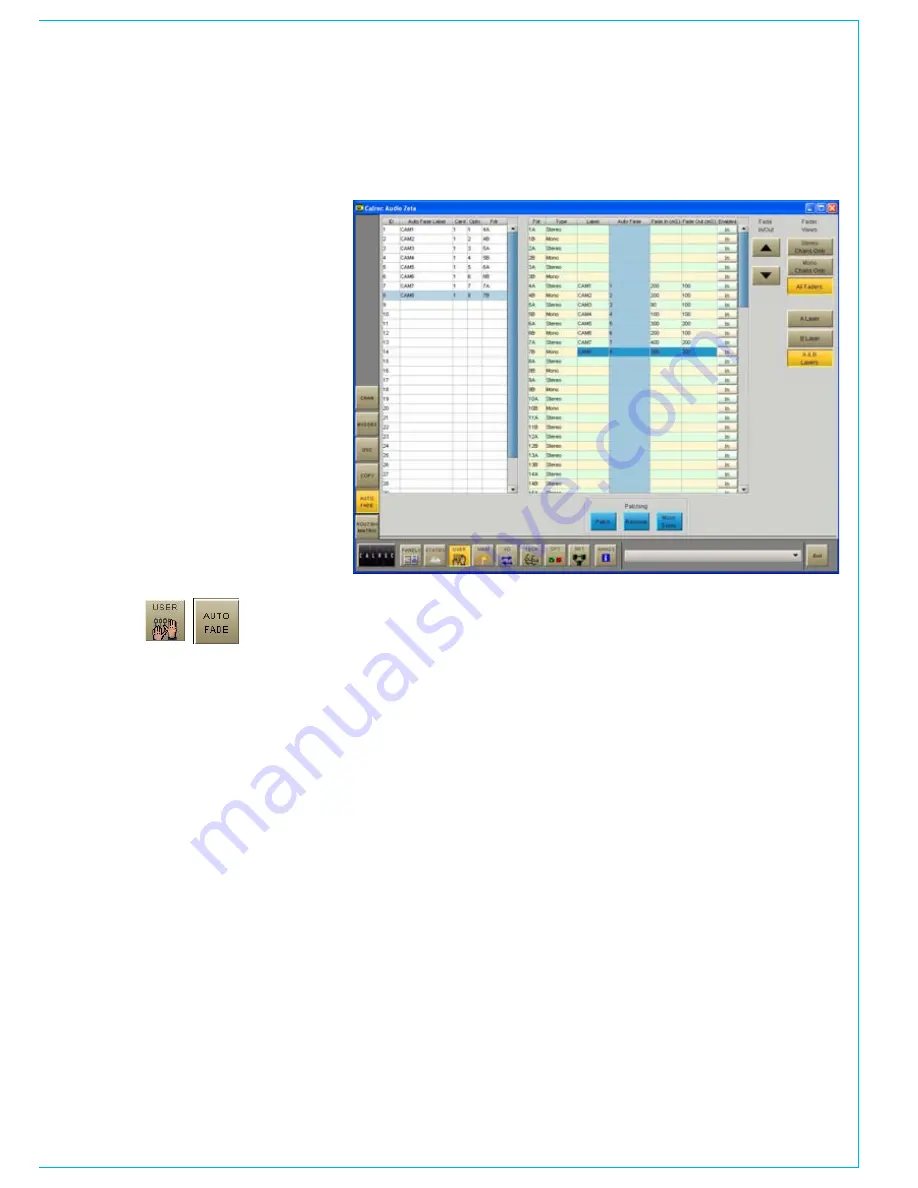
Auto-Fade Screen
The User-Auto Fade screen is used to
allow assignment of each auto-fader to a
channel or group fader.
A list of auto-faders is on the left hand
side of the screen, and shows auto-fader
number, auto-fader label, assigned Opto
card and circuit, and assigned fader
number. Only faders with valid channel
or group paths will be available for
assignment although other faders may be
displayed.
Auto-faders are assigned to channel and
group paths by selecting an auto-fader
and a channel or group from the available
lists, and selecting “Patch”.
Fade In/Out Times
The fade in and out times of each auto-
fader are individually adjustable either
by typing a value in the relevant cell in
the fade in/out columns, or by using the
nudge buttons.
autOmatIC CrOSS-fadIng
The range for both parameters are 10 ms
to 5secs, as follows:
10ms to 100ms in 10ms steps
•
100ms to 1sec in 100ms steps
•
1sec to 5s in 500ms steps
•
Operation
Once an autofader has been assigned to
an opto input, and has a channel or group
path assigned, it is possible to automatically
fade in or out the assigned channel or group
fader under the control of the assigned opto
input. When the opto input is fired, the path
connected to the opto will be automatically
faded in to the current fader level (after taking
into account any VCA fader adjustment).
When the opto is not fired, the fader
connected to the opto will be automatically
faded out. An auto-fader without an assigned
opto will remain inactive, its operation will
have no effect on the audio but it may still be
assigned to a path.
The user can enable and disable each
autofader by selecting the Enabled IN
column.
Indication of an Auto-Fade
Indication of an auto-fade is provided by
illuminating the down NULL LED on the
fader strip when the fader is or is currently
being faded out. If the current physical
position of the fader is OFF then this will not
apply. The down NULL LED will revert back
to its original state as the path is faded back
to its current position. If the path’s fader is
also a VCA master, the NULL LED operates
only if the fader is in VCA interrogate mode
thereby exposing the status of the slaved
path.
Summary of Contents for Zeta
Page 7: ...calrec com Putting Sound in the Picture ZETA Overview...
Page 16: ...16 ZETA Digital Broadcast Production Console...
Page 17: ...Fader Area calrec com Putting Sound in the Picture ZETA...
Page 22: ...22 ZETA Digital Broadcast Production Console...
Page 23: ...calrec com Putting Sound in the Picture ZETA Inputs And Outputs...
Page 28: ...28 ZETA Digital Broadcast Production Console...
Page 29: ...calrec com Putting Sound in the Picture ZETA Console Functions...
Page 46: ...46 ZETA Digital Broadcast Production Console...
Page 47: ...calrec com Putting Sound in the Picture ZETA Memory System...
Page 52: ...52 ZETA Digital Broadcast Production Console...
Page 53: ...Metering System calrec com Putting Sound in the Picture ZETA...
Page 60: ...60 ZETA Digital Broadcast Production Console...
Page 61: ...On Screen Patching calrec com Putting Sound in the Picture ZETA...
Page 75: ...Port List Management calrec com Putting Sound in the Picture ZETA...
Page 80: ...80 ZETA Digital Broadcast Production Console...
Page 81: ...Engineering Information calrec com Putting Sound in the Picture ZETA...
Page 99: ...calrec com Putting Sound in the Picture ZETA Hydra Audio Networking...
Page 112: ...112ZETA Digital Broadcast Production Console...
Page 113: ...calrec com Putting Sound in the Picture ZETA Programming Utility...
Page 118: ...118ZETA Digital Broadcast Production Console...
Page 119: ...calrec com Putting Sound in the Picture ZETA Setup Application...
Page 131: ...calrec com Putting Sound in the Picture ZETA Appendix A Offline Editor...
Page 139: ...calrec com Putting Sound in the Picture ZETA Appendix C Version Changes...
Page 143: ...CALREC Putting Sound in the Picture 143 Notes...


