


116 Zeta
Digital Broadcast Production Console
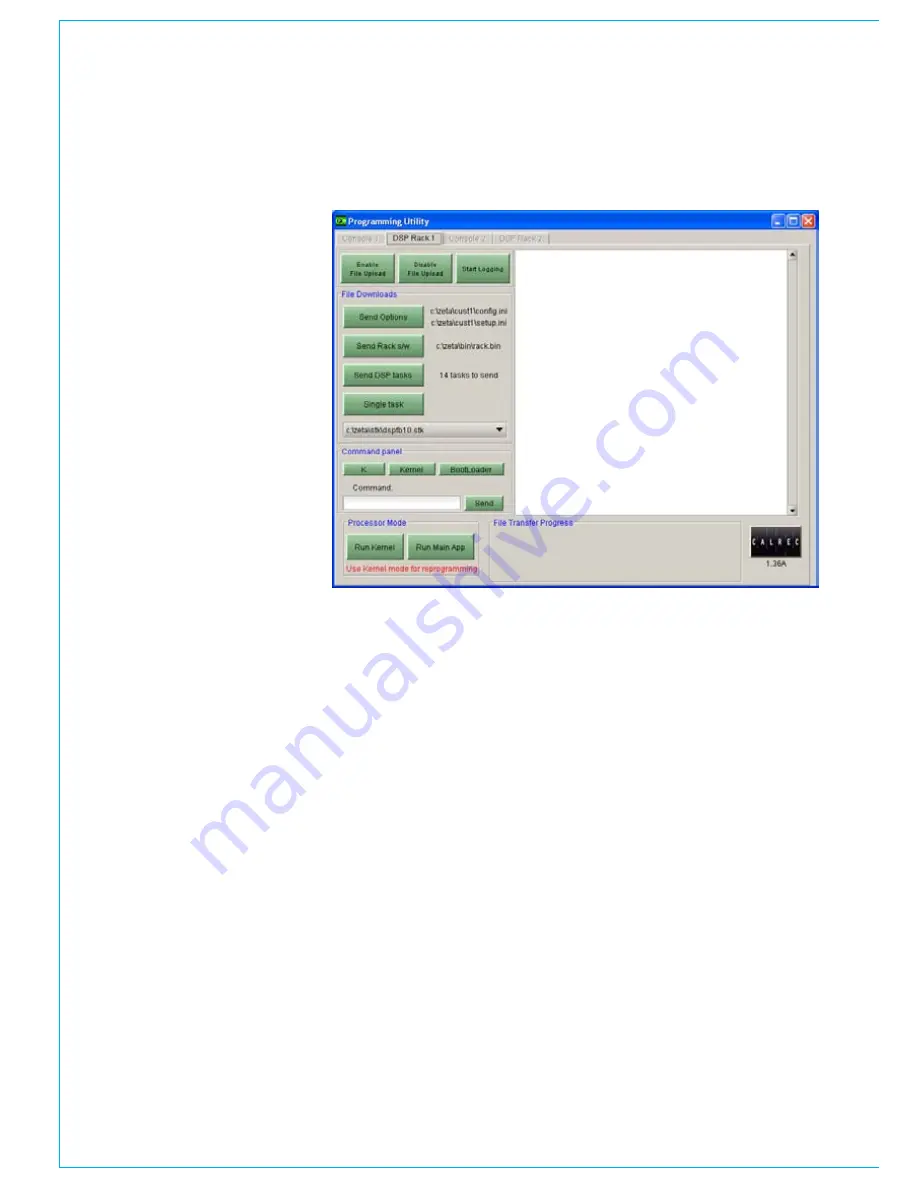
Programming the rack processors
(DSP Rack 1 Screen)
If you wish to transfer any files from
the PC to the processors, select ‘RUN
KERNEL’. If a processor has successfully
entered kernel mode, the following
message, or one very similar, will be
displayed in the text window on the right
of the screen:-
Reboot to kernel
Calrec UN4805-8 Bootloader v1.0
DRAM found 0 1 2 3
--!!—
Loading kernel
xxxxxxxxxxxxxxxxxxxxxxxxxxxxxxxxxxx
xx CALREC UN4805-8 kernel Rev 1.0 xx
xxxxxxxxxxxxxxxxxxxxxxxxxxxxxxxxxxx
If the above message is not displayed
then the processor is not in kernel mode.
In which case you should re-try. If after
repeated attempts the processor will
not enter kernel mode, please see the
paragraphs, at the end of this section,
called ‘Forcing a processor into Kernel
mode’.
When a processor card is in kernel mode,
the LEDs on the edge of the card will all
flash. The flashing LEDs will alternate
between adjacent LEDs.
Once successfully in kernel mode you
can send data to the processor card. If
changes have been made to the setup
of the mixer, using the setup application,
those changes need to be programmed
into all the mixers processors. To do this
press ‘SEND OPTIONS’. The progress of
the file transfer can be seen at the bottom
of the window.
The programming utility does not have
a direct connection to the DSP cards
(Calrec unit number UD5225-4). To
program or verify the DSP card software,
we must first send the software files to a
rack processor card (Calrec unit number
UN4805-8). When the rack processor
boots up, it will check the version of
software files on the DSP card, and if it
finds that any cards are not correct, it will
automatically re-program them. To do this,
please carry out the following:-
Put the rack processor card into kernel
1.
mode, if it is not already in kernel mode.
Press send DSP tacks
2.
The DSP software files will then be
3.
transferred from the PC to the rack
processor. Please be aware that
there are multiple files. The progress
of each individual file transfer can be
seen at the bottom right corner of the
programming utility window.
It is possible to select individual DSP
4.
files from the pull down list, and then
select ‘Program single DSP’. However,
in an update or verification scenario, it
is recommended that all DSP files are
sent, to ensure all files are correct.
Please be aware that if any DSP software
tasks have changed the mixer boot up will
take longer, the first time after the update.
Also, the secondary/back-up rack
processor must also be programmed with
any new DSP tasks. If this is not carried
out, and the primary rack processor fails,
then the back-up processor will reprogram
all the DSP cards with the old files.
ImPortant note - When data is
being transferred from the PC to the
processor cards it is vital that the
mixer power is not switched off, no
cards are removed and no resets
are pressed. Failure to adhere to
this could cause the memory of the
processors to be corrupted. the
corruption could be so severe that the
processor operating system is lost,
Summary of Contents for Zeta
Page 7: ...calrec com Putting Sound in the Picture ZETA Overview...
Page 16: ...16 ZETA Digital Broadcast Production Console...
Page 17: ...Fader Area calrec com Putting Sound in the Picture ZETA...
Page 22: ...22 ZETA Digital Broadcast Production Console...
Page 23: ...calrec com Putting Sound in the Picture ZETA Inputs And Outputs...
Page 28: ...28 ZETA Digital Broadcast Production Console...
Page 29: ...calrec com Putting Sound in the Picture ZETA Console Functions...
Page 46: ...46 ZETA Digital Broadcast Production Console...
Page 47: ...calrec com Putting Sound in the Picture ZETA Memory System...
Page 52: ...52 ZETA Digital Broadcast Production Console...
Page 53: ...Metering System calrec com Putting Sound in the Picture ZETA...
Page 60: ...60 ZETA Digital Broadcast Production Console...
Page 61: ...On Screen Patching calrec com Putting Sound in the Picture ZETA...
Page 75: ...Port List Management calrec com Putting Sound in the Picture ZETA...
Page 80: ...80 ZETA Digital Broadcast Production Console...
Page 81: ...Engineering Information calrec com Putting Sound in the Picture ZETA...
Page 99: ...calrec com Putting Sound in the Picture ZETA Hydra Audio Networking...
Page 112: ...112ZETA Digital Broadcast Production Console...
Page 113: ...calrec com Putting Sound in the Picture ZETA Programming Utility...
Page 118: ...118ZETA Digital Broadcast Production Console...
Page 119: ...calrec com Putting Sound in the Picture ZETA Setup Application...
Page 131: ...calrec com Putting Sound in the Picture ZETA Appendix A Offline Editor...
Page 139: ...calrec com Putting Sound in the Picture ZETA Appendix C Version Changes...
Page 143: ...CALREC Putting Sound in the Picture 143 Notes...


