


2003 Buell XB9R: Chassis
2-29
HOME
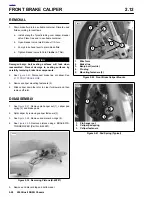
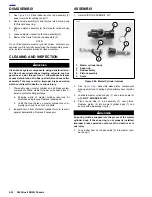
CLEANING AND INSPECTION
1
1
WARNING
1
WARNING
Clean brake system components using denatured alco-
hol. Do not use mineral-base cleaning solvents, such as
gasoline or paint thinner. Use of mineral-base solvents
causes deterioration of rubber parts that continues after
assembly. This may result in improper brake operation
which could result in death or serious injury.
1.
Clean all parts with denatured alcohol or D.O.T. 4
BRAKE FLUID. Do not contaminate with mineral oil or
other solvents. Wipe dry with a clean, lint free cloth. Blow
out drilled passages and bore with a clean air supply. Do
not use a wire or similar instrument to clean drilled pas-
sages.
2.
Carefully inspect all components. Replace any parts that
appear damaged or worn. Do not hone caliper piston
bore.
1
1
WARNING
1
WARNING
Always replace brake pads in complete sets for correct
brake operation. Never replace just one brake pad. Fail-
ure to install brake pads as a set could result in death or
serious injury.
3.
Inspect brake rotor and pads. See
1.6 BRAKE SYSTEM
MAINTENANCE
.
4.
Check rotor surface. Replace if warped or badly scored.
See
Table 2-10.
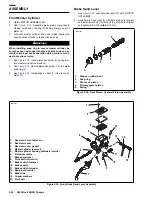
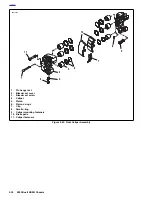
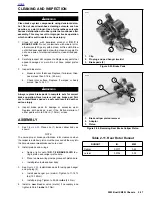
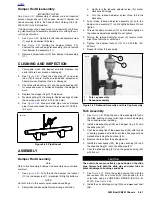
ASSEMBLY
1.
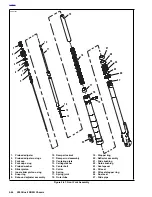
See
Figure 2-42.
Install pistons and o-rings.
a. Lubricate
new o-rings (6), pistons (5), and caliper
piston bores with D.O.T. 4 BRAKE FLUID.
b. Install two new o-rings (6) in grooves of each piston
bore.
c.
Install pistons (5) in each piston bore.
2.
Install new o-rings (8) between caliper halves.
3.
Clamp caliper together with caliper fasteners (11) and
tighten to 15-19 ft-lbs (20-26 Nm).
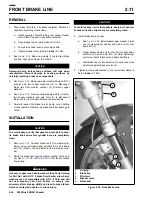
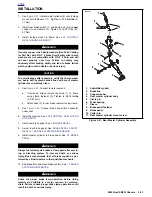
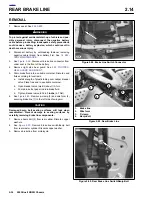
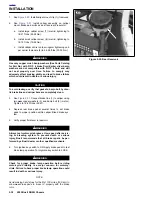
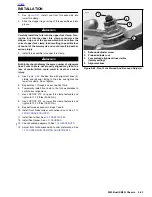
INSTALLATION
1.
See
Figure 2-42.
Install brake pads (10).
2.
Install pin hanger set (1) and tighten to 11-14 ft-lbs (15-
19 Nm).
3.
Rotate front fork counterclockwise and install caliper on
caliper mount. Using LOCTITE 272, tighten fasteners (9)
to 35-37 ft-lbs (47-50 Nm).
4.
Rotate front fork/caliper clockwise and slide caliper onto
rotor.
1
1
WARNING
1
WARNING
Use only copper crush banjo washers (See Parts Catalog
for Part No.) with D.O.T. 4 brake fluid. Earlier silver banjo
washers are not compatible with D.O.T. 4 fluid and will
not seal properly over time. Failure to comply may
adversely affect braking ability and lead to brake failure
which could result in death or serious injury.
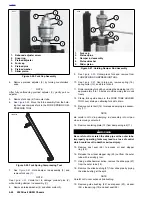
5.
Install brake line to caliper. See
2.11 FRONT BRAKE
LINE
.
6.
Bleed front brakes. See
BLEEDING BRAKES
in
1.6
BRAKE SYSTEM MAINTENANCE
.
1
1
WARNING
1
WARNING
Check for proper brake lamp operation before riding
motorcycle. Visibility is a major concern for motorcy-
clists. Failure to have proper brake lamp operation could
result in death or serious injury.
7.
Turn ignition key switch to ON. Apply brake hand lever to
test brake lamp operation.
Table 2-10. Front Rotor Runout
RUNOUT
IN.
MM
Radial
0.0177
0.45
Lateral
0.0248
0.63
Summary of Contents for XB9R 2003
Page 2: ...1 2 Edit Me Printed June 5 2002 12 26 pm ...
Page 35: ...D 2 2003 Buell XB9R Appendix D HOME Figure D 2 Rear Brake Systems Top View b1115xbx ...
Page 36: ...2003 Buell XB9R Appendix D D 3 HOME Figure D 3 Rear Brake Systems Left Side View b1116xcx ...
Page 47: ...D 14 2003 Buell XB9R Appendix D HOME NOTES ...
Page 49: ......
Page 77: ...1 28 2003 Buell XB9R Maintenance HOME NOTES ...
Page 103: ...1 54 2003 Buell XB9R Maintenance HOME NOTES ...
Page 105: ... 2 ...
Page 191: ......
Page 263: ...3 72 2003 Buell XB9R Engine HOME NOTES ...
Page 299: ...4 2 2003 Buell XB9R Fuel System HOME NOTES ...
Page 385: ...4 88 2003 Buell XB9R Fuel System HOME NOTES ...
Page 421: ...4 124 2003 Buell XB9R Fuel System HOME NOTES ...
Page 423: ......
Page 445: ...5 22 2003 Buell XB9R Starter HOME NOTES ...
Page 447: ......
Page 469: ...6 22 2003 Buell XB9R Drive Transmission HOME NOTES ...
Page 497: ...6 50 2003 Buell XB9R Drive Transmission HOME NOTES ...
Page 499: ......