


2003 Buell XB9R: Chassis
2-21
HOME
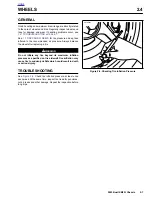
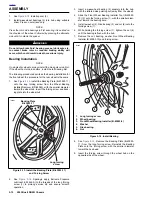
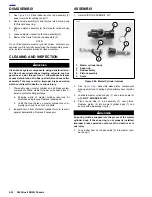
Checking Tire Lateral Runout
1.
See
Figure 2-29.
Turn wheel on axle and measure
amount of displacement from a fixed point to tire side-
wall.
2.
Check tire tread for appropriate runout specification. See
Table 2-9.
If runout is more then specification, remove
tire from rim.
3.
Check rim bead side runout. See
2.7 CHECKING CAST
RIM RUNOUT
. Replace rims not meeting specifications.
4.
Install tire and check again for tire tread lateral runout.
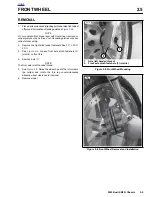
Checking Tire Radial Runout
1.
See
Figure 2-30.
Turn wheel on axle and measure tread
radial runout.
2.
Check tire tread for appropriate runout specification. See
Table 2-9.
If runout is more then specification, remove
tire from rim.
3.
Check rim bead runout. See
2.7 CHECKING CAST RIM
RUNOUT
. Replace rims not meeting specifications.
4.
Install tire and check tire tread radial runout again.
ADJUSTMENT
Wheel Balancing
Wheel balancing is recommended to improve handling and
reduce vibration, especially at high road speeds.
In most cases, static balancing using
WHEEL TRUING AND
BALANCING STAND (Part No. HD-99500-80) will produce
satisfactory results. However, dynamic balancing, utilizing a
wheel spinner, can be used to produce finer tolerances for
better high-speed handling characteristics. Follow the instruc-
tions supplied with the balance machine you are using.
NOTE
If the rear wheel on the XB9R will not fit on a stock dynamic
spin balance shaft, use the Carlson wheel balance shaft (Part
No. AF15).
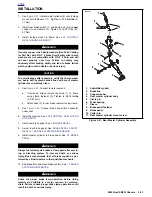
WEIGHTS FOR CAST WHEELS
The maximum weight permissible to accomplish balance is:
●
1.0 oz. (28 g) total weight applied to the front wheel.
●
2.0 oz. (56 g) total weight applied to the rear wheel.
Wheels should be balanced to within 1/4 oz. (7 g) at 60 MPH
(97 KM/H).
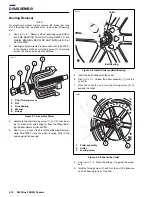
See
Figure 2-31.
Use only WHEEL WEIGHTS (Part No.
43692-94Y) which have special self-adhesive backings.
Apply WHEEL WEIGHTS to the flat surface of the wheel rim.
1.
Make sure that area of application is completely clean,
dry and free of oil and grease.
2.
Remove paper backing from weight. For additional adhe-
sive strength, apply three drops of LOCTITE SUPER-
BONDER 420 to adhesive side of weight.
3.
Locate a flat surface on the right side of the wheel rim
and press weight firmly in place, holding for ten seconds.
4.
Allow eight hours for adhesive to cure completely before
using wheel.
NOTE
If wheel assembly is out of specification (1 oz front, 2 oz rear)
rotate tire and rebalance until wheel is within specification.
Figure 2-31. Wheel Weights
b0417x2x
Summary of Contents for XB9R 2003
Page 2: ...1 2 Edit Me Printed June 5 2002 12 26 pm ...
Page 35: ...D 2 2003 Buell XB9R Appendix D HOME Figure D 2 Rear Brake Systems Top View b1115xbx ...
Page 36: ...2003 Buell XB9R Appendix D D 3 HOME Figure D 3 Rear Brake Systems Left Side View b1116xcx ...
Page 47: ...D 14 2003 Buell XB9R Appendix D HOME NOTES ...
Page 49: ......
Page 77: ...1 28 2003 Buell XB9R Maintenance HOME NOTES ...
Page 103: ...1 54 2003 Buell XB9R Maintenance HOME NOTES ...
Page 105: ... 2 ...
Page 191: ......
Page 263: ...3 72 2003 Buell XB9R Engine HOME NOTES ...
Page 299: ...4 2 2003 Buell XB9R Fuel System HOME NOTES ...
Page 385: ...4 88 2003 Buell XB9R Fuel System HOME NOTES ...
Page 421: ...4 124 2003 Buell XB9R Fuel System HOME NOTES ...
Page 423: ......
Page 445: ...5 22 2003 Buell XB9R Starter HOME NOTES ...
Page 447: ......
Page 469: ...6 22 2003 Buell XB9R Drive Transmission HOME NOTES ...
Page 497: ...6 50 2003 Buell XB9R Drive Transmission HOME NOTES ...
Page 499: ......