


2-20
2003 Buell XB9R: Chassis
HOME
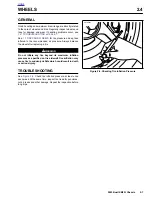
CLEANING AND INSPECTION
1.
Clean inside of tire with dry rag.
2.
If rim is dirty or corroded, clean with a stiff wire brush.
3.
Inspect tire for wear and damage. Replace worn or dam-
aged tires. See
1.7 TIRES AND WHEELS
.
INSTALLATION
1
1
WARNING
1
WARNING
Only install original equipment (stock) tire valves and
valve caps. A valve or valve and cap combination that is
too long may interfere with (strike) adjacent components,
damage the valve and cause rapid tire deflation. Rapid
tire deflation could cause loss of control. These events
could result in death or serious injury.
1
1
WARNING
1
WARNING
Aftermarket valve caps that are heavier than the stock
cap may have clearance at slow speeds; but, at high
speed the valve/cap will be moved outward by centrifugal
force. This outward movement could cause the valve/cap
to strike the adjacent components, damage the valve and
cause rapid tire deflation. Rapid tire deflation could
cause loss of control. These events could result in death
or serious injury.
1.
Damaged or leaking valve stems must be replaced.
2.
Install and tighten fastener to 40-44 in-lbs (4-5 Nm).
3.
Thoroughly lubricate rim flanges and both beads of tire
with tire lubricant.
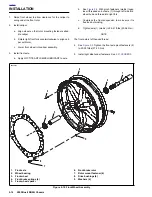
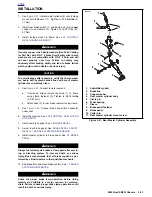
4.
See
Figure 2-28.
Starting at the valve stem, start first
bead into the rim well using a bead breaker machine. If
no machine is available, work bead on as far as possible
by hand. Use a tire tool to pry the remaining bead over
rim flange.
5.
Start 180° from valve stem hole and place second bead
on rim. Work bead onto rim with tire tools, working
toward valve in both directions.
1
1
WARNING
1
WARNING
Do not inflate over 40 psi (275 kPa) to seat the beads.
Inflating the tire beyond 40 psi (275 kPa) to seat the
beads can cause the tire rim assembly to burst with force
sufficient to cause death or serious injury. If the beads
fail to seat to 40 psi (275 kPa), deflate and relubricate the
bead and rim and reinflate to seat the beads, but do not
exceed 40 psi (275 kPa).
6.
Apply air to stem to seat beads on rim. It may be neces-
sary to use a TIRE BEAD EXPANDER (Part No. HD-
28700) on the tire until beads seal on rim.
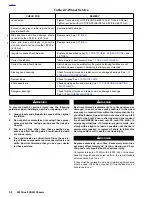
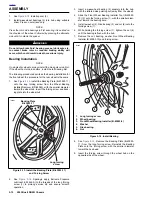
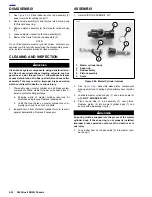
Figure 2-29. Checking Tire Lateral Runout
Figure 2-30. Checking Tire Radial Runout
Table 2-9. Tire Runout
RUNOUT
IN.
MM
Radial
0.060
1.52
Lateral
0.080
2.03
Gauge
b0087x2x
b0088x2x
Gauge
Summary of Contents for XB9R 2003
Page 2: ...1 2 Edit Me Printed June 5 2002 12 26 pm ...
Page 35: ...D 2 2003 Buell XB9R Appendix D HOME Figure D 2 Rear Brake Systems Top View b1115xbx ...
Page 36: ...2003 Buell XB9R Appendix D D 3 HOME Figure D 3 Rear Brake Systems Left Side View b1116xcx ...
Page 47: ...D 14 2003 Buell XB9R Appendix D HOME NOTES ...
Page 49: ......
Page 77: ...1 28 2003 Buell XB9R Maintenance HOME NOTES ...
Page 103: ...1 54 2003 Buell XB9R Maintenance HOME NOTES ...
Page 105: ... 2 ...
Page 191: ......
Page 263: ...3 72 2003 Buell XB9R Engine HOME NOTES ...
Page 299: ...4 2 2003 Buell XB9R Fuel System HOME NOTES ...
Page 385: ...4 88 2003 Buell XB9R Fuel System HOME NOTES ...
Page 421: ...4 124 2003 Buell XB9R Fuel System HOME NOTES ...
Page 423: ......
Page 445: ...5 22 2003 Buell XB9R Starter HOME NOTES ...
Page 447: ......
Page 469: ...6 22 2003 Buell XB9R Drive Transmission HOME NOTES ...
Page 497: ...6 50 2003 Buell XB9R Drive Transmission HOME NOTES ...
Page 499: ......