


2-26
2003 Buell XB9R: Chassis
HOME
FRONT BRAKE LINE
2.11
REMOVAL
1.
Drain brake fluid into a suitable container. Discard of
used fluid according to local laws.
a. Install a length of plastic tubing over caliper bleeder
valve. Place free end in a suitable container.
b.
Open bleeder valve (metric) about 1/2-turn.
c.
Pump brake hand lever to drain brake fluid.
d.
Tighten bleeder valve to 36-60 in-lbs (4-7 Nm).
2.
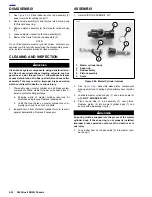
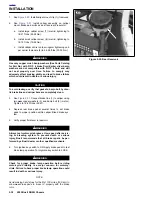
See
Figure 2-38.
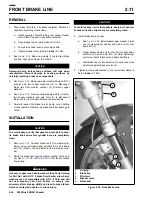
Remove p-clamp (1) detaching brake
line from right side of lower fork clamp.
CAUTION
Damaged banjo bolt seating surfaces will leak when
reassembled. Prevent damage to seating surfaces by
carefully removing brake line components.
3.
See
Figure 2-35.
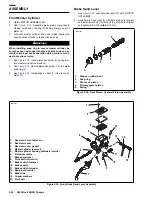
Remove master cylinder banjo bolt (12)
(metric) and two copper washers (14) to disconnect
brake line from master cylinder (4). Discard copper
washers.
4.
See
Figure 2-38.
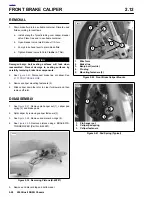
Remove caliper banjo bolt (5) (metric),
two copper washers and wire form (3) to disconnect
brake line (2) from caliper. Discard copper washers.
5.
Carefully inspect the brake line for dents, cuts, chaffing
or other defects. Replace the brake line if any damage is
noted.
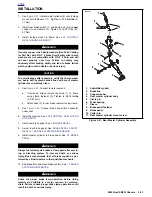
INSTALLATION
CAUTION
To avoid leakage, verify that gaskets, banjo bolt, hydrau-
lic brake line and master cylinder bore are completely
clean.
1.
See
Figure 2-35.
Connect brake line (13) to master cylin-
der (4) using two new copper washers (14) and a banjo
bolt (12) (metric). Loosely install bolt into master cylin-
der.
2.
Route the brake line from the master cylinder to the cali-
per. See
D.1 HOSE AND WIRE ROUTING
for front brake
line routing.
1
1
WARNING
1
WARNING
Use only copper crush banjo washers (See Parts Catalog
for Part No.) with D.O.T. 4 brake fluid. Earlier silver banjo
washers are not compatible with D.O.T. 4 fluid and will
not seal properly over time. Failure to comply may
adversely affect braking ability and lead to brake failure
which could result in death or serious injury.
CAUTION
To avoid leakage, verify that gaskets, banjo bolt, hydrau-
lic brake line and caliper bore are completely clean.
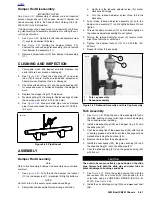
3.
Install brake line to caliper.
a. See
Figure 2-38.
Install new copper washer, brake
line (2), new copper washer and wire form (3) onto
banjo bolt (5).
b.
Finger tighten banjo bolt (5) onto front caliper being
careful not to pinch wire form (3) while tightening,
wire form should rotate around banjo bolt freely.
c.
Twist brake line (2) into wire form (3) spiral and clock
wire form against bleeder valve (4).
4.
Tighten p-clamp with fastener (1) on lower triple clamp to
36-60 in-lbs (4-7 Nm).
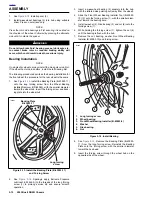
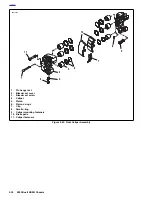
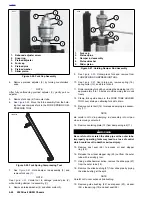
Figure 2-38. Front Brake Line
8429
1.
P-clamp
2.
Brake line
3.
Wire form
4.
Bleeder valve
5.
Banjo bolt
1
2
3
4
5
Summary of Contents for XB9R 2003
Page 2: ...1 2 Edit Me Printed June 5 2002 12 26 pm ...
Page 35: ...D 2 2003 Buell XB9R Appendix D HOME Figure D 2 Rear Brake Systems Top View b1115xbx ...
Page 36: ...2003 Buell XB9R Appendix D D 3 HOME Figure D 3 Rear Brake Systems Left Side View b1116xcx ...
Page 47: ...D 14 2003 Buell XB9R Appendix D HOME NOTES ...
Page 49: ......
Page 77: ...1 28 2003 Buell XB9R Maintenance HOME NOTES ...
Page 103: ...1 54 2003 Buell XB9R Maintenance HOME NOTES ...
Page 105: ... 2 ...
Page 191: ......
Page 263: ...3 72 2003 Buell XB9R Engine HOME NOTES ...
Page 299: ...4 2 2003 Buell XB9R Fuel System HOME NOTES ...
Page 385: ...4 88 2003 Buell XB9R Fuel System HOME NOTES ...
Page 421: ...4 124 2003 Buell XB9R Fuel System HOME NOTES ...
Page 423: ......
Page 445: ...5 22 2003 Buell XB9R Starter HOME NOTES ...
Page 447: ......
Page 469: ...6 22 2003 Buell XB9R Drive Transmission HOME NOTES ...
Page 497: ...6 50 2003 Buell XB9R Drive Transmission HOME NOTES ...
Page 499: ......