


3- 3
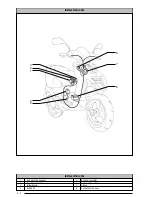
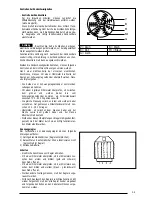
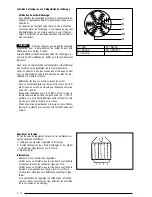
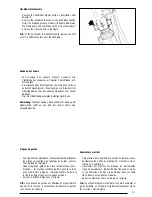
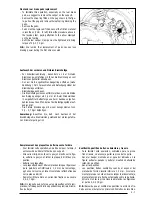
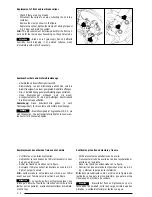
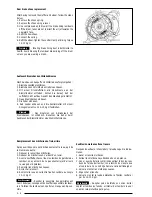
Grommet and stem disassembly
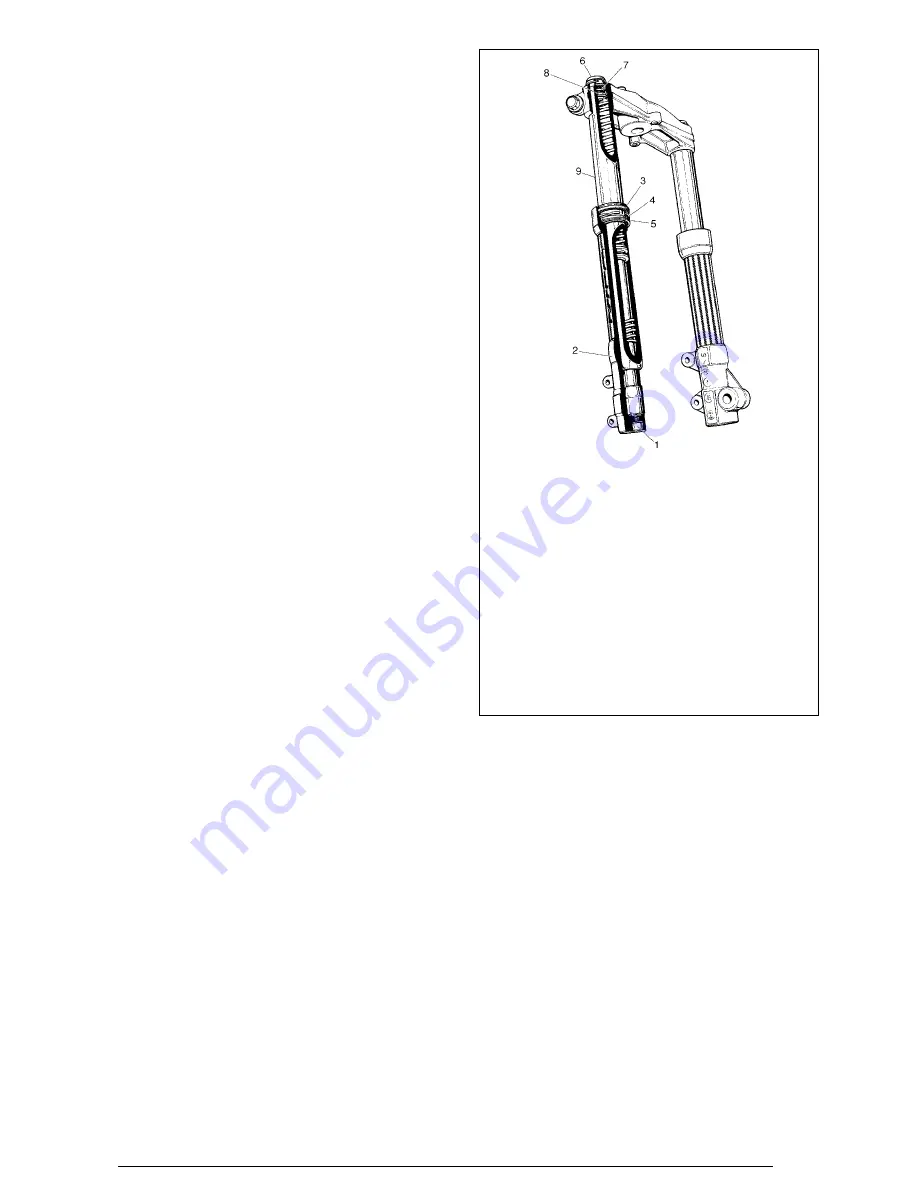
- After having removed the front wheel and the splash
guard, remove the screw (1) and collect the oil into a sui-
table container.
- Pull out the sleeve (2).
- Remove the dust cover (3), the spring (4) and the oil seal
(5) on the fork’s sleeve.
- Check the components conditions, if necessary replace the
oil seal and dust cover and lubricate the housings.
- Refit the stem into the sleeve (2), refit the screw (1) repla-
cing the gasket.
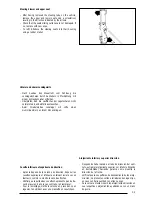
- Remove the tap (6), the spring (7) and the buffer (8).
Introduce the right amount of oil (120 cc) IP HYDRUS F
into the stem.
- Refit the three parts (6) (7) (8) following the procedure
above in the reverse order.
N.B.:
Before refitting, make sure that all components are in
good conditions, check whether there are any indentations on
stems; moreover, we suggest to always use new oil seals,
dust covers and gaskets.
1 =
Lower clamp -
2 =
Sleeve -
3 =
Dust cover -
4 =
Spring -
5 =
Oil seal -
6 =
Rubber tap -
7 =
Upper spring -
8 =
Buffer -
9 =
Stem.
Ausbau Dichtungsring und Ausbau Federbein
- Zunächst das Vorderrad und den Spritzschutz ausbauen.
Schraube (1) entfernen und das Öl in einem geeigneten
Behälter auffangen.
- Schutzrohr (2) abziehen.
- Staubschutz (3), Feder (4) und Dichtungsring (5) aus
dem Schutzrohr der Gabel herausziehen.
- Abnutzungszustand der Bauteile überprüfen und gegebe-
nenfalls Dichtungsring und Staubschutz auswechseln. Bei
Einbau die Sitz abschmieren.
- Federbein wieder im Schutzrohr (2) anbringen, Schraube
(1) mit neuer Dichtung befestigen.
- Deckel (6), Feder (7) und Puffer (8) entfernen und 120
cm3 Öl IP HYDRUS F in das Federbein einfüllen.
- Bauteile (6), (7) und (8) in umgekehrter Reihenfolge wie
beim Ausbau wieder anbringen.
Anmerkung:
Vor dem Wiedereinbau müssen alle Bauteile auf
Vollständigkeit und besonders die Federbeine auf
Einkerbungen überprüft werden. Wir raten Ihnen stets einen
neuen Staubschutz, Dichtungsring und Dichtungen zu
verwenden.
Dépose du joint d’étanchéité et démontage du tube de
fourche
- Après dépose de la roue avant et du garde-boue, retirer la
vis (1) et récupérer l’huile dans un récipient adéquat.
- Extraire le fourreau (2).
- Déposer le joint poussière (3), le ressort (4) et le joint à
lèvre (5) du fourreau de fourche.
- Contrôler l’état des composants, si nécessaire remplacer
le joint à lèvre et le joint poussière par des neufs, en lubri-
fiant les sièges de montage.
- Remonter le tube dans le fourreau (2) remonter la vis (1)
en remplaçant le joint.
- Retirer le bouchon (6), le ressort (7) et le Silentbloc (8),
verser dans le tube la quantité juste d’huile (120 cm3) IP
HYDRUS F.
- Remonter les trois pièces (6)(7)(8) dans l’ordre inverse
du démontage.
N.B.:
Avant d’effectuer le remontage, contrôler le parfait état
des composants en particulier la présence d’encoches sur les
tubes; nous conseillons aussi de toujours utiliser des joints
neufs.
Desmontaje retén de aceite y desmontaje vástago
- Después de haber extraido la rueda delantera y el para
salpicaduras, extraer el tornillo (1) recogiendo el aceite en
un recipiente apropiado.
- Sacar la funda(2).
- Sacar el Guardapolvo(3), el muelle(4) y el reten de acei-
te(5) de la funda de la horquilla.
- Verificar el estado de desgaste de los componentes, si
fuese necesario, sustituir el retén de aceite y el guarda-
polvo con otros componentes nuevos, lubricar los aloja-
mientos de montaje.
- Volver a montar el vástago en su funda(2) volver a colo-
car el tornillo(1) sustituyendo la junta.
- Sacar el tapón (6), el muelle(7) y el silent-block(8) inse-
rir en el vástago la adecuada cantidad de
aceite(12Occ.)IP HYDRUS F.
- Volver a montar las tres piezas (6) (7) (8) en secuencia
inversa respecto al desmontaje.
N.B.:
Antes de efectuar el montaje asegurarse de la integri-
dad de todos los componentes, en especial verificar even-
tuales ranuras en los vástagos; les aconsejamos además
que utilicen siempre retenes de aceite, guardapolvos y juntas
nuevas.
1 =
Untere Befestigung -
2 =
Schutzrohr -
3 =
Staubschutz -
4 =
Feder -
5 =
Dichtungsring -
6 =
Gummideckel -
7 =
Obere
Fede -
8 =
Federbein -
9 =
Schaft.
1 =
Fixation inférieure -
2 =
Fourreau -
3 =
Joint poussière -
4
=
Ressort -
5 =
Joint à lèvre -
6 =
Bouchon en caoutchouc -
7
=
Ressort supérieur -
8 =
Silentbloc -
9 =
Tube de fourche.
1 =
Fijación inferior -
2 =
Funda -
3 =
Guardapolvo -
4 =
Muelle -
5 =
Retén aceite -
6 =
Tapón de goma -
7 =
Muelle
superior -
8 =
Tampón -
9 =
Vástago.
Summary of Contents for Ark AC
Page 46: ...2 LIGHTING SET ELEKTRISCHE ANLAGE ÉQUIPMENT ÉLECTRIQUE INSTALACIÓN ELÉCTRICA ...
Page 61: ...3 SUSPENSIONS FEDERUNG SUSPENSIONS SUSPENSIONES ...
Page 70: ...4 BRAKING SYSTEM BREMSANLAGE CIRCUIT DE FREINAGE INSTALACIÓN DE FRENADO ...
Page 79: ...5 BODYWORK KAROSSERIE CARROSSERIE CARROCERIA ...


