ASG Key User’s Guide
206
6.
Enter your new PIN and press the ON button. (If you do not want to change the PIN, press
the Menu button to exit the Change PIN procedure.)
The ASG Key displays
CONFIRM
.
7.
Re-enter the new PIN and press the ON button.
The ASG Key displays
COMPLETE
. The ASG Key will turn off automatically in 30 seconds.
A.6 Viewing the Serial Number of the ASG Key
Each ASG Key has a unique serial number. To view the serial number for your ASG Key:
1.
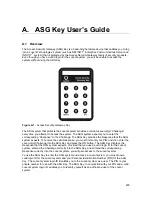
Press the ON button on the ASG Key.
2.
Enter your PIN and press the ON button.
3.
Enter any seven-digit number (for example, 1234567) and press the ON button.
4.
Press the Menu button two times.
The ASG Key displays
VIEW SN
.
5.
Press the ON button.
The ASG Key displays its serial number.
A.7 Replacing the Battery
When the battery in the ASG Key needs to be replaced, the ASG Key display will not turn on or
the low battery icon will appear in the upper right-hand corner of the display:
The ASG Key requires a single Sony CR2025 3 Volt Lithium coin cell battery.
To replace the battery:
1.
Make sure the ASG Key is off.
2.
Locate the battery compartment on the back of the ASG Key. The battery compartment cover
is fastened by a single screw.
3.
Remove the cover of the battery compartment.
4.
Remove the old battery.
5.
Insert the new battery into the holder with the positive (+) side facing the front (display side)
of the ASG Key.
6.
Place the battery compartment into the ASG Key, and then fasten the battery compartment
with the screw.
7.
Press the ON button on the ASG Key to make sure the ASG Key works properly.
Summary of Contents for Lucent Technologies Access Security Gateway Guard
Page 12: ...x Page intentionally left blank ...
Page 28: ...ASG Guard Overview 16 Page intentionally left blank ...
Page 36: ...Physical Connections 24 Page intentionally left blank ...
Page 60: ...Modem Port Setup 48 Page intentionally left blank ...
Page 82: ...Modifying the User Database 70 Page intentionally left blank ...
Page 120: ...Action and Event Tables 108 Page intentionally left blank ...
Page 158: ...User Connectivity 146 Page intentionally left blank ...
Page 188: ...Log Functions 176 Page intentionally left blank ...
Page 236: ...Troubleshooting 224 Page intentionally left blank ...
Page 252: ...Internal Battery Replacement 240 Page intentionally left blank ...
Page 258: ...Glossary of Command References 246 Page intentionally left blank ...


