


2-4
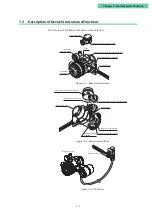
2.2 Installation Method
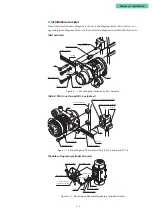
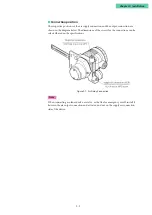
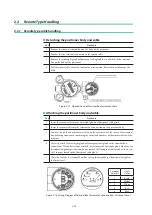
2.2.1 Attachment to actuator
Smart valve positioners are designed for use in combination with a control valve that
uses a linear or rotary actuator. The main unit weighs about 2.5 kg. It should be attached
in the same manner as a conventional electro-pneumatic positioner.
Caution
•
During installation, be careful to avoid injury from edges on the main unit and
actuator, sharp edges on the threads of screws, etc. The type of mounting plate and
the mounting method and procedure differ depending of the type of actuator to
which the device is attached. If installation is not performed correctly, it will not be
possible to realize the potential performance of the device, and damage to or failure
of the device may result. Be careful of the following points.
•
The mounting plate and accompanying accessories differ depending on the specifi-
cations (actuator type). Be sure to use those that are appropriate for the actuator to
be installed.
•
When installing the control valve, leave as much space as possible around it, taking
ease of maintenance (piping, wiring, adjustment, etc.) into consideration.
•
To the extent possible, transport the device to the installation location in its pack-
aged state.
•
During installation, do not apply excessive force to the feedback lever.
•
Do not bend the feedback pin.
•
Tighten bolts securely.
•
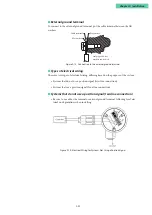
If the model KZ03 pressure regulator with filter is installed with the device, install
with the drain of the KZ03 facing downward. If the KZ03 cannot be attached verti-
cally (with the drain facing downward), remove it from the device.
•
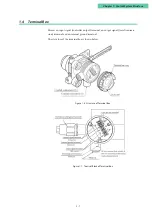
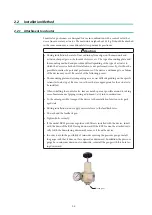
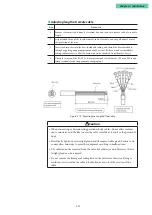
In order to avoid the possibility of rainwater entering the pressure gauge, install
the gauge such that it does not face upward or downward. In addition, the pressure
gauge has a rainwater drain on its underside, so install the gauge with this hole fac-
ing downward.
Drain port
Summary of Contents for AVP200
Page 30: ......
Page 66: ...2 28...
Page 80: ...4 4 Menu Tree...
Page 120: ...5 16...
Page 128: ...6 8 For models those date of manufacture are before September 2017...
Page 130: ...6 10 For models those date of manufacture are before September 2017...
Page 132: ...6 12 For models those date of manufacture are before September 2017...
Page 136: ...6 16 For models those date of manufacture are after October 2017...
Page 138: ...6 18 For models those date of manufacture are after October 2017...
Page 184: ...Appendix A Specifications A 25...
Page 185: ......
Page 188: ......
Page 190: ......


