


4-15
A Glance of the User Interface
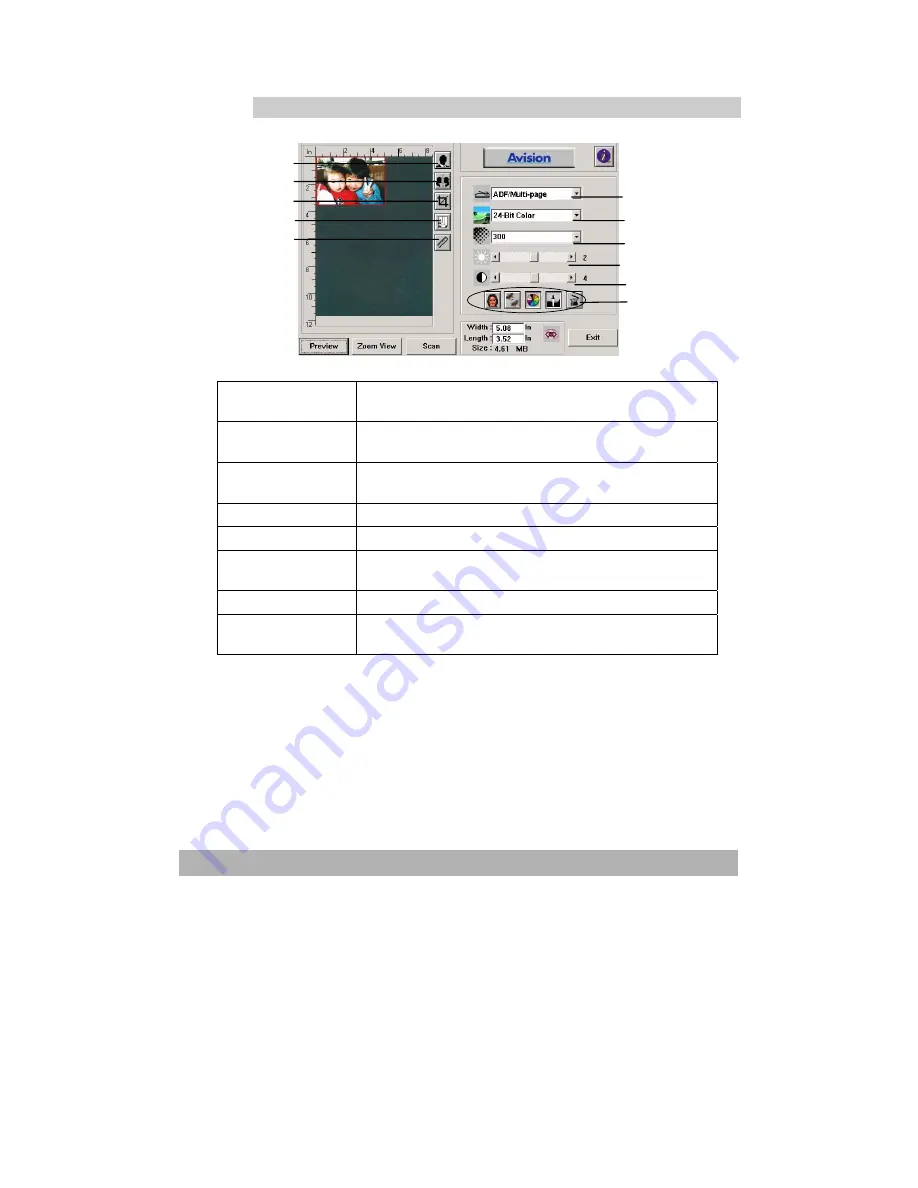
1.
Scan Method
Choice:
ADF/Single-page, ADF/Multi-page,
Flatbed.
2.
Image Type
Choice:
Black & White, Halftone1-4, Diffusion,
8-Bit Gray, 24-Bit Color, 48-Bit Color.
3.
Resolution
Choice:
50, 72, 100, 144, 150, 200, 300, 600,
1200 (dpi).
4. Brightness
:
Adjust the brightness level from –100 to +100.
5. Contrast
Adjust the contrast level from –100 to +100.
6. Further Tools
Descreen, Sharpen, Color Adjustment, Auto
Level, Advanced Settings (From left to right).
7. Invert
Reverse the color of your scanned image.
8. Mirror
Function
Flap your image.
1
2
3
4
5
6
7
8
9
10
11
Summary of Contents for AM6120
Page 1: ...AM6120 Color MFP...
Page 34: ...Installing Your Machine 2 6 7 Place the printer upon the installation base 26...
Page 35: ...2 7 8 Turn the lock switch to Unlocked position...
Page 37: ...2 9 11 Remove the tape and paper 12 Close the multi purpose tray...
Page 38: ...Installing Your Machine 2 10 13 Open the protective plastic bag...
Page 39: ...2 11 14 Place the AM6120 scanner to the support of the printer and move it backward...
Page 40: ...Installing Your Machine 2 12 15 Move the lock switch to Locked position...
Page 41: ...2 13 16 Turn the lock switch on the scanner to the Unlcoked position...
Page 42: ...Installing Your Machine 2 14 17 Press the release button to open the cover...
Page 43: ...2 15 18 Pull the release lever to raise the image drum 5...
Page 44: ...Installing Your Machine 2 16 19 Open the image drum 20 Remove paper and protective film...
Page 45: ...2 17 21 Close the drum and move 4 levers to the p position 5 22 Close the printer top cover...
Page 47: ...2 19 25 Insert the printing paper 26 Make sure the paper size properly fit in the tray...
Page 48: ...Installing Your Machine 2 20 27 Gently pull back the paper tray...


