


Operation
3-36
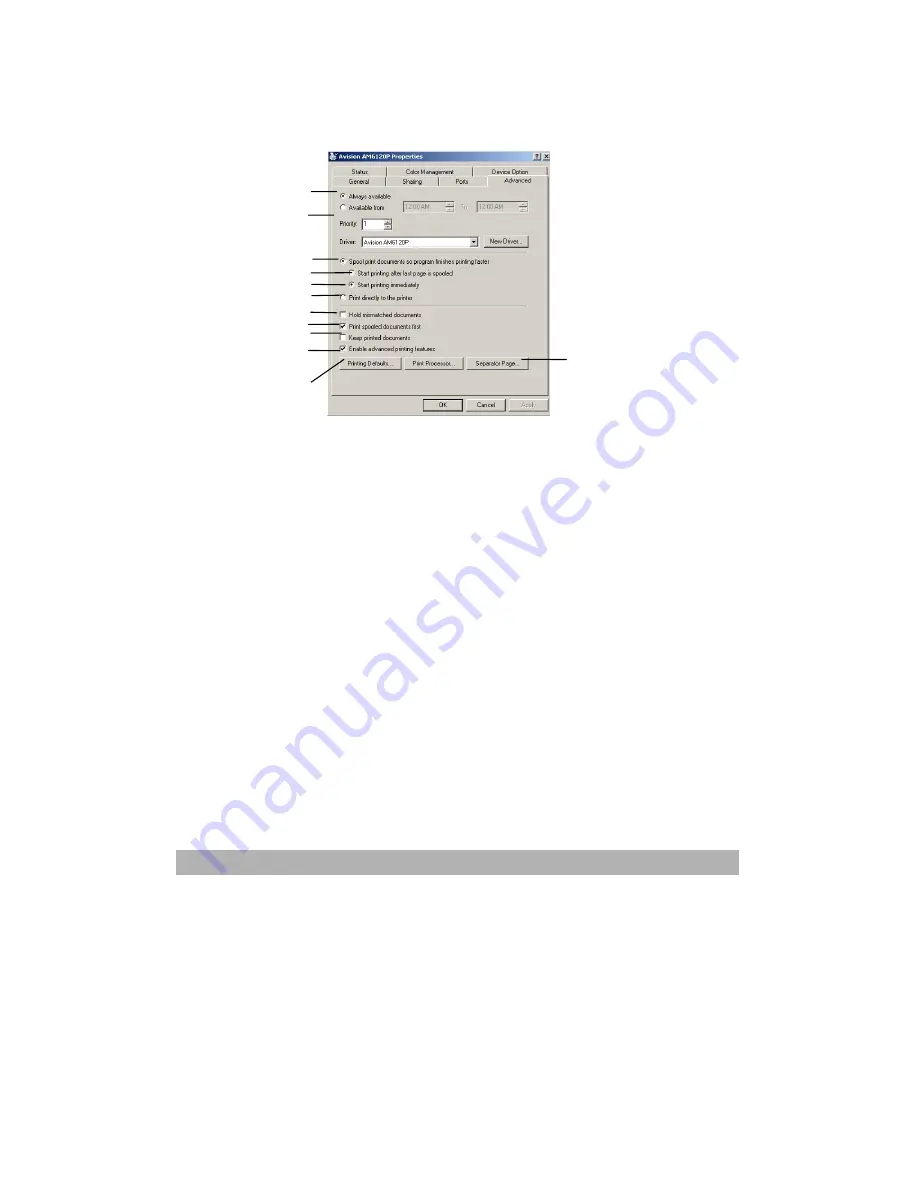
“Advanced” Tab
1.
You can specify which times of day your printer will be
available.
2.
Indicates current priority, from 1 (lowest) to 99 (highest).
Highest priority documents will print first.
3.
Specifies that documents should be spooled (stored in a special
print file) before being printed. The document is then printed in
the background, allowing your application program to become
available more quickly.
4.
This specifies that printing should not start until the last page
has been spooled. If your application program needs a lot of
time for further computation in the middle of printing, causing
the print job to pause for more than a short period, the printer
could prematurely assume that the document has finished.
Selecting this option would prevent that situation, but printing
will be completed a little later, as the start is delayed.
5.
This is the opposite choice to the one above. Printing starts as
soon as possible after the document begins spooling.
6.
This specifies that the document should not be spooled, but
printed directly. Your application will not normally be ready for
further use until the print job is complete. This requires less
disk space on your computer, since there is no spool file.
12
11
1
2
3
4
5
6
7
8
9
10
Summary of Contents for AM6120
Page 1: ...AM6120 Color MFP...
Page 34: ...Installing Your Machine 2 6 7 Place the printer upon the installation base 26...
Page 35: ...2 7 8 Turn the lock switch to Unlocked position...
Page 37: ...2 9 11 Remove the tape and paper 12 Close the multi purpose tray...
Page 38: ...Installing Your Machine 2 10 13 Open the protective plastic bag...
Page 39: ...2 11 14 Place the AM6120 scanner to the support of the printer and move it backward...
Page 40: ...Installing Your Machine 2 12 15 Move the lock switch to Locked position...
Page 41: ...2 13 16 Turn the lock switch on the scanner to the Unlcoked position...
Page 42: ...Installing Your Machine 2 14 17 Press the release button to open the cover...
Page 43: ...2 15 18 Pull the release lever to raise the image drum 5...
Page 44: ...Installing Your Machine 2 16 19 Open the image drum 20 Remove paper and protective film...
Page 45: ...2 17 21 Close the drum and move 4 levers to the p position 5 22 Close the printer top cover...
Page 47: ...2 19 25 Insert the printing paper 26 Make sure the paper size properly fit in the tray...
Page 48: ...Installing Your Machine 2 20 27 Gently pull back the paper tray...


