Avermedia SA6000 User Manual Download Page 21


15


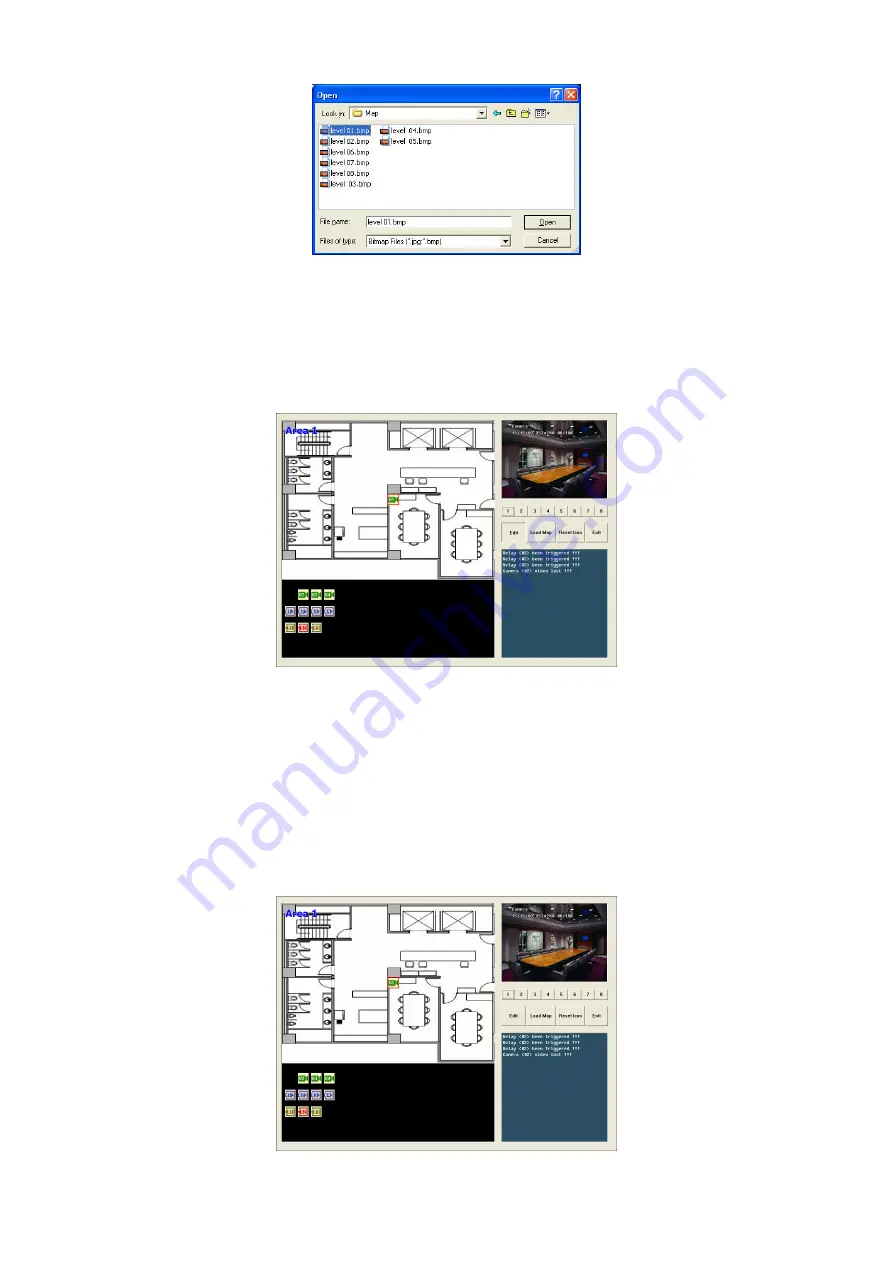
4.  When the inserted map appears on the Emap screen, click 

Edit

. You may now 

drag the camera, sensor, and relay icons to its place on the map. Icons on the 
map can be relocated anywhere. If you are going to locate the icon on the map to 
other area, you need to drag the icon to the black pane at the bottom of the Emap 
screen and then switch to the area on where you want to locate the icon.   
To bring all the icons back to the black pane at the bottom of the Emap screen, 
click 

Reset Icon


5.  When  you  are  done,  click 

Edit

  button  to  save  the  new  setting.  To  close  Emap 

screen, click 

Exit

3.6.2  To Use the Emap 

To use the Emap: 
1.  Click 

E-map

.   

2.  In  the  Emap  screen,  click  the  camera  icon  to  switch  on  the  area  where  the 

camera is located on the map and to display the video at the upper right corner of 
the  Emap  screen.  At  the  lower  right  corner  of  the  Emap  screen,  it  lists  all  the 
warning message. 


3.  Click 

Exit 

to close Emap screen. 

Summary of Contents for SA6000

Page 1: ...http www avermedia com http www averdigi com AverMedia SA6000 6416 6216 Hybrid Real Time Standalone DVR System User s Manual...

Page 2: ...ntation has been carefully checked for reliability however no responsibility is assumed for inaccuracies The information contained in this documentation is subject to change without notice In no event...

Page 3: ...ORIZED PRODUCT MODIFICATION Manual Conventions The following conventions are used throughout this manual Caution symbol is intended to alert the user of the important installation and operating instru...

Page 4: ...Camera Controller 14 3 6 Setting Up and Using the Emap 14 3 6 1 To Set Up the Emap 14 3 6 2 To Use the Emap 15 3 7 To Cut and Save the Wanted Portion of the Recorded Video 16 3 8 To Bookmark a Section...

Page 5: ...Chapter 7 Using the Remote Programs 48 7 1 Familiarizing the SA6000 DVR WebCam Buttons 49 7 1 1 To Setup Remote System Setting 50 7 2 Familiarizing the WebCam PTZ Buttons 52 7 3 Familiarizing the Rem...

Page 6: ...79 Chapter 11 Using the Remote Control Server 68 Appendix A Registering Domain Names 69 Appendix B Removable Hard Disk Installation 1 LIMITED WARRANTY 1...

Page 7: ...user can backup the recording video and playback within the bundled software on personal computer 1 1 Package Contents 1 2 3 4 AverMedia SA 6000 6416 6424 Hybrid Real Time Standalone DVR System Quick...

Page 8: ...ory OSD kit I O card 4 inputs 4 outputs USB 2 0 Front 2 ports Rear 4 ports Ethernet RJ 45 10 100 1000 Mbps Power 250 watt Dimensions W x H x D 290 W 160 H 480 D 16 channels BNC Video Input IP camera P...

Page 9: ...sily save links to particular locations of recorded data and play them directly from the saved links POS Integration Compatible with most commonly used POS system Easy to add POS protocol Confidential...

Page 10: ...nd live audio DDNS Allow remote clients to search dynamic servers without enquiring for server s IP address 1 4 Front Panel 1 2 4 3 1 Temperature display panel The panel will display the system curren...

Page 11: ...6 12 11 1 Sensor and Relay connection interface 2 D Type AV In port 3 TV Out port 4 DVI port 5 VGA Out port 6 TV Out port 7 Audio Input 8 USB and 1394 port 9 Parallel and Com port 10 Keyboard and mous...

Page 12: ...case cover 2 Plug the DOM on DOM cable 3 Plug one side of DOM cable to IDE slot and another end of DOM cable to DVD RW if there is a available DVD RW 4 Plug the DOM power cable to DOM and another end...

Page 13: ...disk through USB connection the bundled software enables you to transfer and back up the recorded video Also the bundled software can playback and segment the backup recorded video Follow the illustra...

Page 14: ...e signal 2 Sensor 1 negative pole signal 12 Relay Comment 2 3 Sensor 2 positive pole signal 13 Relay negative pole signal 4 Sensor 2 negative pole signal 14 Relay positive pole signal 5 Sensor 3 posit...

Page 15: ...een Mode It provides 6 split display modes for your selection You can select one of the split display modes by clicking the following icon 1 Cam display 4 Cam split display 9 Cam split display 16 Cam...

Page 16: ...icon to play the desired channel After you click the icon it turns yellow If you assign a split display mode and appoint a camera number the icon group of the cameras will turn yellow altogether 13 Sn...

Page 17: ...seek at any location of the track 3 Hour Buttons Select and click to playback the recorded video file on the specific time frame i The Hour buttons represent the time in 24 hour clock The blue bar on...

Page 18: ...d save the screen shot either in jpg or bmp format 14 Full screen View in Playback compact mode To return press the right button of the mouse or ESC on the keyboard When you switch to full screen in m...

Page 19: ...creen mode When you are in single screen mode Right click and Drag a square on the area you want to enlarge When you are in multiple screen mode Right click the video screen of the camera and Drag on...

Page 20: ...on Save the PTZ camera preset position number Select the camera and click the preset position number and save it 9 Camera lens speed controller Adjust the moving speed of the PTZ camera lens 10 Camera...

Page 21: ...you want to locate the icon To bring all the icons back to the black pane at the bottom of the Emap screen click Reset Icon 5 When you are done click Edit button to save the new setting To close Emap...

Page 22: ...filename and select the video format 3 8 To Bookmark a Section of the Video 1 Click Bookmark The video playback stops when the bookmark button is executed 2 In the Bookmark dialog box you may do the...

Page 23: ...Click on the video screen on where you want to search 2 Click Event Search The Event Search text red would appear at the lower left corner of the screen 3 In the Event Search Setting dialog box check...

Page 24: ...o search and list all the result Just check the List box In the Search Duration section set the Begin Time End Time and Searching Interval Then click OK to start searching 3 11 To Setup the PTZ camera...

Page 25: ...nd in the Preset Name text box type the word When done click Save to keep the settings 6 Repeat step 4 5 if you want to save another PTZ camera position 7 When done click OK to save the setting Click...

Page 26: ...NAS for extremely high storage capacity Select the Enable network storage check box to send the recorded video in network attached storage To add network storage the Internet storage drive folder must...

Page 27: ...the Attention dialog box to appear in a day in Times per day text box To check the graph on how fast the person response click Analysis When this feature is enabled the Attention dialog box would app...

Page 28: ...to the selected default user when the SA DVR is executed 10 POS Set from which camera screen to display the data from the POS equipment Click Setting to set the POS Console Setting To set the text flo...

Page 29: ...eneral for Epson compatible printer or for TP_3688 3 Skip first Set the number of lines you want to be removed 4 Setup Set the COM Properties If you are not sure please contact your POS service provid...

Page 30: ...camera icon To select one camera only Left click on the camera icon The camera icon turns red when it is selected 2 Enable Set to enable disable the selected camera When there is no video source on th...

Page 31: ...DVR The video source is coming from another SA DVR server In the Remote DVR dialog box enter the server IP port number user ID password and select the camera number If you are not sure of the server...

Page 32: ...on the time blocks When the system starts recording a red triangle mark would appear at the upper left corner of the screen The recording modes are listed below Always Recording Record the video from...

Page 33: ...ck the button The higher the size the larger the file it create You can also activate the Enable Deinterlace to enhance the video quality Set the Enable Deinterlace mode to 1 if you are capturing moti...

Page 34: ...me on the 9 Video Screen to create Mask or Shield area 4 3 2 To show and change the color of the Mask 1 Enable the Show Mask check box 2 In the Color section select the color and click button 4 3 3 To...

Page 35: ...Webcam Port Activate Enable Anonymous Login to remotely access the SA DVR server without the need of password and Talk to Web Client to use the 2 Way Talk feature that allows the client and server to...

Page 36: ...ed in the archive To assign backup path click i Make sure the backup folder and storage folder are not on the same drive Enable Network Activate SA DVR remote system to access at the set time After th...

Page 37: ...era number When you back up the file you may find QLogViewer and Player application included in the backup folder see also Chapter 5 To Backup file 1 Select the date of the recorded file in the calend...

Page 38: ...it to end this procedure and burn it later 9 In CD DVD Backup enable disable Delete file after burning check box to remove the archived file after burning Click Burn to start and Exit to cancel this p...

Page 39: ...to exit without saving the setting 4 9 Alarm Setting In the Alarm Setting dialog box click Add to insert and set new alarm setting click Delete to remove the selected alarm setting click OK to exit a...

Page 40: ...e condition of the hard disk Enable disable the POS Keyword check box to scan the data from the POS if it matches the keyword see also Chapter 4 9 11 Enable disable the Alarm Message check box to acti...

Page 41: ...4 9 8 Alarm SOP Standard Operation Procedure List the instructions to inform the person of what to do when the alarm is activated To setup click Detail see also Chapter 4 9 9 Send to CMS Central Manag...

Page 42: ...When the Sound Recorder appears use the record control panel to record stop play rewind and forward If you want to keep the existing file click File Save As enter filename and click Save Make sure yo...

Page 43: ...dialog box click OK to exit and save the setting and Cancel to exit without saving the setting 1 2 3 4 1 Mail Server Enter the SMTP Server and port If your e mail system requires user identification e...

Page 44: ...le All to select all cameras 3 In the Frame Rate selection select As Setting to record the number of frames based on the Recording Setting or Max to record the maximum of frames based on the available...

Page 45: ...ll phone provider both support JPG file format transmitting 4 9 8 To Setup PTZ Preset Point Beside the PTZ preset point check box click Detail In the Trigger PTZ Preset Setting dialog box select the P...

Page 46: ...CMS Setting select the camera to enable disable sending the video to CMS Enable All to select all cameras Then click OK to accept the new settings and Cancel to exit without saving 4 9 11 To Setup POS...

Page 47: ...et all object frames click Clean To clean an object frame click right button of mouse and drag the object frame that user want to clean Suspicious Object Suspicious Object is including the object miss...

Page 48: ...creen 8 To reset all object frames click Clean To clean an object frame click right button of mouse and drag the object frame that user want to clean 4 10 User Setting Only administrator can access Us...

Page 49: ...DVR from a remote location using internet explorer Enable Infinite check box to access SA DVR without time limit If you want to set time limit enter the number of minutes in Minute text box 4 Visible...

Page 50: ...Playback mode and supports six 6 different split screen types to view all the video at the same time The only difference is that there are no Preview and Playback buttons To run the application go to...

Page 51: ...t either in jpg or bmp format 8 Print Print the screen shot 9 Open Access the backup video file 5 2 Familiarizing the Player Buttons 3 5 4 6 8 7 10 9 11 12 13 14 17 16 15 1 2 Name Function 1 Split Scr...

Page 52: ...ow the number of cameras that are being viewed When you are in single screen mode click the camera ID number to switch and view other camera 9 Output Save the segmented file in mpg avi or dvr format s...

Page 53: ...s Function Keys Description F1 Display system information F2 Start recording F3 Enable network function F4 Access system settings F5 Switch to playback mode F6 Access E map setting F7 Access PTZ camer...

Page 54: ...re for the first time you will be prompted by your browser to install WebCamX cab allow the installation and you should be able to connect and login afterwards For Windows 2000 click Yes when the Secu...

Page 55: ...server to talk via internet using MIC Make sure your microphone and speakers work before using this function If the SA DVR server Talk to web client setting is disabled you won t be able to hear from...

Page 56: ...ality based on the selected setting Click OK to exit 7 1 1 To Setup Remote System Setting Click OK to exit and save the setting and Cancel to exit without saving the setting The setting here applies t...

Page 57: ...m automatically saves the previous frames and stop based on the Start Record Prior and Stop Record After settings Smart Recording Automatically switch to recorded at the maximum frame rate setting onc...

Page 58: ...amiliarizing the WebCam PTZ Buttons 4 3 2 5 6 1 Name Function 1 Direction buttons Adjust and position the focal point of the PTZ camera Click the center to pan automatically 2 Select PTZ Choose to ena...

Page 59: ...the Remote Console setting see also Chapter 7 3 1 8 Preview Switch to Preview Advanced mode This allows you to view live camera display 9 Playback Switch to Playback mode This allows you to view the...

Page 60: ...tips and dialogs based on the selected language By default the language is in English 3 Remote Server Enter the SA DVR Server IP and Port number 4 Channel Settings The numbers from 01 to 16 represent...

Page 61: ...blue block to select and open the recorded file The blue block turns red when it is selected The block that appears in white doesn t have data You can only select one block when you choose Download a...

Page 62: ...is a recorded video file on that period of time While the red bar indicates that you are currently viewing the recorded video file 4 Playback Control Buttons Begin Move at the beginning of the record...

Page 63: ...Left click to toggle to only display one of the video in the multiple screen mode or all 7 4 2 Familiarizing the RealTime Playback Buttons 2 4 3 5 6 9 8 7 10 11 1 Name Function 1 Split Screen Mode Se...

Page 64: ...iod of time While the red colored column indicates on where to start playing the recorded video file 6 Preview Switch to Preview Advanced mode 7 Playback Switch to Playback mode This allows you to vie...

Page 65: ...erver Users can use a mobile phone to access the SA DVR through Internet Make sure your mobile phone support IE browser and is connected to the internet To access the SA DVR server open IE browser and...

Page 66: ...re prompted click Yes to install the application using the default directory 5 When done click OK 7 6 2 To install PDA Viewer from the Internet 1 Make sure you are connected to the internet 2 Open the...

Page 67: ...en appears enter the server IP port user ID password and select the connection type Then click OK 2 Split Screen Mode Select between 2 screen display types It also allows you to switch and view differ...

Page 68: ...amera image 10 Direction buttons Adjust and position the focal point of the PTZ camera 3 To change the video quality enable disable audio and select to display different camera tap on the video screen...

Page 69: ...1 Click Start Programs DSS ImageVerification 2 In the ImageVerification screen click Load Source Image and locate the image source 3 Click Verify Image to begin the process 4 Check the result in the...

Page 70: ...ying the video file Play Play the video file Faster Play the video file at the speed of 2x 4x or 8x Next Go to the next frame End Go to the end of the video file 4 Save Video Save the edited or segmen...

Page 71: ...e of the image 17 Temporary Setting Block Display the sample settings Click the sample to apply the setting on the current video 18 Status Bar Display the date and time of the video 19 Progress Bar Sh...

Page 72: ...ispatch server when start up 5 In the Dispatch Service section if you have installed more than one network card select the Service IP number 6 In the Dynamic DNS Configuration section enter the DNS se...

Page 73: ...elect the time you want to backup The red block turns white when it is unselected Enable disable Disk Recycle check box to automatically overwrite the oldest file when there is not enough free space t...

Page 74: ...it remotely access the SA DVR server You many need to manually run this program for CMS access the SA DVR server To run click start Programs DSS DVR Remote Control Server The remote control server ic...

Page 75: ...avers com tw 1 User Login Browse the website ddns avers com tw with Microsoft IE or Netscape Navigator to access the following dialog First input the serial number of your product and select the produ...

Page 76: ......

Page 77: ...ght position 1 Unlock the removable hard disk drawer then pull it out 2 Connect the power connector to the hard disk master 3 Carefully insert the hard disk in the removable rack then replace the remo...

Page 78: ......

Page 79: ...sed with the product 4 AVerMedia TECHNOLOGIES Inc does not warrant that this product will meet your requirements it is your responsibility to determine the suitability of this product for your purpose...

Reviews: