


Unified Communications Module Installation and Maintenance
Page 88
15-601011 Issue 03l (28 August 2012)
IP Office
Booting and Loading a New Image from a USB2 memory device
1. Using either of the processes above prepare a USB2 memory device with the required .iso file.
2. Remove the plastic cover from the front of the faceplate of the card. The cover must be retained and must be
reattached after this process is completed.
3. Connecting a suitable monitor for use with an HDMI to HDMI cable or HDMI to DVI cable is recommended. This will
allow you to monitor the process and to confirm when the process has been completed.
4. Check that you have obtained backups of all application data (one-X Portal for IP Office, Voicemail Pro) from the
module if it is already from an operating customer system.
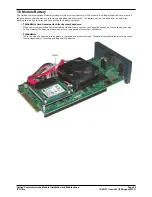
5. Insert the USB2 memory device with the new images file into one of the USB ports located on the front of the
module.
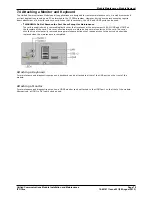
6. Shut down the module by pressing the upper button on the module until the lower LED starts to flash green. The
shutdown is complete once all module LEDs are off except for regular (every 5 seconds) amber flashes of the lower
LED.
7. Restart the module by pressing the upper reset button again and keeping it pressed until the top two LEDs change
from orange to off.
8. The module will reboot using the image files on the USB2 memory device.
9. After a short period the top two LEDs will change to alternately flashing green as the upgrade process takes place.
The lower LED will be steady green. This process takes approximately 45 minutes.
10.When the two top LED stop alternately flashing green, wait a few additional minutes for any USB2 memory device
activity to cease. If you have a monitor connected to the module, completion of the upgrade is shown by the
Login> prompt appearing on the monitor.
11.Remove the USB2 memory device and monitor connection. Refit the plastic cover that was removed at the start of
the process.
12.You now need to repeat the processes for
module initialization
as if this was a new module.
Restoring the Application Data
Any previously backed up settings and date for the Voicemail Pro and one-X Portal for IP Office applications can now be
restored. Do this using the processes outlined in
Transferring Voicemail Server Settings
and Transferring one-X Portal
for IP Office Settings.
19
80