


GENERAL INFORMATION
1
- 25
Pegaso 650 I.E.
).3425#4)/.3 &/2 !00,9).'
42!.3&%23
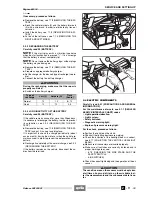
When removing parts of the frame:
a
CAUTION
Handle the plastic and painted components with care
to avoid scraping or damaging them.
Proceed with care.
Do not damage the tangs and/or their seats.
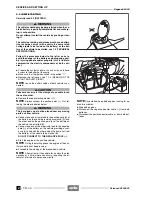
When applying the transfers, follow the instructions given
below carefully.
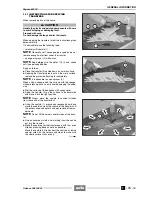
It is advisable to use the following tools:
– relatively stiff spatula (1);
NOTE
Generally, soft, squeegee-type spatulas do not
remove enough water from under the transfer.
– sponge or sprayer (2) with water.
NOTE
Add detergent to the water (1-3%) and shake
until you get soap bubbles.
Apply as follows:
◆
Place the transfer (3) upside down on a work surface.
◆
Keeping the transfer spread out on the work surface,
remove the protective backing (4) completely.
NOTE
It is advisable to use a sprayer (2).
When using a sponge, dab the surface with the sponge,
without pressing hard so as to avoid damaging the adhe-
sive.
◆
Wet the surface of the adhesive with soapy water.
◆
Apply the transfer (3) on the surface to be decorated
and move it into the right position.
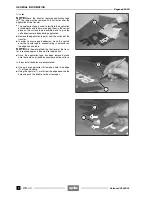
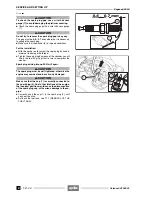
NOTE
Always move the spatula in constant strokes
from the centre of the transfer out.
◆
Using the spatula (1), press down reasonably hard and
move the spatula across the surface of the transfer until
the excess soap and water has been removed from un-
derneath.
NOTE
Do not lift the corners and/or sides of the trans-
fer.
◆
Use an absorbent cloth and, working from the centre
out, dry the transfer.
◆
Move the spatula over the transfer again with firm, even
strokes, pressing down as hard as possible.
Move the spatula in strokes from the centre out, taking
special care with the corners and sides to make sure
the whole surface sticks evenly.
Follow
ã
Release 00/2002-02
- 00
Summary of Contents for Pegaso 650 I.E.
Page 11: ...1 1 Pegaso 650 I E GENERAL INFORMATION 1 Release 00 2002 02 00 ...
Page 24: ...GENERAL INFORMATION 1 14 Pegaso 650 I E 1 7 2 GENERIC TOOLS Release 00 2002 02 00 ...
Page 39: ...2 1 Pegaso 650 I E 1 SERVICE AND SETTING UP 2 Release 00 2002 02 00 ...
Page 45: ...SERVICE AND SETTING UP 2 7 Pegaso 650 I E LUBRICATION CHART Release 00 2002 02 00 ...
Page 95: ...3 1 Pegaso 650 I E 1 3 ENGINE 3 Release 00 2002 02 00 ...
Page 99: ...ENGINE 3 5 Pegaso 650 I E Release 00 2002 02 00 ...
Page 113: ...4 1 Pegaso 650 I E 1 2 3 FUEL SUPPLY SYSTEM 4 Release 00 2002 02 00 ...
Page 139: ...5 1 Pegaso 650 I E 1 2 3 4 COOLING SYSTEM 5 Release 00 2002 02 00 ...
Page 149: ...6 1 Pegaso 650 I E 1 2 3 4 5 ELECTRIC SYSTEM 6 Release 00 2002 02 00 ...
Page 152: ...6 4 ELECTRIC SYSTEM Pegaso 650 I E 42 0 43 9 54 00 Release 00 2002 02 ...
Page 190: ...ELECTRIC SYSTEM 6 42 Pegaso 650 I E 7 2 2 Release 00 2002 02 00 ...
Page 193: ...7 1 Pegaso 650 I E 1 2 3 4 5 6 CHASSIS 7 Release 00 2002 02 00 ...
Page 287: ...1 2 3 4 5 6 7 8 1 Pegaso 650 I E 1 2 3 4 5 6 7 REPAIR INFORMATION 8 Release 00 2002 02 00 ...
Page 297: ...REPAIR INFORMATION 8 11 Pegaso 650 I E 8 2 3 FUEL SYSTEM PIPES Release 00 2002 02 00 ...
Page 298: ...REPAIR INFORMATION 8 12 Pegaso 650 I E 8 2 4 ENGINE OIL PIPES Release 00 2002 02 00 ...
Page 304: ...REPAIR INFORMATION 8 18 Pegaso 650 I E Release 00 2002 02 00 ...
Page 305: ...Pegaso 650 I E REPAIR INFORMATION 8 19 Release 00 2002 02 00 ...
Page 306: ...REPAIR INFORMATION 8 20 Pegaso 650 I E Release 00 2002 02 00 ...
Page 307: ...REPAIR INFORMATION 8 21 Pegaso 650 I E Release 00 2002 02 00 ...
Page 311: ... 1 Pegaso 650 I E ANALYTICAL INDEX 00 Release 00 2002 02 ...
Page 317: ...ANALYTICAL INDEX 7 Pegaso 650 I E 9 2IF 0AGE 2IF 0AGE 00 Release 00 2002 02 ...


