ENGINE
3
- 13
Pegaso 650 I.E.
Follow
ã
~
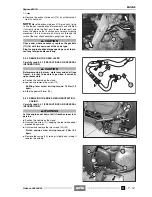
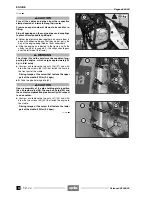
Unscrew and remove the nut (45) and withdraw the
screw (46) that fastens the frame to the rear part of the
cradle.
Driving torque of the screw that fastens the rear part
of the cradle: 50 Nm (5.0 kgm).
◆
Remove the cradle (47) (complete with side stand and
expansion tank front support) by moving it forward.
NOTE
When reassembling the cradle (48), position the
coolant compensation pipe and the engine oil pipe (30)
inside it.
NOTE (X)
For the reassembly the engine on the
frame, from this point on follow the specific procedures,
see 3.5 (R EFITTING THE WHOLE ENGINE ON THE
FRAME).
◆
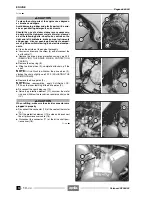
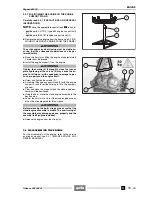
Partially unscrew the pin (49), holding the bush (48) in
its position.
Fork pin driving torque: 100 Nm (10.0 kgm).
◆
Hold the bush (48) in its position, unscrew and remove
the locking metal ring (50) using the appropriate socket
spanner, see 1.7 (SPECIAL TOOLS
m
), then take the
washer.
◆
Unscrew the adjusting bush (48) completely.
a
CAUTION
The rear fork pin (49) must not be withdrawn com-
pletely: part of the pin must remain inserted in its
seat, in order to maintain the coupling frame/fork on
the right side and to prevent the rear wheel/fork as-
sembly from moving downwards and becoming mis-
aligned.
Any successive reassembly operation would be par-
ticularly difficult.
◆
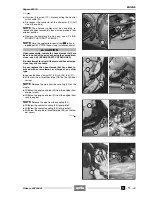
Unscrew the pin (49) completely.
◆
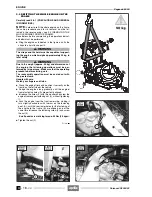
Insert the appropriate tool in the adjusting bush (48),
see 1.7 (SPECIAL TOOLS
m
).
◆
Using a rubber hammer, slightly strike the tool until it
touches the adjusting bush (48).
a
WARNING
Due to the weight (approx. 50 kg) and dimensions of
the engine, the following operations must be per-
formed by two persons. Make sure that the operating
procedure before starting work.
The removal must be carried out with the greatest
care.
Follow
ã
Release 00/2002-02
- 00
Summary of Contents for Pegaso 650 I.E.
Page 11: ...1 1 Pegaso 650 I E GENERAL INFORMATION 1 Release 00 2002 02 00 ...
Page 24: ...GENERAL INFORMATION 1 14 Pegaso 650 I E 1 7 2 GENERIC TOOLS Release 00 2002 02 00 ...
Page 39: ...2 1 Pegaso 650 I E 1 SERVICE AND SETTING UP 2 Release 00 2002 02 00 ...
Page 45: ...SERVICE AND SETTING UP 2 7 Pegaso 650 I E LUBRICATION CHART Release 00 2002 02 00 ...
Page 95: ...3 1 Pegaso 650 I E 1 3 ENGINE 3 Release 00 2002 02 00 ...
Page 99: ...ENGINE 3 5 Pegaso 650 I E Release 00 2002 02 00 ...
Page 113: ...4 1 Pegaso 650 I E 1 2 3 FUEL SUPPLY SYSTEM 4 Release 00 2002 02 00 ...
Page 139: ...5 1 Pegaso 650 I E 1 2 3 4 COOLING SYSTEM 5 Release 00 2002 02 00 ...
Page 149: ...6 1 Pegaso 650 I E 1 2 3 4 5 ELECTRIC SYSTEM 6 Release 00 2002 02 00 ...
Page 152: ...6 4 ELECTRIC SYSTEM Pegaso 650 I E 42 0 43 9 54 00 Release 00 2002 02 ...
Page 190: ...ELECTRIC SYSTEM 6 42 Pegaso 650 I E 7 2 2 Release 00 2002 02 00 ...
Page 193: ...7 1 Pegaso 650 I E 1 2 3 4 5 6 CHASSIS 7 Release 00 2002 02 00 ...
Page 287: ...1 2 3 4 5 6 7 8 1 Pegaso 650 I E 1 2 3 4 5 6 7 REPAIR INFORMATION 8 Release 00 2002 02 00 ...
Page 297: ...REPAIR INFORMATION 8 11 Pegaso 650 I E 8 2 3 FUEL SYSTEM PIPES Release 00 2002 02 00 ...
Page 298: ...REPAIR INFORMATION 8 12 Pegaso 650 I E 8 2 4 ENGINE OIL PIPES Release 00 2002 02 00 ...
Page 304: ...REPAIR INFORMATION 8 18 Pegaso 650 I E Release 00 2002 02 00 ...
Page 305: ...Pegaso 650 I E REPAIR INFORMATION 8 19 Release 00 2002 02 00 ...
Page 306: ...REPAIR INFORMATION 8 20 Pegaso 650 I E Release 00 2002 02 00 ...
Page 307: ...REPAIR INFORMATION 8 21 Pegaso 650 I E Release 00 2002 02 00 ...
Page 311: ... 1 Pegaso 650 I E ANALYTICAL INDEX 00 Release 00 2002 02 ...
Page 317: ...ANALYTICAL INDEX 7 Pegaso 650 I E 9 2IF 0AGE 2IF 0AGE 00 Release 00 2002 02 ...


