


SERVICE AND SETTING UP
2
- 11
Pegaso 650 I.E.
30!2+ 0,5'
Carefully read 0.5.1 (PRECAUTIONS AND GENERAL
INFORMATIONS).
For the maintenance intervals, see 2.1.1 (REGULAR
SERVICE INTERVALS CHART) under:
– Sp ark p lug.
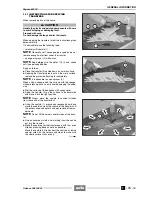
To reach the spark plug:
a
CAUTION
Let the engine cool down until it reaches room tem-
perature.
Never disconnect the spark plug cap with the engine
running, since you may get an electric shock from
the ignition system.
◆
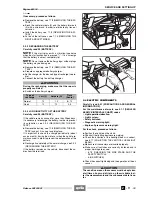
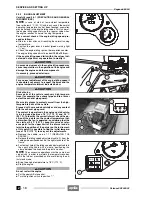
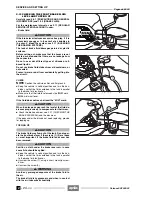
R emove the fuel tank, see 7.1.1 (REMOVAL OF THE
FUEL TANK).
For the removal, proceed as follows:
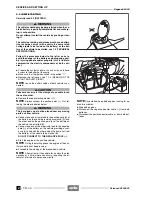
◆
Remove the cap (1) of the spark plug (2).
◆
Remove any trace of dirt from the spark plug base.
◆
Introduce the special spanner provided in the tool kit on
the spark plug.
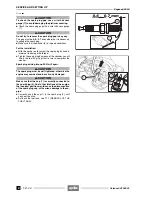
◆
Unscrew the spark plug and extract it from its seat, tak-
ing care to prevent dust or other substances from get-
ting inside the cylinder.
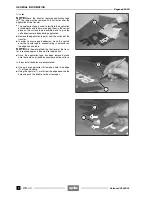
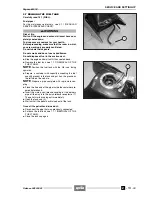
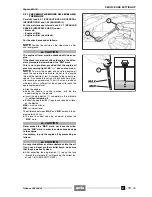
For the check and cleaning:
Key:
– centre electrode (3);
– insulating (4);
– side electrode (5).
◆
Make sure that there are neither carbon deposits, nor
corrosion marks on the electrodes and on the insulating
material; if necessary, clean them with a pressurized air
jet.
If the spark plug has crackings on the insulating material,
corroded electrodes, excessive deposits or the tip (6) of
the central electrode (3) is rounded, it must be changed.
a
CAUTION
When changing the spark plug, check the thread
pitch and length.
If the threaded part is too short, the carbon deposits
will accumulate on the thread seat, and therefore the
engine may be damaged during the installation of the
right spark plug.
Use the recommended type of spark plugs only, see
1.5 (TECHNICAL SPECIFICATIONS), in order not to
compromise the life and performance of the engine.
Follow
ã
Release 00/2002-02
- 00
Summary of Contents for Pegaso 650 I.E.
Page 11: ...1 1 Pegaso 650 I E GENERAL INFORMATION 1 Release 00 2002 02 00 ...
Page 24: ...GENERAL INFORMATION 1 14 Pegaso 650 I E 1 7 2 GENERIC TOOLS Release 00 2002 02 00 ...
Page 39: ...2 1 Pegaso 650 I E 1 SERVICE AND SETTING UP 2 Release 00 2002 02 00 ...
Page 45: ...SERVICE AND SETTING UP 2 7 Pegaso 650 I E LUBRICATION CHART Release 00 2002 02 00 ...
Page 95: ...3 1 Pegaso 650 I E 1 3 ENGINE 3 Release 00 2002 02 00 ...
Page 99: ...ENGINE 3 5 Pegaso 650 I E Release 00 2002 02 00 ...
Page 113: ...4 1 Pegaso 650 I E 1 2 3 FUEL SUPPLY SYSTEM 4 Release 00 2002 02 00 ...
Page 139: ...5 1 Pegaso 650 I E 1 2 3 4 COOLING SYSTEM 5 Release 00 2002 02 00 ...
Page 149: ...6 1 Pegaso 650 I E 1 2 3 4 5 ELECTRIC SYSTEM 6 Release 00 2002 02 00 ...
Page 152: ...6 4 ELECTRIC SYSTEM Pegaso 650 I E 42 0 43 9 54 00 Release 00 2002 02 ...
Page 190: ...ELECTRIC SYSTEM 6 42 Pegaso 650 I E 7 2 2 Release 00 2002 02 00 ...
Page 193: ...7 1 Pegaso 650 I E 1 2 3 4 5 6 CHASSIS 7 Release 00 2002 02 00 ...
Page 287: ...1 2 3 4 5 6 7 8 1 Pegaso 650 I E 1 2 3 4 5 6 7 REPAIR INFORMATION 8 Release 00 2002 02 00 ...
Page 297: ...REPAIR INFORMATION 8 11 Pegaso 650 I E 8 2 3 FUEL SYSTEM PIPES Release 00 2002 02 00 ...
Page 298: ...REPAIR INFORMATION 8 12 Pegaso 650 I E 8 2 4 ENGINE OIL PIPES Release 00 2002 02 00 ...
Page 304: ...REPAIR INFORMATION 8 18 Pegaso 650 I E Release 00 2002 02 00 ...
Page 305: ...Pegaso 650 I E REPAIR INFORMATION 8 19 Release 00 2002 02 00 ...
Page 306: ...REPAIR INFORMATION 8 20 Pegaso 650 I E Release 00 2002 02 00 ...
Page 307: ...REPAIR INFORMATION 8 21 Pegaso 650 I E Release 00 2002 02 00 ...
Page 311: ... 1 Pegaso 650 I E ANALYTICAL INDEX 00 Release 00 2002 02 ...
Page 317: ...ANALYTICAL INDEX 7 Pegaso 650 I E 9 2IF 0AGE 2IF 0AGE 00 Release 00 2002 02 ...


