


Adding and Attaching a Gateway
70
AltiWare ACC 5.2 Administration Manual
Adding and Attaching a Gateway
Caution!
Always try to attach a gateway
when call activity in the system is low
.
If
resources are being used in one of the gateways
,
ongoing calls may be
dropped
.
To attach a gateway to the AltiWare system, you must first add it to the list in the
Gateway Management window.
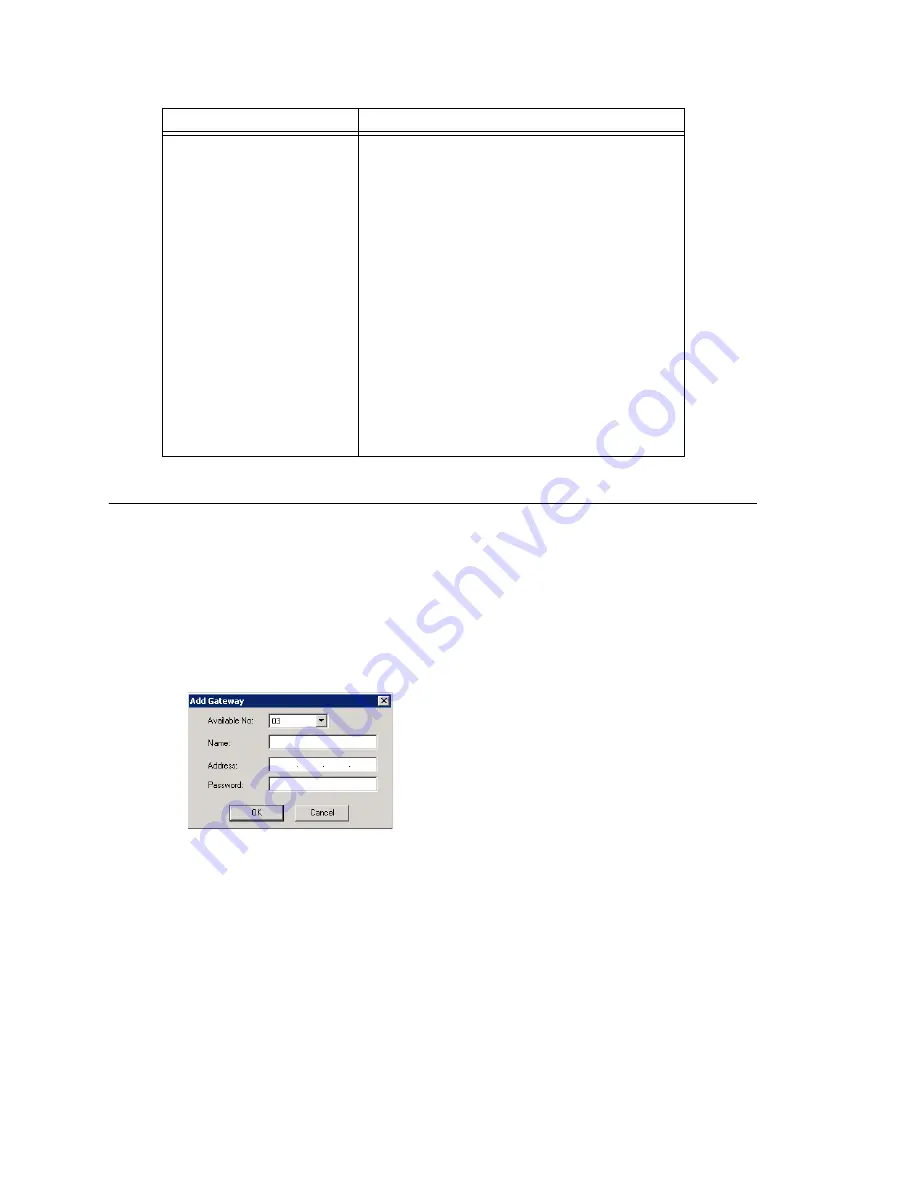
To add a gateway to the list:
1. Click the
Add
button. The Add Gateway dialog box appears:
2. Set this gateway’s unique number. Each gateway in the system must have a unique
identifying number.
3. Specify a name for the gateway that identifies it to you.
4. Enter the IP address of the gateway.
5. Create a password for this gateway. The password is used for access to the
AltiGateway Configuration Tool for the gateway.
After you add a gateway to the list, you can attach it to the AltiWare system. Also, you
may have disconnected a gateway that has already been attached. In either case, you
can attach it in the Gateway Management window.
Set CT-Bus Clock
This parameter determines which telephony
board will provide the clock signal for the TDM
bus. If you don't have multiple T1 or E1 boards
in a gateway, the default
Auto
setting is
recommended. The system will find the
appropriate board to supply the clock. If you
have multiple T1 or E1 boards in a gateway, the
system will automatically select the one with the
lowest logical board ID as the clock source.
However, in some circumstances, you may need
to manually change to other boards. For
example:
1.
If multiple T1/E1 boards are in the gateway
and the T1/E1 board that has been selected
automatically is not active.
2.
If the T1/E1 board that has been selected
automatically is set up as a tie trunk to
another system, and the T1/E1 connecting to
the CO is on the other board.
Parameter
Description
Summary of Contents for AltiWare ACC 5.2
Page 1: ...AltiWare ACC 5 2 Administration Manual 10 2008 4413 0001 5 2 ...
Page 14: ...2 AltiWare ACC 5 2 Administration Manual ...
Page 38: ...Chapter 2 AltiWare Requirements 26 AltiWare ACC 5 2 Administration Manual ...
Page 50: ...Chapter 3 Getting Around AltiWare Administrator 38 AltiWare ACC 5 2 Administration Manual ...
Page 86: ...AltiGateway Configuration Tool 74 AltiWare ACC 5 2 Administration Manual ...
Page 92: ...Chapter 6 Voice Mail Configuration 80 AltiWare ACC 5 2 Administration Manual ...
Page 102: ...Chapter 7 Auto Attendant Configuration 90 AltiWare ACC 5 2 Administration Manual ...
Page 118: ...Chapter 9 Call Recording Configuration 106 AltiWare ACC 5 2 Administration Manual ...
Page 122: ...Chapter 10 Application Extension Configuration 110 AltiWare ACC 5 2 Administration Manual ...
Page 146: ...Chapter 11 Board Configuration 134 AltiWare ACC 5 2 Administration Manual ...
Page 174: ...Chapter 12 Trunk Configuration 162 AltiWare ACC 5 2 Administration Manual ...
Page 180: ...Chapter 13 In Call Routing Configuration 168 AltiWare ACC 5 2 Administration Manual ...
Page 192: ...Chapter 14 Out Call Routing Configuration 180 AltiWare ACC 5 2 Administration Manual ...
Page 224: ...Chapter 15 Extension Configuration 212 AltiWare ACC 5 2 Administration Manual ...
Page 232: ...Chapter 16 Setting Up IP Extensions 220 AltiWare ACC 5 2 Administration Manual ...
Page 248: ...Chapter 18 Mobile Extension Configuration 236 AltiWare ACC 5 2 Administration Manual ...
Page 266: ...Chapter 20 Paging Group Configuration 254 AltiWare ACC 5 2 Administration Manual ...
Page 270: ...Chapter 21 Line Park Configuration 258 AltiWare ACC 5 2 Administration Manual ...
Page 292: ...Chapter 22 Workgroup Configuration 280 AltiWare ACC 5 2 Administration Manual ...
Page 346: ...Chapter 26 System Report Management 334 AltiWare ACC 5 2 Administration Manual ...
Page 386: ...374 AltiWare ACC 5 2 Administration Manual ...


