


FS2 Frame Synchronizer/Converter v3.0 39 www.aja.com
6. Turn the SELECT knob clockwise again one click to confirm the setting and
advance to the 11.3 ProcAmp Hue menu. Turn ADJUST to set the hue.
7. Turn the SELECT knob clockwise again one click to confirm the setting and
advance to the 11.4 ProcAmp Sat menu. Turn ADJUST to set the saturation.
Multiple Field Parameters: IP Address
These steps explain how to surf and change multiple field parameter menus, such
as the IP Address settings, where there are multiple fields to set within the value.
1. Press the CONFIG Menu Group button. The Config menus appear.
2. Turn the SELECT knob clockwise to access the 2.1 IP Config menu. Turn the
ADJUST knob to change the setting to Static Addr. This setting allows you to
manually set the IP address in the following steps.
3. Turn the SELECT knob clockwise one click to access menu 2.2 IP Address.
The current IP address appears on the second line. For example: 10.2.42.8
4. Push the ADJUST knob momentarily to highlight the first field, which is the
octet (group of numbers) to the left of the first period. The numbers blink to
indicate they are ready for editing.
5. Turn the ADJUST knob to change the blinking field value.
6. Turn the SELECT knob to highlight the next field, a group of numbers to the
right of the first period. The field will blink when they are ready for editing.
7. Turn the ADJUST knob to change the blinking field value. For coarse
adjustment of wide-ranging values, hold down CONFIG and turn ADJUST.
8. Repeat this process of selecting fields and changing them until all fields
have been changed as desired.
9. Push the ADJUST knob quickly to confirm all settings. Alternatively, you can
scroll counterclockwise back through the fields, stopping on any of them to
change them. They must be blinking before they can be changed.
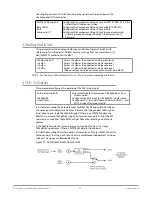
Turn SELECT to scroll to parameter
menu 50.2 IP Address.
When editing params, turn SELECT
to advance fields.
SELECT ADJUST
2.2 IP Address
192.168.0.2
Parameter Menu
Current Setting
Push ADJUST to
edit the first field.
Turn ADJUST
to change values.
Push again to save.
Select the CONFIG
Menu Group button
CONFIG
Other Actions
• To begin editing the first field in the parameter, push ADJUST momentarily.
• To confirm (save) edits, push the ADJUST knob momentarily again. This saves
the edits and exits the edit mode.
• To undo edits to all of the fields before the changes are confirmed, push the
SELECT knob. This returns all fields to their previous settings.
• To reset the entire parameter to the factory default value, push in and hold
down the ADJUST knob for at least 4 seconds.