87
87
21.
If number 3-4 and number 8 of J59 socket are loaded as 3,5Ω 14W, DC 7V±%3 can be
measured.
22.
The fuse is inserted in F5 fuse holder as definer in GENERAL MATERIAL LIST.
23.
Number 2 of F7 fuse is applied to DC +24V from 0-24V point of power supply. After the
procedure, D22 LED is ON. Number 3-4 of J59 is measured as ground of measuring device;
number 6-7 is measured as active point of the device. DC 12V±%2 is measured.
24.
If number 3-4 and number 6-7 of J59 socket are loaded as 6Ω 24W, DC 12V±%3 can be
measured.
25.
The fuse is inserted in F3, F4, F7 fuse holder as definer in GENERAL MATERIAL LIST.
After completing the test by running all the functions, the board should be labelled and stored in
available conditions.
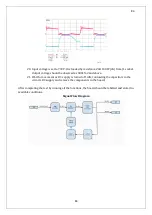
Signal Flow Diagram
Summary of Contents for IST5 Series
Page 2: ...2 2 SERVICE MANUAL 10 15 20 30 40 60 80 100 120 160 200 300 KVA...
Page 6: ...9 9 2 PRODUCT DESCRIPTION 2 1 General View 10 15 20 30 40KVA...
Page 7: ...10 10 60 80KVA...
Page 8: ...11 11 100 120 160 200 300 KVA...
Page 13: ...16 16 2 5 Side Interior View 10 15 20 30 40KVA...
Page 16: ...19 19 2 7 Electrical Connections...
Page 35: ...38 38...
Page 36: ...39 39...
Page 51: ...54 54 30 40KVA 60 80 100 120 160 200 300 KVA...
Page 54: ...57 57...
Page 71: ...74 74 1 Turn CB2 ON 10 15 20KVA 30 40KVA...
Page 72: ...75 75 60 80 100 120KVA 2 Stop the UPS using the user front panel Main menu Control Stop...
Page 73: ...76 76 3 Turn CB1 CB3 and CB4 OFF 10 15 20KVA 30 40KVA...
Page 100: ...103 103 Signal Flow Diagram zole trafo means isolated transformer...
Page 102: ...105 105 20 30KVA IGBT Driver 40KVA IGBT Driver...

