ptg
C h a p t e r t h i r t e e n
Using Flash Video and 3D Media
268
In Acrobat 9 Pro Extended, you can use 3D content exported from various
3D modeling programs in several common 3D formats in a PDF file, or in a
source Microsoft Office file. You embed a 3D model in the same way you
embed movies or sounds.
Follow these steps to embed a 3D model in a Word document:
1. Click the 3D Tool
on the Acrobat PDFMaker toolbar to open the
Add 3D Data dialog. A marquee is placed on the page automatically.
2. Select the model file and scripts. Click OK to close the dialog and insert
the model.
3. Position the model’s marquee on the page. Save the file and convert
to PDF.
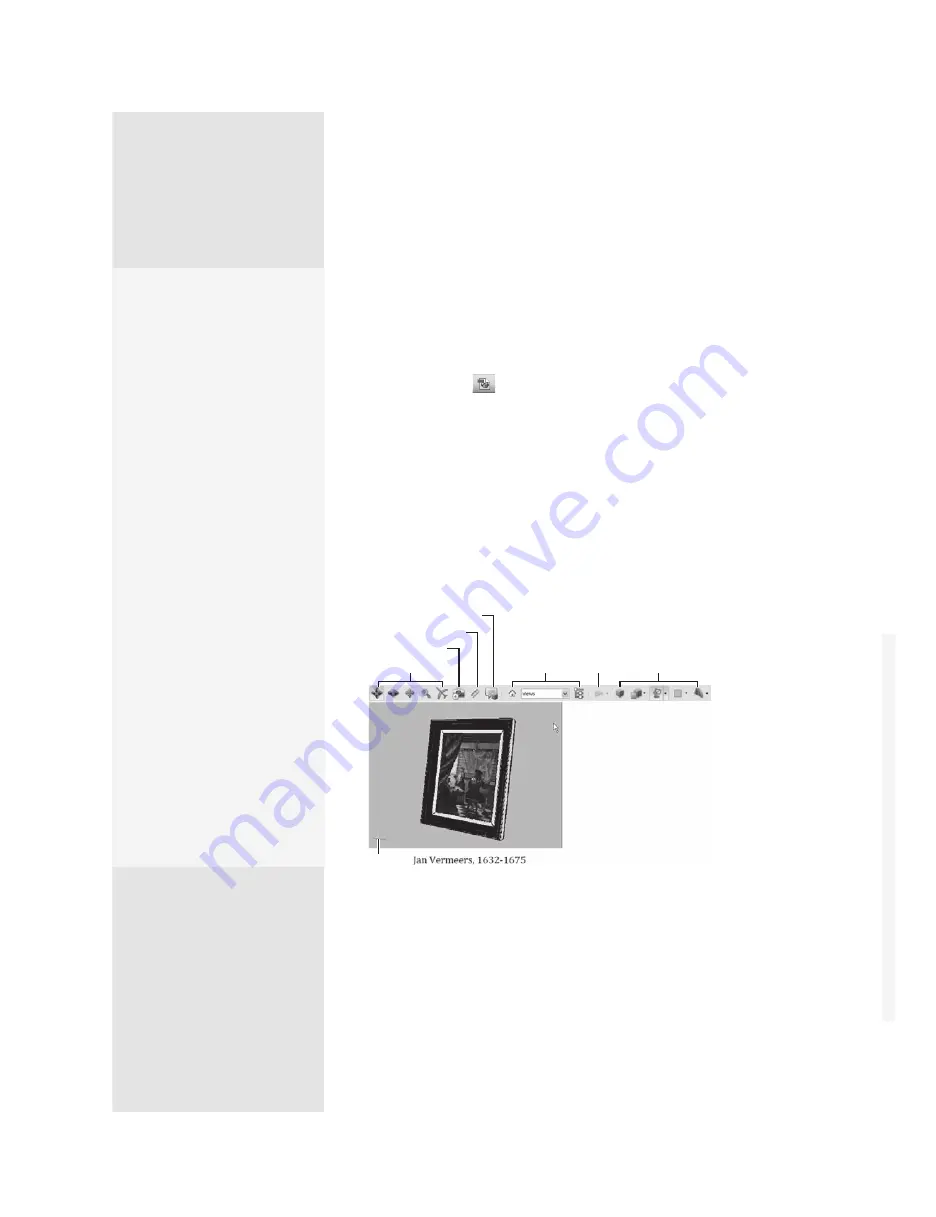
4. In Acrobat, click the model on the page with the Hand tool to
display the toolbar and run any animations associated with the file
(Figure 98). Move the Hand tool away from the model’s location to
hide the toolbar.
3D navigation tools
Views
Model
view options
Animation
controls
Axes
display
Camera properties
3D measurement
3D commenting
Figure 98
Moving the Hand tool over the model activates the toolbar
automatically.
Several categories of tools are available for working with a 3D model:
•
3D navigation tools. With these tools you can turn and spin, pan and
zoom, and fly by to view the image. From the shortcut menu, add a
Adjusting the Model’s
Appearance
There are a number of ways
to change the appearance of
your model in Acrobat using
the tools on the 3D toolbar:
•
Specify the type of
projection—either
orthographic or
perspective—for
viewing the model.
•
Choose a Render Mode
from the Model Render
Mode pop-up menu—
the model in the figure
is shown in Shaded
Illustration mode.
•
From the Enable Extra
Lighting pop-up menu,
choose supplementary
lighting for the model
ranging from night lights
to headlamps—the
model in the figure uses
Bright Lights.
•
Select a background
color for the model from
the color swatches.
•
Show or hide cross
sections.
Create a PDF Template for 3D Files
To give 3D PDFs a consistent layout and structure, create a PDF template that
contains a placeholder for a 3D model. Create the template in any Microsoft
Office application in which PDFMaker is available. After you create a template,
select it in the Acrobat Pro Extended Conversion dialog whenever you convert
a 3D file to PDF.
1.
In an Office 2003 document, click the Insert Acrobat 3D Model button on
the PDF toolbar. In an Office 2007 document, click Embed 3D on the Acrobat
ribbon.
2.
In the Add 3D data dialog, click OK without selecting a 3D model to create a
placeholder for your 3D conversion.
3.
Move and resize the 3D placeholder to accommodate your 3D models.
4.
Add any other information you want and save the file.
5.
Click the Convert To Adobe PDF button on the PDF toolbar (Office 2003), or
select Create PDF on the Acrobat ribbon (2007). Then save the file as a PDF.
To use this template when you convert a file, click the Document tab in the
Acrobat 3D Conversion dialog. If the template name is not displayed in the Tem-
plate PDF section, click Browse to find and open it.
From the Library of Daniel Dadian
Summary of Contents for ACROBAT 9 Extended
Page 1: ...From the Library of Daniel Dadian...
Page 4: ...Dedication For Pippi From the Library of Daniel Dadian...
Page 31: ...This page intentionally left blank From the Library of Daniel Dadian...
Page 75: ...This page intentionally left blank From the Library of Daniel Dadian...
Page 111: ...This page intentionally left blank From the Library of Daniel Dadian...
Page 137: ...This page intentionally left blank From the Library of Daniel Dadian...
Page 217: ...This page intentionally left blank From the Library of Daniel Dadian...
Page 241: ...This page intentionally left blank From the Library of Daniel Dadian...
Page 269: ...This page intentionally left blank From the Library of Daniel Dadian...
Page 309: ...This page intentionally left blank From the Library of Daniel Dadian...


