


Diagnostics and Adjustments
4 - 119
Diagnostics, Adjustments
and NVRAM
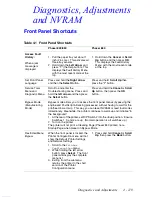
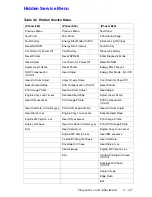
Front Panel Shortcuts
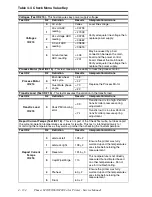
Table 4-1 Front Panel Shortcuts
Phaser 840/850
Phaser 860
Access Fault
History:
When a jam
message is
displayed
1. Pull the paper tray out about 1
inch (2.5 cms.). This activates all
three tray sensors.
2. Hold down the
Left Arrow
and
press “
?
” (the Help button). This
displays the Fault History Menu
with the most recent code at the
top.
1. Hold down the
Cancel
or
Scroll
Up
button and then press
OK
.
This displays the Fault History
Menu with the most recent code
at the top.
Set Front Panel
Language
Press and hold the
Right Arrow
and then the
Select
Button.
Press and hold
Scroll Up
then
press the
“i”
button.
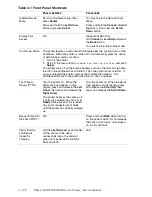
Service Tools
Menu and
Diagnostic Menu
Scroll to and enter the
Troubleshooting menu. Press and
hold the
left arrow
and then press
the
Select
button.
Press and hold the
Cancel
or
Scroll
Up
button, then press the
OK
button.
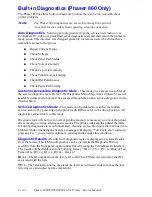
Bypass Mode
(Manufacturing
Mode)
Bypass mode allows you to access the front panel menus (bypassing the
engine and PostScript initializing processes) without having to wait for the
printhead to warm up. This way, you can reset NVRAM or read fault codes
immediately. Meanwhile, the printer continues to warm-up and initialize “in
the background.”
1. At the rear of the printer, set DIP Switch 2 into the
down
position. Ensure
Switches 1, 3 and 4 are up. (Normal operation is all switches up.)
2. Turn on the printer.
The printer will not print a Cleaning Page (Phaser 840 printer) nor a
Startup Page when placed in Bypass Mode.
Restricted Menu
Bypass
When the front panel is locked, the
Printer Configuration menu will not
show the Default Printer Settings
and Network Settings.
1. Scroll to the
Printer
Configuration
menu.
2. While holding the left arrow
button; press
Select
. The front
panel will display the complete
menu list.
3. Exiting from the submenu
returns the printer to the short
version of the Printer
Configuration menu.
1. Press and hold
Cancel
or
Scroll
Up
then press the
Back
button.
Содержание Phaser 840
Страница 2: ......
Страница 12: ...vi Phaser 840 850 860 8200 Color Printer Service Manual ...
Страница 52: ...1 36 Phaser 840 850 860 8200 Color Printer Service Manual ...
Страница 88: ...2 72 Phaser 840 850 860 8200 Color Printer Service Manual Blank Page ...
Страница 134: ...3 118 Phaser 840 850 860 8200 Color Printer Service Manual ...
Страница 174: ...4 158 Phaser 840 850 860 8200 Color Printer Service Manual ...
Страница 188: ......
Страница 250: ...8 234 Phaser 840 850 860 8200 Color Printer Service Manual ...
Страница 286: ...270 Phaser 840 850 860 8200 Color Printer Service Manual ...
Страница 287: ...071 0723 00 ...