


3-108
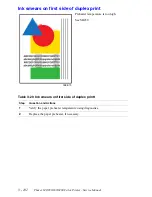
c.
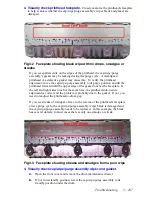
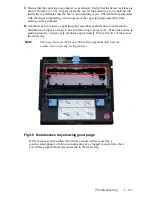
With a flashlight, closely examine the cap/wipe/purge assembly. Inspect
the gasket for defects and signs of separation.
d.
Tilt the printhead all the way back and raise the cap/wipe/purge assembly
to its purge position. Inspect the rubber wiper, especially at the ends, for
signs of separation. Gently probe the cap/wipe/purge assembly gasket
with fingers or a blunt tool for signs of damage or separation from the cap
assembly. Replace if defective. Refer to SF147.
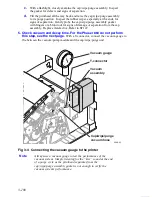
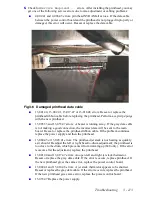
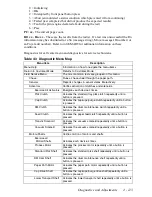
5. Check vacuum and decay time. For the Phaser 860 do not perform
this step, see the next page.
With a T-connector, connect the vacuum gauge to
the between the vacuum/pump module and the cap/wipe/purge unit.
Note
Always u
se a vacuum gauge to test the performance of the
vacuum system. Simply listening for the “kiss” sound at the end
of a purge cycle as the printhead separates from the
cap/wipe/purge assembly gasket is not enough to verify the
vacuum system’s performance.
Fig 3-4 Connecting the vacuum gauge to the printer
0388-35
Vacuum guage
40
20
0
60
-76
Cap/wipe/purge
vacuum hose
T-connector
Vacuum
assembly
Содержание Phaser 840
Страница 2: ......
Страница 12: ...vi Phaser 840 850 860 8200 Color Printer Service Manual ...
Страница 52: ...1 36 Phaser 840 850 860 8200 Color Printer Service Manual ...
Страница 88: ...2 72 Phaser 840 850 860 8200 Color Printer Service Manual Blank Page ...
Страница 134: ...3 118 Phaser 840 850 860 8200 Color Printer Service Manual ...
Страница 174: ...4 158 Phaser 840 850 860 8200 Color Printer Service Manual ...
Страница 188: ......
Страница 250: ...8 234 Phaser 840 850 860 8200 Color Printer Service Manual ...
Страница 286: ...270 Phaser 840 850 860 8200 Color Printer Service Manual ...
Страница 287: ...071 0723 00 ...