Wax Hose
Removing and replacing components of the WaxJet Solid Wax
System is a delicate task. During operation, the Printhead is heated
to approximately 135º C (275º
F). Make sure that the system is
thoroughly cooled down to avoid injury. Handle the wax hose
carefully to avoid damage. Read each step carefully and follow the
prescribed sequence to avoid pitfalls. The drawings shown in this
section are for illustrative purposes and are not necessarily exact
replicas of the assemblies.
Removal
1. Turn off power and allow wax system to cool for 1 hour.
2. Transfer Printhead/Wax System from production line to a clean
workbench environment.
3. Support Printhead and remove Printhead mounting hardware.
4. Remove photocell mounting bracket and rotational side mount
bracket on wax reservoir cover.
5. Remove screws securing housing cover, open wax fill cover and
remove housing cover.
6. Do not remove the wax fill cover.
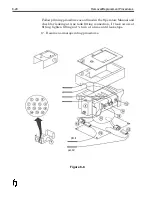
7. Remove top mounting plate and top insulating foam.
8. Disconnect heater hose wire at connector.
9. Loosen heater hose tube fitting nuts at both ends.
10. Remove print head housing assembly from mounting bracket.
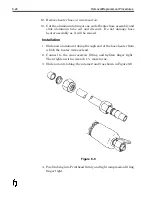
11. Loosen wax line nut at print head, remove Printhead from
heater hose and set aside.
12. Remove heater hose at wax reservoir and discard heater hose.
8-26
Removal/Replacement Procedures
Содержание 6100
Страница 8: ...This page intentionally left blank...
Страница 18: ...2 8 Application Design This page intentionally left blank...
Страница 21: ...Dimensions Controller Application Design 2 11...
Страница 22: ...Integrated Printhead Wax System 2 12 Application Design...
Страница 55: ...Command Definitions 5 21...
Страница 56: ...5 22 Command Definitions This page intentionally left blank...
Страница 70: ...6 14 Installation Setup Figure 6 6...
Страница 87: ...7 8 Service Figure 7 1...
Страница 89: ...7 10 Service Figure 7 2...
Страница 95: ...7 16 Service Figure 7 3...
Страница 97: ...7 18 Service This page intentionally left blank...
Страница 115: ...8 18 Removal Replacement Procedures Figure 8 7...
Страница 125: ...8 28 Removal Replacement Procedures This page intentionally left blank...


