Maintenance and Repair 5
VES, LLC
Elite-RS Panel Installation Manual
VF3529-00, Revision E01.03
H-Series
57 of 146
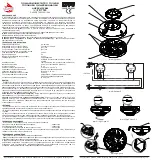
Installing the Standby-Batteries
To install the replacement standby-batteries:
Reference Section 3, Installation for more information describing the standby battery installation process.
The figure below illustrates the connection required for installing replacement standby-batteries in the
Elite-RS Panel:
Figure 5-1
The series connection illustrated above provides the 24 volt standby voltage required by the Elite-RS Panel.
Do not connect the two batteries in parallel. A parallel connection will not provide the 24 volts required for
operating the Elite-RS Panel in a standby condition.
1
Place standby-batteries at the bottom of the Elite-RS Panel cabinet.
2
Connect the black-cable to the negative terminal of Battery 2.
3
Connect the red-cable to the positive terminal of Battery 1.
4
Connect the jumper-cable from the negative terminal of Battery 1 to the positive terminal of Battery 2.
5
Mark a “placed into service date” on Battery 1 and Battery 2.
E E
P2
R
P2
T
L2
R
L2
T
P1
R
P1
T
L1
R
L1
T
Alarm
Silence
Panel Sounder
Silence
Lamp
Test
Reset
Fire Drill
Programmable
Function
Enable Access
Re-Sound
Alarm
Fire
AC Power On
Pre-Alarm
On Test
More Events
General
Disablement
General Trouble
Power Trouble
Supervisory
NAC Trouble
More
Fire Events
More
Events
Enter
Exit
24V OUT AUX 24V
+
-
+
-
NC C NO
TROUBLE
NC C NO
FIRE
NC C NO
SUPERVISORY
NAC 1 NAC2
+
-
+
-
NET OUT NET IN
+
-
+
-
COMMS
+
-
SLC1 OUT SLC1 IN
+
-
+
-
Battery
Connection
+
-
JP1
PC
PC / Dialer
Reset
Watchdog
Operated
Contrast
Watchdog
Reset
SLC2 OUT SLC2 IN
+
-
+
-
1
2
3
4
?
1 2 3 4 5 6 7 8 9 10 11 12 13 14 15 16 17 18 19 20 21 22 23 24 25 26 27 28 29 30 31 32 33 34 35 36 37
38 39 40 41
Panel Sounder
Silenced
Delay Active
E E
P2
R
P2
T
L2
R
L2
T
P1
R
P1
T
L1
R
L1
T
Alarm
Silence
Panel Sounder
Silence
Lamp
Test
Reset
Fire Drill
Programmable
Function
Enable Access
Re-Sound
Alarm
Fire
AC Power On
Pre-Alarm
On Test
More Events
General
Disablement
General Trouble
Power Trouble
Supervisory
NAC Trouble
More
Fire Events
More
Events
Enter
Exit
24V OUT AUX 24V
+
-
+
-
NC C NO
TROUBLE
NC C NO
FIRE
NC C NO
SUPERV ISORY
NAC 1
NAC2
+
-
+
-
NET OUT NET IN
+
-
+
-
COMMS
+
-
SLC1 OUT SLC1 IN
+
-
+
-
AC POWER
L N E
Battery
Connection
+
-
JP1
PC
PC / Dialer
Reset
Watchdog
Operated
Contrast
Watchdog
Reset
SLC2 OUT SLC2 IN
+
-
+
-
1
2
3
4
?
1 2 3 4 5 6 7 8 9 10 11 12 13 14 15 16 17 18 19 20 21 22 23 24 25 26 27 28 29 30 31 32 33 34 35 36 37
38 39 40 41
Panel Sounder
Silenced
Delay Active
AC POWER
L N E
NEGATIVE BATTERY LEAD
(BLACK CABLE)
BATTERY 2
VF5450-00
+
-
POSITIVE BATTERY LEAD
(RED CABLE)
JUMPER-LEAD
KIT, VF1514-00 CONTAINS BATTERY LEADS,
JUMPER AND FUSE ASSEMBLY VF1548-00.
FUSE ASSEMBLY VF1548-00 CONTAINS 32 V
@10 A FUSE WITH RED CABLING.
BATTERY 1
VF5450-00
STANDBY-BATTERIES ARE 12 VOLT, 7 AMP
HOUR AND SEALED RECHARGEABLE.
10 AMP BATTERY FUSE