background image

Chapter 8: Archiving files 

56 

TruVision NVR 22 (SP) User Manual 

Using TruVision Player 

Playing back video using TruVision Player 

You can include multiple files in the TruVision Player playlist. Double-click the desired 
video file from the list and click the 

Start 

button. When the first file finishes, the next file 

will automatically start.  

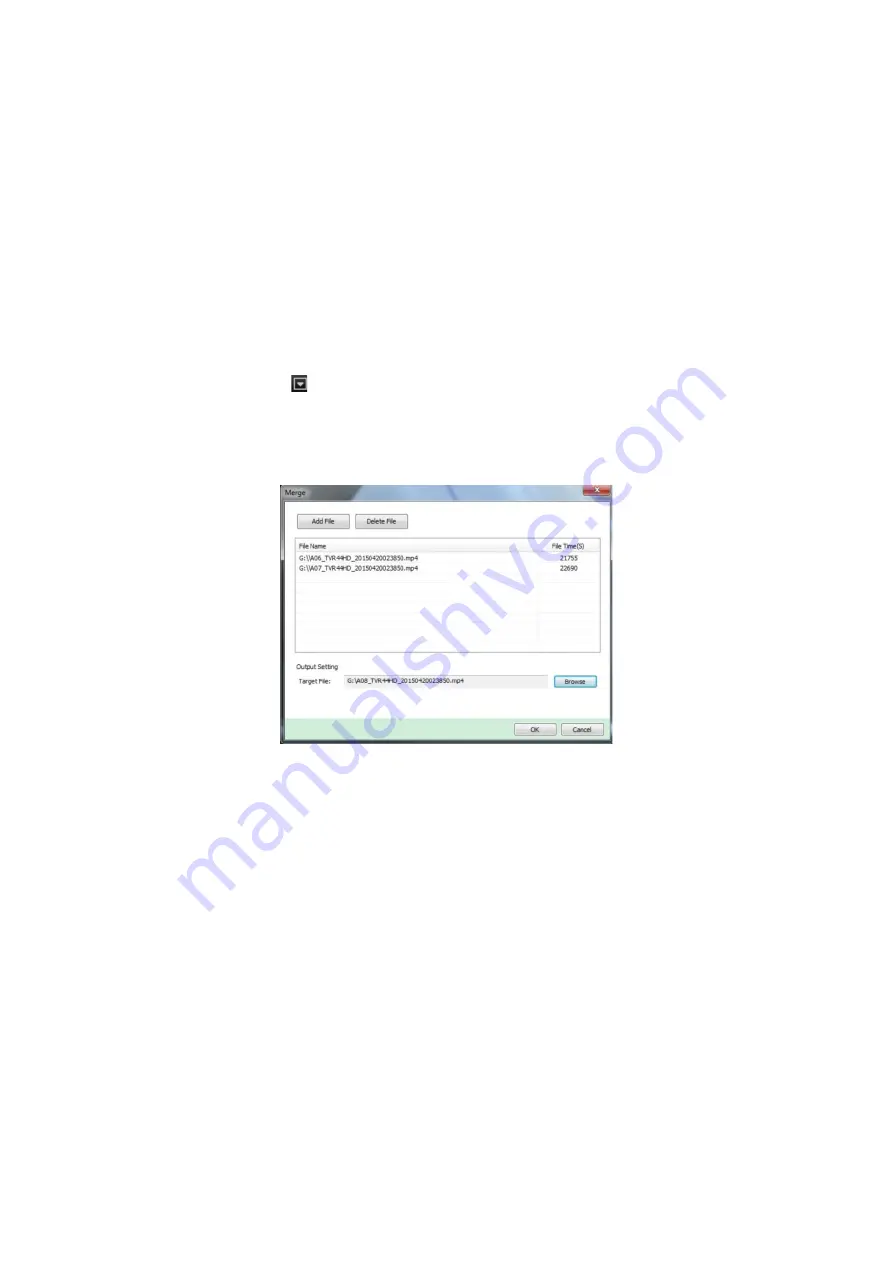
Merging video files in TruVision Player 

1.  Add the exported video files to TruVision Player,  

2.  Click the menu icon    and select 

Tool 

Merge

3.  The Merge window appears. Click 

Add File 

to add the files you want to merge onto 

a selected video file. Under 

Output Setting

, select the video file to which you want 

to add the files. 


Содержание NVR 22 Series

Страница 1: ...TruVision NVR 22 SP User Manual P N 1073192 EN REV P ISS 15JUN22...

Страница 2: ...to radio communications Operation of this equipment in a residential area is likely to cause harmful interference in which case the user will be required to correct the interference at his own expense...

Страница 3: ...orted municipal waste in the European Union See the product documentation for specific battery information The battery is marked with this symbol which may include lettering to indicate cadmium Cd lea...

Страница 4: ......

Страница 5: ...tarted 15 Powering on the recorder 15 The startup wizard 15 Chapter 4 Operating instructions 18 Controlling the recorder 18 Using the front panel 18 Using the mouse 22 Menu overview 23 Chapter 5 Live...

Страница 6: ...hived files on a PC 55 Using TruVision Player 56 Chapter 9 Display settings 57 Display settings 57 Layout 59 Chapter 10 Camera setup 62 IP camera status 62 Using RTSP custom protocols 65 PoE power bud...

Страница 7: ...outputs 105 Manual trigger 106 Alarm Audio 106 Buzzer settings 107 Event notifications 107 Detect video loss 110 Alarm host setup 110 Intrusion integration alarm reporting 111 TVRMobile push notifica...

Страница 8: ...web browser 158 Configure the recorder via the browser 158 HTTPS settings 161 Web browser live view 167 Control a PTZ dome camera via the web browser 168 Play back recorded video 169 Search for event...

Страница 9: ...on of this manual to ensure the accuracy of its contents Carrier assumes no responsibility for errors or omissions Product Warnings YOU UNDERSTAND THAT A PROPERLY INSTALLED AND MAINTAINED ALARM SECURI...

Страница 10: ...battery is replaced by an incorrect type Dispose of batteries according to the instructions Contact your supplier for replacement batteries Warranty Disclaimers CARRIER HEREBY DISCLAIMS ALL WARRANTIES...

Страница 11: ...purpose it was designed for refer to the data sheet and user documentation For the latest product information contact your local supplier or visit us online at firesecurityproducts com The system sho...

Страница 12: ...y and up to 8 SATA hard drives The full TVN 22 series provides integration with the Carrier portfolio of security solutions and offers a seamless user experience within the TruVision brand The TVN 22...

Страница 13: ...r case letters and special characters _ Space The maximum number of allowed attempts to enter a password is 3 Lockout is 30 minutes when in web mode and 10 minutes when in OSD mode The password is cas...

Страница 14: ...ome Safari or Firefox port in HTTP mode 7681 When using TruNav RTSP port 554 Server Client software port 8000 Go to Using the web browser on page 156 for further information Note It is recommended tha...

Страница 15: ...llation location Extremes of heat or cold beyond the specified operating temperature limits may reduce the life expectancy of the recorder Do not install the unit on top of other hot equipment Leave 4...

Страница 16: ...el The figures below show the back panel connections and describe each connector on a typical TVN 22 digital video recorder Details may vary for specific models Before powering up the recorder insert...

Страница 17: ...t not used 6 Connect to a keypad via RS 485 KTD 405 shown 7 Connect up to four alarm relay outputs 8 Connect to a network RJ45 9 Connect to speakers for audio output 10 Connect to a VGA monitor 11 Uni...

Страница 18: ...VGA or HDMI monitor can be used as the main monitor of the recorder The BNC video output can be used as event or alarm monitor Rack mounting The TVN 22 and 22S have a 1 5U desk based chassis The TVN 2...

Страница 19: ...ack panel Once it is powered up the status LEDs on the front panel will light up To turn off the recorder 1 In live view mode right click the mouse and click Menu Shutdown 2 In the Shutdown popup menu...

Страница 20: ...me and date configuration Select the desired time zone date format system time and system date If Daylight saving time DST is required select Enable DST and enter the desired summer and winter times N...

Страница 21: ...the LAN Recording Configure your default recording settings as required The settings apply to all cameras connected to the recorder Select the Constant Recording check box for the recorder to record...

Страница 22: ...sing the web browser Software TruVision Navigator TVRMobile or other video management or integration software platforms Please refer to the relevant user manuals of the individual software platforms f...

Страница 23: ...ete a selected item from USB flash drive Exit the virtual keypad F2 In live view mode 24 hour playback and playback modes press to display or hide the time or control bar In PTZ mode stop all ongoing...

Страница 24: ...yback Play In live view mode play 24 hour playback of the current camera upper left video tile if in multiview mode In playback mode play back a camera in the forward direction In search mode play bac...

Страница 25: ...e seconds to start and stop sequencing Menu Press to enter the main menu Playback mode Direction The left and right buttons are used to speed up and slow down recorded video Single to 300X The up and...

Страница 26: ...ck panel or the front panel The mouse is immediately operational and the pointer should appear Note Use a USB 2 0 front panel or 3 0 back panel mouse See Table 3 below for a description of the mouse b...

Страница 27: ...e sections The currently selected command icon and submenu item are highlighted in green See Figure 6 below You must be in live view mode to access the main menu Figure 6 Menu structure 1 Menu toolbar...

Страница 28: ...trigger alarm notifications alarm audio buzzer settings alarm notifications video loss alarm host setup intrusion panel setup and intrusion panel zone setup See Chapter 13 Alarm and event setup on pa...

Страница 29: ...turn to live view The soft keyboard A keyboard will appear on screen when you need to enter characters in a window option Click a key to input that character Figure 7 The soft keyboard Description of...

Страница 30: ...ns are shown for each camera Each icon represents information on a specific item These icons include Table 5 Description of the on screen status icons Icon Description Indicates an alarm Indicates tha...

Страница 31: ...I port the recorder will not look for a monitor on the VGA port When a VGA monitor is also connected then it will be monitor B and can be setup as the event monitor in the menu Display Settings Displa...

Страница 32: ...splay mode on page 29 for more information 4 Previous Screen Displays the previous camera 5 Next Screen Displays the next camera 6 Start Sequence Turn on sequence mode The window automatically sequenc...

Страница 33: ...reen before advancing to the next camera in the sequence list Sequencing can only be done in single view display mode The default sequence displays each camera in numerical order However each camera o...

Страница 34: ...Capture a snapshot of a video image The image is saved on the unit See Search snapshots on page 38 for further information PTZ Control Enter PTZ control mode See PTZ presets and tours on page 31 for...

Страница 35: ...ified 4 To exit digital zoom right click the mouse PTZ preset and tours When in live view you can quickly call up the list of existing presets preset tours and shadow tours by using the front panel mo...

Страница 36: ...Centers the PTZ dome camera image This command is not supported on all PTZ dome cameras Jumps to the home position 5 Select PTZ command Displays the desired function from the scroll bar Camera Preset...

Страница 37: ...anel to Tour and double click the desired preset tour from the list The camera immediately carries out the preset tour movement To call up a shadow tour 1 In live view left click the mouse and select...

Страница 38: ...events bookmarks and snapshots Figure 12 The Advanced Search menu Period within which the search can be done The Search window has four submenus that allow you to carry out different searches by theme...

Страница 39: ...file can be up to 1GB in size Every day at midnight a new recording file is started and each event is also stored as a separate recording file Only one file can be played back at a time Figure 13 Exa...

Страница 40: ...m Input Motion Text Insertion VCA Alarm and Intrusion Alarm To play back search results 1 In live view right click the mouse on the desired video pane and select Advanced Search Or Click the Search ic...

Страница 41: ...dings For information on creating bookmarks see Create bookmarks on page 50 To search for a bookmark 1 In live view right click the mouse on the desired video pane and select Search Video Or Click the...

Страница 42: ...times of the recording to be searched 5 Click Search The list of snapshots appears 6 Select a snapshot to see it in the thumbnail window Click its Play button to see it in full screen mode 7 When in f...

Страница 43: ...y s recorded video Search video by specific time events bookmarks or snapshots see Chapter 6 Searching files on page 34 for further information Launch playback of video associated to searched events T...

Страница 44: ...recordings Note Cameras can also be selected manually The maximum number of cameras that can be selected is 16 whether selected automatically or manually 7 Camera panel Select the cameras for playbac...

Страница 45: ...e ball position and how much playback has already played are also displayed 3 Zoom in and out of the recording 4 Audio and video control toolbar Audio on off When audio is On use the scale to adjust t...

Страница 46: ...constant recording Yellow indicates motion recording Red indicates alarm recording Pale green indicates manual recording Aquamarine indicates text insertion Magenta indicates VCA recording Instant pla...

Страница 47: ...k or to select playback from a different day move the mouse to the right edge of the screen The camera list and calendar appear Select the desired cameras and or another day Up to eight cameras can be...

Страница 48: ...kmark by file name in the 24 hour playback mode Smart This feature lets you selectively playback the parts of a recording with VCA and motion events and skip over video that does not have such events...

Страница 49: ...the event search 5 Click the Search icon to search for the desired events The results are listed on the right side of the window Each individual recorded event is listed They are collectively not sho...

Страница 50: ...and objects crossing a pre defined line or an area on screen If someone or an object crosses the line the time of the event is shown on the Smart bar Click the icon and then click on the image to ind...

Страница 51: ...ed video Video that does not have selected events will not be played Play non related video Set the speed to play the video with no selected events Play related video Set the speed to play the video w...

Страница 52: ...mode Main Stream or Substream 3 Select a camera and date from the calendar on the right hand side of the window 4 In the Split screen drop down list select the desired number of split screens Up to 1...

Страница 53: ...ame by frame You can play back a selected video at different speeds This allows you to carefully examine an event frame by frame as it happens The current frame rate is shown on the right of the playb...

Страница 54: ...can be used for several bookmarks You can search both types To create a bookmark 1 Open a 24 hour playback window or the playback window from a search result 2 In the playback recording click the tim...

Страница 55: ...the File Management window select the Locked File tab The list of locked files is shown To unlock a locked file 1 In playback mode click the File Management button and in the File Management window se...

Страница 56: ...writers are Pioneer XU01 Samsung SE208DB TSBS Archiving files There are two ways to archive files Quick Archive button Quick archive lets you archive recorded files quickly by using the Archive button...

Страница 57: ...upport all types of USB hubs The Archive options available may depend on the type of backup device selected You can also archive files while in 24 hour playback by clicking the File Management icon in...

Страница 58: ...rt on the front panel If using a digital video disk DVD or eSATA drive insert the disc into the DVD drive If both media are found in the recorder the USB device takes precedence over the DVD 2 In live...

Страница 59: ...ment window appears Click No to exit and return to the search results window The clips are not saved 9 In the File Management window click Archive In the Archive window that appears select from the dr...

Страница 60: ...from the list and click the Start button When the first file finishes the next file will automatically start Merging video files in TruVision Player 1 Add the exported video files to TruVision Player...

Страница 61: ...sable the local audio output See Figure 19 on page 58 The recorder can use the BNC HDMI and VGA outputs independently The TVN 22P recorder has two HDMI and two VGA outputs that mirror each other and o...

Страница 62: ...lution must be the same as that of the monitor 5 HDMI Resolution Define the resolution of the selected monitor The resolution can be up to 4K Select one of the options from the drop down list and clic...

Страница 63: ...seconds Alarm Full Screen Monitoring Dwell Time Set the length of time during which an image is displayed on the event monitor in full screen in case of an alarm Default is 10 seconds Layout The Layou...

Страница 64: ...order in the sequence Camera number selection Default format of live view You can set up the default layout of live view displayed on the monitor in web mode and define the camera channel for each vid...

Страница 65: ...pport sound 5 Camera list Shows the list of available camera channels 6 Multiview options Specifies the image scale in a video tile Options are Full Screen 1 1 2x2 1 5 1 7 3x3 4x4 The number of channe...

Страница 66: ...P cameras For advanced IP camera settings please consult the IP camera web browser interface Supported IP cameras The NVR supports TruVision IP cameras as well as TVE encoders It supports a wide range...

Страница 67: ...ch Add Search the network for available TruVision or other natively supported IP cameras Add an IP camera to the recorder system 5 Upgrade Upgrade IP camera software Insert USB flash drive in the reco...

Страница 68: ...remain valid LAN network There are two ways to connect an IP camera to the LAN network To automatically add an IP camera via the LAN network 1 From the menu toolbar click Camera Setup IP Camera Statu...

Страница 69: ...r which is not 1234 to the recorder 1 Connect the IP camera to a network and set the camera s IP address to 192 168 254 x where x is between 1 and 254 Note The camera s IP address must be in the same...

Страница 70: ...he name for use in a software The camera name will not be pushed to the streaming device PoE power budget TVN 22S only The PoE power budget information is only available for the TVN 22S It is importan...

Страница 71: ...you can experience a loss of PoE power Ensure that this is considered when configuring the system To display the PoE power consumption information 1 From the menu toolbar click Camera Setup PoE Setup...

Страница 72: ...andwidth can vary depending on video quality and the bandwidth required If Constant is selected the video streaming is always at the maximum bit rate selected Video Quality Select the quality at which...

Страница 73: ...click Exit to return to live view Snapshots You can define the image quality and resolution of snapshots for each camera Snapshots can be taken at any time during live view or playback or can be creat...

Страница 74: ...a time format 6 Select how you want the camera information displayed Select one of the options from the drop down list Default is non transparent non flashing Transparent Flashing Transparent Not Flas...

Страница 75: ...button to return image setting values to the default position 5 Select how you want the camera to rotate the image There are two rotate functions Enable Rotate You can rotate the image 270 In a vertic...

Страница 76: ...desired sensitivity level Maximum sensitivity is 6 Default is 4 7 Select the cameras that will start the motion recording schedule once motion is detected Click the Actions button The Actions window a...

Страница 77: ...n the recorder and set up the actions and arming schedule 2 Go to the camera s webpage to set up advanced motion detection Privacy mask You can define an area on screen to remain hidden from view and...

Страница 78: ...x to enable the feature 4 Select the tamper detection sensitivity level by clicking the sensitivity scroll bar Higher sensitivity is to the right of the bar 5 Select the recording schedules for the ta...

Страница 79: ...up an area in the surveillance scene to detect when intrusion occurs If someone enters the area a set of alarm actions can be triggered Defocus Detection The camera can detect image blur caused by de...

Страница 80: ...a for which to set up the VCA alarm 4 Select the Enable VCA Alarm check box to enable the feature 5 Select the recording schedules for the selected VCA 6 Click the Actions button to define which actio...

Страница 81: ...locations of a PTZ dome camera It allows you to quickly move the PTZ dome camera to a desired position They are configured and modified from the Camera Setup PTZ Presets Tours window see Figure 23 be...

Страница 82: ...ndow appears Select a preset number from the drop down list and click the OK button to save changes Note Presets can be overwritten 4 Click Exit to return to live view To call up a preset 1 From the m...

Страница 83: ...the preset tour 6 Click Exit to return to live view To call up a preset tour 1 Click the PTZ Settings icon on the menu toolbar and select More Settings 2 Select the desired preset tour from the list...

Страница 84: ...s for virtual When enabled you can see the output from the cameras on a remote client monitor in one stream Note The V stream uses the layout that is set up for the BNC monitor To setup V stream encod...

Страница 85: ...the report type Daily report Weekly report Monthly report or Annual report Daily report calculates the data on the selected date Weekly report calculates for the week of the selected date Monthly rep...

Страница 86: ...ool to analyze the behavior of the recorder on the network You must correctly configure your recorder s network settings before using it over the network to Connect IP cameras to it Connect to the rec...

Страница 87: ...ault LAN connection LAN1 is default Bridge PoE Camera Network This is only available for TVN 22S Select this check box to enable the Bridge PoE Camera Network Default value is Enable 5 Enable DHCP DHC...

Страница 88: ...n case of a network storm 13 Enable Telnet For Technical Support purposes only For security reasons the Telnet port is disabled by default 14 IPv6 Address 1 Enter the IPv6 address for the recorder Def...

Страница 89: ...lution that can be installed on a PC There are minimum hardware and software requirements for the PC More information about FreeNAS can be found via www freenas org FreeNAS works with our recorder For...

Страница 90: ...re are three ways to set up a DDNS account ezDDNS A free of charge service included with your recorder and fully managed within the recorder interface It is exclusive to TruVision products DynDNS A th...

Страница 91: ...from the NO IP web site Then enter the user name and password that are registered with the No IP network 4 Ask your ISP service provider for your DNS server address or look it up in the browser interf...

Страница 92: ...r name Password If the mail server requires authentication enter the login password SMTP Server Enter the SMTP server s IP address SMTP Port Enter the SMTP port The default TCP IP port for SMTP is 25...

Страница 93: ...ct the desired options for them 5 Click Apply to save the settings and click Exit to return to live view SNMP settings SNMP is a protocol for managing devices on networks When you enable SNMP in the m...

Страница 94: ...matically uses the free ports available that were set up in the Network Settings menu Manual mapped type You enter the particular external port settings and IP addresses required to connect to the des...

Страница 95: ...ation displayed is refreshed once a second To check network delay and packet loss 1 From the menu toolbar click Network Settings Net Detect 2 Under Select NIC select the destination address Click Test...

Страница 96: ...ngs Net Statistics 2 The latest information is displayed on the bandwidth used by remote live view and playback as well by Net Receive Idle and Net Send Idle Click Refresh to update the information 3...

Страница 97: ...supplicant i e client device is not allowed access through the authenticator to the protected side of the network until the supplicant s identity has been validated and authorized by the authenticatio...

Страница 98: ...RFC 5216 The protocol was created as an open standard leveraging the TLS Transport Layer Security protocol and it primarily consists of the original EAP authentication protocol For each option shown...

Страница 99: ...used Each camera can be configured to have its own recording schedule The schedules are visually presented on a map for easy reference See Figure 25 below for a description of the recording schedule w...

Страница 100: ...y Up to eight recording periods can be scheduled during the 24 hour period 7 Copy button Click to copy schedules between cameras Define a schedule from the recording schedule window To set up a daily...

Страница 101: ...TL Lo the recorder records continuously 8 Click Apply to save settings 9 Repeat steps 4 to 8 for other days of the week or to copy the schedule settings to another day To copy the current schedule se...

Страница 102: ...ways to start and stop a manual recording Use the live view toolbar You can start stop manual recording for each camera individually Position the cursor over a camera image and left click the mouse to...

Страница 103: ...e Full Rule Select how the recorder responds when the storage device or system becomes full and there is no longer enough space to save new data The overwrite option is enabled by default 6 Device Typ...

Страница 104: ...be considered A stable network connection is required There must be at least 10 Mbps of unallocated bandwidth available with the main recorder The main and failover recorders must have equal camera c...

Страница 105: ...nues until the connection is re established The recording also includes the post event time image memory buffer default post event time is 10 s Post event is the time of the image memory buffer length...

Страница 106: ...the desired camera 5 Select Enable Recording eventual set time schedule if desired 6 Click the Advanced button to open the Advanced menu 7 Select Enable EFR Edge Failover Recording When a camera is o...

Страница 107: ...is triggered by an external alarm device for example PIR detector dry contacts They are the physical inputs on the IP cameras and recorder To set up external alarms 1 From the menu toolbar click Alar...

Страница 108: ...arm In the Actions window click the Actions tab to define the method by which you want the recorder to notify you of the alarm Select one or more of the alarm notification types See Alarm response act...

Страница 109: ...audio file when a notification or alarm is detected by the system or a camera See Alarm Audio on page 106 for further information Trigger Alarm Output Triggers an alarm output or multiple alarm outpu...

Страница 110: ...g buttons Trigger Clear Trigger an alarm output or stop an alarm output As there is only one alarm output available the Trigger All button just triggers the one output Clear All Stop all alarm outputs...

Страница 111: ...ed and click Delete Note There will always be a minimum of five audio files listed Buzzer settings When an alarm is triggered by the system or a camera the recorder can be set up to respond with a war...

Страница 112: ...int on the lens or by moving the camera Motion Detected Motion is detected IP Camera Address Conflicted Conflict in IP address setting Resolution or Bitrate of Substream Not Supported Cross Line Detec...

Страница 113: ...ve view and click OK See Event notifications on page 107 for the complete list 4 Select the event priority VCA Motion or VCA Motion Default is VCA Motion where motion has priority over VCA 5 Select a...

Страница 114: ...eight time periods per day Click Apply to save the settings 6 Select the alarm response method Click the Arming Schedule tab and select how you want the recorder to notify you of video loss Select on...

Страница 115: ...g Aritech panels are supported ATS Master EMEA only Advisor Advanced NetworX panels Up to three intrusion panels can be set up in the recorder Each panel can report up to 32 intrusion zones a zone is...

Страница 116: ...usion Panel Setup 2 In the Intrusion Panel Setup window enter the required settings Option Description Set up the intrusion panel connection parameters 1 Enable Intrusion Panel Connection Select this...

Страница 117: ...10 Enable Panel Arming Event Select this check box to enable the panel arming event When the panel is armed it will be reported to the recorder 11 Actions Click the button to set up the actions linke...

Страница 118: ...camera as well as the preset preset tour or shadow tour that is triggered when the alarm event is detected Click Apply to save the settings Click OK to return to the main window 4 Click Apply to save...

Страница 119: ...he alarm schedule for the actions You can schedule up to eight periods in a day Default is 24 hours Actions Select the required action that needs to be executed when an alarm is received Full screen M...

Страница 120: ...the user The recorder needs to be connected to the internet to be able to use push notifications Even when the phone or tablet is used via Wi Fi on the same LAN as the recorder an internet connection...

Страница 121: ...the following ports HTTP port default 80 RTSP port default 554 Server port default 8000 Some ISPs block the use of port 80 and or 554 When these ports are blocked use a port number higher than 1024 Ho...

Страница 122: ...13 Alarm and event setup 118 TruVision NVR 22 SP User Manual 2 Select Notify Alarm Host as an action for motion detection 3 The user does not need to enter a destination address in the Alarm Host setu...

Страница 123: ...d alarms alarm inputs or intrusion panel events can be disabled when the alarm panel is disarmed This will avoid users receiving unnecessary notifications push notifications emails events in TruVision...

Страница 124: ...sure the alarm panel has a relay contact to connect it to the recorder Connect one wire to alarm input 1 and connect the other wire to one of the Ground G connections 4 Select the alarm input type NO...

Страница 125: ...t are set up for the disarming event will also no longer be executed This is a known limitation To define the recording behavior when Disable Actions is used 1 From the menu toolbar click Device Manag...

Страница 126: ...n web mode For further information on Disable Actions see Disable actions on page 119 To disable the use of the alarm outputs when Disable Actions is active 1 From the menu toolbar click Configuration...

Страница 127: ...d enable disable password requirement Import export configuration files Upgrade the firmware Set up holiday periods Configure RS 232 settings Set up text insertion Time and date settings You can set u...

Страница 128: ...lt is Disable 5 System Date Enter the system date Default date is the current date 6 System Time Enter the system time Default time is the current time 7 Auto DST Adjustment Select the check box to ac...

Страница 129: ...Define the recorder name Click the edit box and enter the new name from the soft keyboard 3 Remote Control ID The device number to use for the recorder when linking the device to a remote control The...

Страница 130: ...ort files Insert an external storage device in the recorder Go to the Device Management Configuration Files to import or export configuration settings Click Export to export the recorder s configurati...

Страница 131: ...menu toolbar click Device Management Upgrade Firmware The list of files on the USB is displayed 4 Select the firmware file and click Upgrade Click Yes to begin the upgrade process 5 When the upgrade p...

Страница 132: ...Insertion Select the camera channel to which you want to apply text insertion Up to 16 channel models All channels can be used for text insertion 32 ch 64 ch models Half of the channels can be selecte...

Страница 133: ...ves within this interval then the two POS messages are considered as one message The interval ranges from 5 to 3600 s Default is 10 s 10 Overlay Text Insertion in Live Mode Select to enable text inser...

Страница 134: ...d Click Apply to save settings Click OK to return to the text insertion settings window 8 Select the protocol that will be used by the converter ProBridge Select ProBridge NPCII Select EPSON 9 Set the...

Страница 135: ...t string and then select the camera to search 5 Select the start and end dates for the event search 6 Click the Search icon to search for the events The results are listed on the right side of the win...

Страница 136: ...ication settings window Option Description 1 Enable RTSP TruVision recorders utilize Real Time Streaming Protocol RTSP for transmitting live and playback video to users Disabling this parameter will s...

Страница 137: ...is feature effectively locks down all HTTP communications making it inaccessible remotely over the network It should be left at its default setting unless otherwise indicated by the system administrat...

Страница 138: ...e status of an HDD 1 From the menu toolbar click Storage Management HDD Information 2 Note the status of the HDDs listed under the Status column If the status is listed as Normal or Sleeping the HDD i...

Страница 139: ...torage IP address Click the Search button to search for the Storage Directory 6 Click the OK button to create the selected network attached storage Initialize an HDD The built in HDD does not need to...

Страница 140: ...be overwritten To avoid this happening set a quota level for the channel or use the group management mode 3 Click Apply to save the settings 4 Continue to configure the recorder or click Exit to retur...

Страница 141: ...r Mode select Group 3 Under Record on HDD Group select a number for the HDD group 4 Select the channels to be added to this group Note By default all channels belong to HDD group 1 5 Click Apply to sa...

Страница 142: ...box to enable sleep mode Default is Enable 3 Click Apply to save the settings 4 Continue to configure the recorder or click Exit to return to live view HDD redundancy The recorder supports redundancy...

Страница 143: ...it for the desired HDD group to see its properties Select Redundancy to enable the function Click Apply to save 6 Select the cameras to be included in the redundancy recording Go to Camera Setup Camer...

Страница 144: ...ming window shows the three recording elements and their capacity ratios on the HDD Main stream Substream and Snapshots The ratios can be easily adjusted by dragging the slider between the recording t...

Страница 145: ...formation on the eSATA for this purpose can be seen under System settings Hard Disk HDD Information To set up the e SATA device 1 Click the Video Schedule icon in the menu toolbar and select More Sett...

Страница 146: ...ck Apply to save the settings 4 Click Exit to return to live view Bad sector detection You can improve the performance of your HDDs by ensuring that they have no bad sectors Bad sectors can slow down...

Страница 147: ...Cancel to cancel it 6 Click Exit to return to live view RAID RAID is data storage technology It combines multiple disk drives into a single logical unit for the purposes of data redundancy or perform...

Страница 148: ...the RAID group is displayed Note You can create a RAID array of RAID 0 RAID 1 RAID 5 RAID 6 and RAID 10 If you choose RAID 0 at least 2 HDDs must be installed If you choose RAID 1 2 HDDs need to be co...

Страница 149: ...ild a damaged RAID If a drive in the RAID array fails you can rebuild the array 1 From the menu toolbar click Storage Management RAID 2 Click the Rebuild icon to open the Rebuild Array window 3 Click...

Страница 150: ...ep is optional 6 Click OK to save the settings and return to the previous window 7 Define the user s permissions Click the Permission button for the new user In the Permissions pop up window select th...

Страница 151: ...log search is enabled for guests Remote Log Search Remotely view logs that are saved on the recorder Remote Parameter Settings Remotely configure parameters and import configuration Remote Camera Man...

Страница 152: ...trol Remotely control PTZ dome cameras Remote Video Export Remotely backup recorded files from any channel To customize a user s access privileges 1 Click the User Management icon in the menu toolbar...

Страница 153: ...K to save the settings and return to the previous window 4 Click Exit to return to live view Change the Admin password The administrator s password can be changed in the User Management menu To change...

Страница 154: ...version and encoding version The QR code for the recorder is also displayed You can quickly enter the recorder parameters into TVRMobile by scanning the QR code Note The TVRMobile app must first be in...

Страница 155: ...You can view the camera number recording status stream type active frame rate active bit rate versus reserved bit rate Kbps active resolution active record type and active encoding parameters The Prev...

Страница 156: ...tatus 7 To view network information click Network You can view the NIC IPv4 address IPv4 subnet mask IPv4 default gateway IPv6 address 1 IPv6 address 2 IPv6 default gateway preferred DNS server altern...

Страница 157: ...xit to return to live view Search the system log Many events of the recorder such as operation alarm and notification are logged into the system logs They can be viewed and exported at any time Up to...

Страница 158: ...Full HDD Error Duplicate IP Address Found Network Disconnected Abnormal Record IP Camera Disconnected IP Camera Address Conflicted Input Output Video Standard Mismatch IP Camera Access Exception Reco...

Страница 159: ...etwork Storage Remote Operate Bookmark Remote Delete HDD Remote Configure SNMP Information All Local HDD Information HDD S M A R T Start Recording Stop Recording Delete Expired Video File Network Stor...

Страница 160: ...rosoft Internet Explorer IE Google Chrome from version 45 Apple Safari from version 10 Mozilla Firefox from version 52 The procedures described in the manual use Microsoft Internet Explorer web browse...

Страница 161: ...plorer users Internet Explorer for Windows operating systems have increased security measures to protect your PC from any malicious software being installed When using the recorder web browser interfa...

Страница 162: ...wser RTSP port 554 HTTP port 80 When using Chrome Safari or Firefox port in HTTP mode 7681 When using TruNav RTSP port 554 Server Client software port 8000 For more information on port forwarding see...

Страница 163: ...is a bandwidth limitation It is only available via the browser 3 Multiscreen Display Specifies the image scale in a video tile Options are Full Screen 4 3 or 16 9 Default is full screen 4 Video File...

Страница 164: ...lay point distance Display highest temperature and Locate highest temperature point IMPORTANT NOTICE This fire detection feature is not a substitute for a certified fire detection system Figure 34 Exa...

Страница 165: ...fies the directory for saving video clips in playback mode 15 Save Downloaded File to Specifies the directory for downloaded files HTTPS settings This feature is only available for Internet Explorer U...

Страница 166: ...ountry hostname IP address and the days of validity The other parameters are optional Click OK 4 Select Enable HTTPS and then click Save 5 Close the connection and open a new browser tab using the HTT...

Страница 167: ...Click on the Certificate error icon to view the certificate and then click Install Certificate Use a signed certificate 1 Go to the Remote Configuration Network Settings HTTPS section of the browser 2...

Страница 168: ...Vision NVR 22 SP User Manual 3 Enter the password which is optional 4 Under Certificate Path click Browse to locate the certificate and then click Install 5 Select Enable HTTPS and then click Save 6 S...

Страница 169: ...usted Root Certification Authorities Third Party and then click OK 9 Click Next 10 Click Finish to install the certificate to the local host and then close the browser Buy a certificate 1 Go to the Re...

Страница 170: ...just created in the browser and get a csr file Visit a site like https www startssl com app 1 and upload your csr file to get a trusted certificate 5 Under Certificate Path click Browse to locate the...

Страница 171: ...Live view in the web browser interface Table 14 Description of live view in the web browser Name Description 1 Camera Select the camera 2 Menu toolbar It lets you do the following View live video Play...

Страница 172: ...ras Start recording from selected cameras Digital zoom Take a video snapshot View previous and next camera respectively If viewing in multiview format live view moves to the next group of cameras for...

Страница 173: ...ed lens such as PTZ or IP cameras This function helps to maintain lens focus accuracy over prolong periods of time 6 Start or stop camera wiper if available on the camera 7 Auxiliary focus Automatical...

Страница 174: ...anscoding Transcoded streaming is normally used when accessing the recorder via a web client Modify the resolution maximum bit rate and frame rate of the transcoded stream Play pause Play or pause pla...

Страница 175: ...k box to enable the feature and select the desired resolution bitrate and frame rate options 12 Jump start Enter a precise time in the box and click the Go To button to jump start the playback from th...

Страница 176: ...corded for the specified day The timeline also classifies by color the type of recording Click and drag the marker across the timeline on where you want video playback to begin and then click Play on...

Страница 177: ...r information IPC Import Export Export and import the IP camera configuration settings from the recorder See Import and export IP camera configuration settings on page 179 for further information Came...

Страница 178: ...on The OSD function is like that of the browser License Plate Capture Define the license plate capture parameters See License plate identification on page 180 for further information This can only be...

Страница 179: ...e that of the browser Email Define the settings to send an e mail See Email settings on page 88 for more information The OSD function is like that of the browser FTP Define the FTP settings See Config...

Страница 180: ...setup on page 110 for more information The OSD function is like that of the browser Intrusion Panel Setup Define the alarm panel in the recorder See Intrusion integration alarm reporting on page 111 f...

Страница 181: ...Chapter 17 System information on page 150 for more information The OSD function is like that of the browser System Information Device Info Review the status of the device See Chapter 17 information on...

Страница 182: ...Firmware Version Note When you add a camera automatically using the Search Add feature the system will check whether the camera password is 1234 or the same as the recorder If the camera password is...

Страница 183: ...ert an external storage device in the recorder Go to Remote Configuration IPC Import Export to import or export configuration settings Click Export to export the recorder s configuration settings into...

Страница 184: ...supported License plate capture Use this function to set up the area on screen to be detected and to capture a vehicle s number plate information Note This license plate functionality only applies to...

Страница 185: ...ing schedule and linking action for the white list black list and other list Under Type select the license plates group White List Black List or Other Click the timeline of the desired day of the week...

Страница 186: ...king Set the alarm linking method Select the method by which you want the recorder to notify you of the alarm Enable Alarm Audio Notify Alarm Host and Send Email See page 107 for the list of alarm not...

Страница 187: ...ou mark your license plate as white or black listed Captured license plates that are not part of the list will automatically be marked as Other The template format is shown below When inputting the li...

Страница 188: ...1 From the menu toolbar click Remote Configuration Camera Setup License Plate Capture Snapshot 2 Select the camera from the drop down list from which you want to place text overlay on the snapshots 3...

Страница 189: ...lity only applies to the EMEA region To create a report on captured license plates 1 Click Reports in the menu toolbar The reports interface appears on screen 2 Select the LPR Snapshot Search tab 3 Se...

Страница 190: ...s in the menu toolbar The reports interface appears on screen 2 Select the Heat Map Statistics tab 3 Select the tab Space Heat Map or Time Heat Map Note Heat maps can only be created using 360 cameras...

Страница 191: ...24 60Hz 1280 720 60Hz 1024 768 60Hz VGA output 1 ch Resolution 1920 1080P 60 Hz 1280 1024 60 Hz 1280 720 60 Hz 1024 768 60 Hz BNC output 1 ch BNC 1 0 Vp p 75 Resolution PAL 704 576 NTSC 704 480 Record...

Страница 192: ...r consumption without HDD 20 W TVN 22S only 20 W without enabling PoE Operating temperature 10 to 55 C 14 to 131 F Relative humidity 10 to 90 Chassis 19 inch rack mounted 1 5 U chassis Dimensions W x...

Страница 193: ...2 ch RCA 2 0 Vp p 1 k Dual stream Support Sub stream at CIF QCIF QXVGA QVGA 25 fps PAL 30 fps NTSC Stream type Video Video Audio Synchronous playback 16 ch 16 ch 16 ch Hard disk SATA 8 SATA interface...

Страница 194: ...municate with browsers and software can be accessed Port 80 HTTP protocol Used to connect via IE browser Port 8000 Client Software Port Used to connect to video streams Port 554 RTSP Port Real time st...

Страница 195: ...l 191 On most routers the brand and model number are located on or near the serial number sticker on the bottom of the device If you cannot find any information for your router please contact your rou...

Страница 196: ...ution and image quality do not impact time Note This information only applies when the bit rate is set to Constant see Camera recording settings on page 67 for more information Constant bit rate Maxim...

Страница 197: ...Appendix C Maximum pre recording times TruVision NVR 22 SP User Manual 193 Constant bit rate Maximum pre recording time seconds 1792 15 2048 15 3072 10 4096 5...

Страница 198: ...kmarks create 50 delete 50 playback 50 rename 50 saving 50 search 37 types 50 C Cameras layout 59 pre and post event times 67 privacy mask 73 recording settings 67 D Daily schedules record 96 Date con...

Страница 199: ...ally add 62 manually add 62 status 62 178 supported 62 ISAPI protocol enable 132 L Language change GUI language 125 License plate detection black white list 183 camera information 184 set up 180 Licen...

Страница 200: ...p and delete 77 set up 78 Privacy mask 73 Protect recorded files 51 PTZ control panel description 32 PTZ dome cameras control remotely 168 Q QR code 150 R RAID array create 143 rebuild 143 verify 143...

Страница 201: ...e push notifications 116 recorder QR code 150 U User privileges camera configuration 147 local configuration 146 remote configuration 147 Users add a new user 146 customize user privileges 146 delete...

Отзывы: