


5-31
SCANNER/INTERNET FAX
Contents
CHANGING THE SUBJECT, FILE NAME, REPLY-TO,
AND BODY TEXT
The subject, file name, reply-to, and body text can be changed when performing a scan transmission. Preset items can
be selected or text can be directly entered.
• When performing Scan to FTP, Scan to Desktop, or Scan to Network Folder, only the file name is used.
• If the subject and file name are not changed, the settings in the Web page are used.
• If the sender name is not changed, the name set in "Default Sender Set" in the system settings is used. If this is not
configured, the reply address in [Network Settings] - [Services Settings] - [SMTP Settings] in the Web pages is used.
(Administrator rights are required.)
• Selections for the subject, file name, and body text are configured by clicking [Application Settings] and then [Network
Scanner Settings] in the Web page menu.
• For the procedure for entering text, see "
ENTERING TEXT
" (page 1-60) in "1. BEFORE USING THE MACHINE".
1
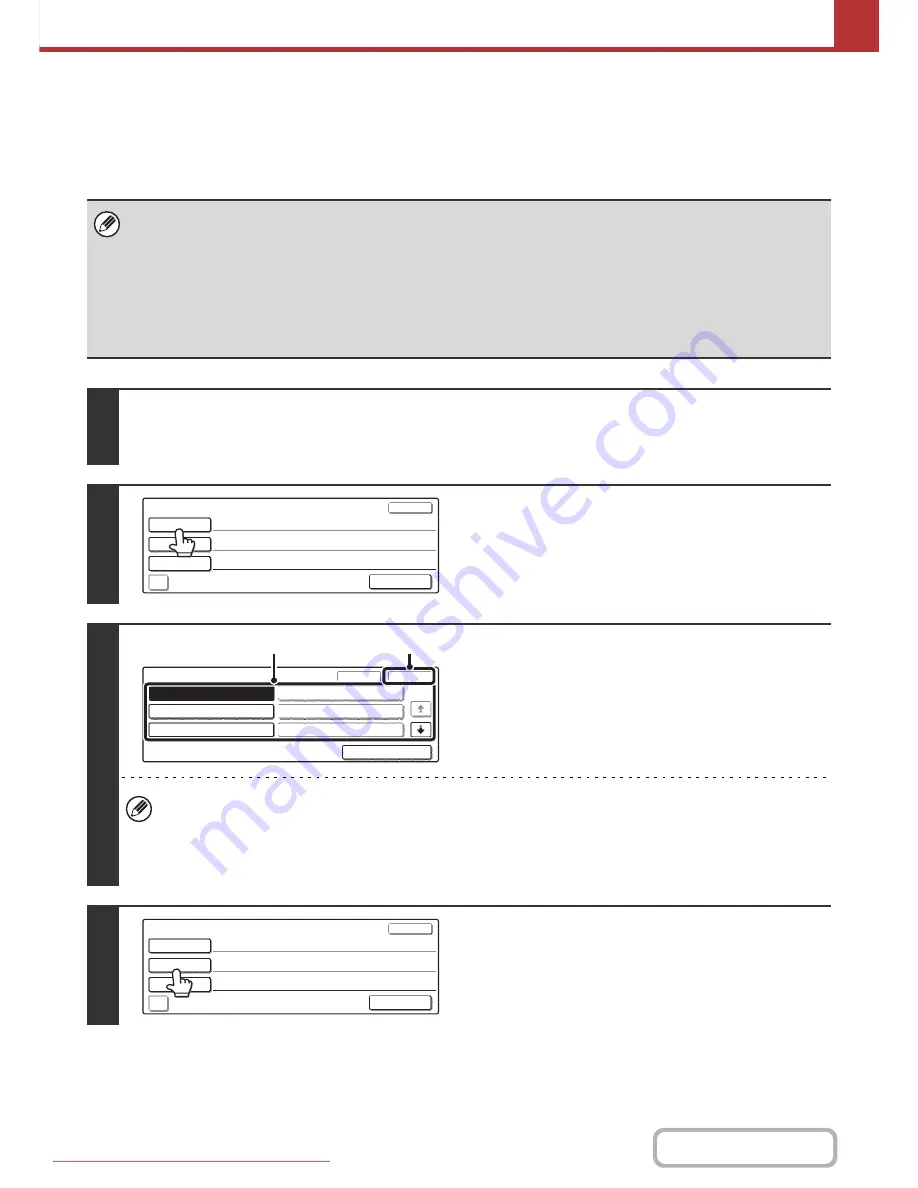
Touch the [Send Settings] key in the base screen.
☞
BASE SCREEN
(page 5-9)
If you are sending to a Scan to FTP, Scan to Desktop, or Scan to Network Folder destination, go to step 4.
2
To change the subject, touch the
[Subject] key.
3
Enter the subject.
(1) Touch a Pre-Set text key.
(2) Touch the [OK] key.
• If you wish to directly enter the text, touch the [Direct Entry] key to open the text entry screen. Enter the text and
touch the [OK] key.
• The text in a pre-set text key can be edited by touching the pre-set text key and then the [Direct Entry] key. The text
entry screen will appear with the selected pre-set text entered. (When a destination is stored using the Web pages,
up to 80 characters can be entered. However, only 54 characters can be entered in the touch panel.)
4
To change the file name, touch the [File
Name] key.
• The file name is entered in the same way as the subject.
• If you are sending to a Scan to FTP, Scan to Desktop, or
Scan to Network Folder destination, go to step 9.
Send Settings
OK
Subject
File Name
Reply-To
Add 'Reply to' to Cc
Body Text
Pre-Set
OK
Cancel
1/5
Direct Entry
No.04
No.05
No.06
No.01 Sub: Schedule coordinat
No.02 Sub: Monthly Schedule
No.03 Sub: Minutes of plannin
(1)
(2)
Send Settings
OK
Subject
File Name
Reply-To
Add 'Reply to' to Cc
Body Text
Sub: Schedule coordination meeting
Downloaded From ManualsPrinter.com Manuals
Содержание MX-2301N
Страница 34: ...Search for a file abc Search for a file using a keyword Downloaded From ManualsPrinter com Manuals ...
Страница 266: ...3 18 PRINTER Contents 4 Click the Print button Printing begins Downloaded From ManualsPrinter com Manuals ...
Страница 817: ...MX2301 GB Z1 Operation Guide MX 2301N MODEL Downloaded From ManualsPrinter com Manuals ...