4. Transfer drum/OPC drum contact
pressure adjustment
A. Outline and purpose
Adjust the contact pressure between the transfer drum and the OPC
drum to assure normal transfer operation.
There is some fluctuations in the transfer drum rubber layer thickness
and they are corrected by changing the distance between the transfer
drum and the OPC drum.
When the contact pressure is too great, paper jam, color shift, or blur
may occur. When the contact pressure is too small, low print density
is caused.
B. The adjustment is required in the following
cases:
1) When the transfer drum is replaced.
2) When the transfer drum is removed.
3) When an image trouble (break down (color missing), color shift,
blur, etc.) is caused by improper transfer.
4) When paper jams occur frequently in the transfer section.
C. Details
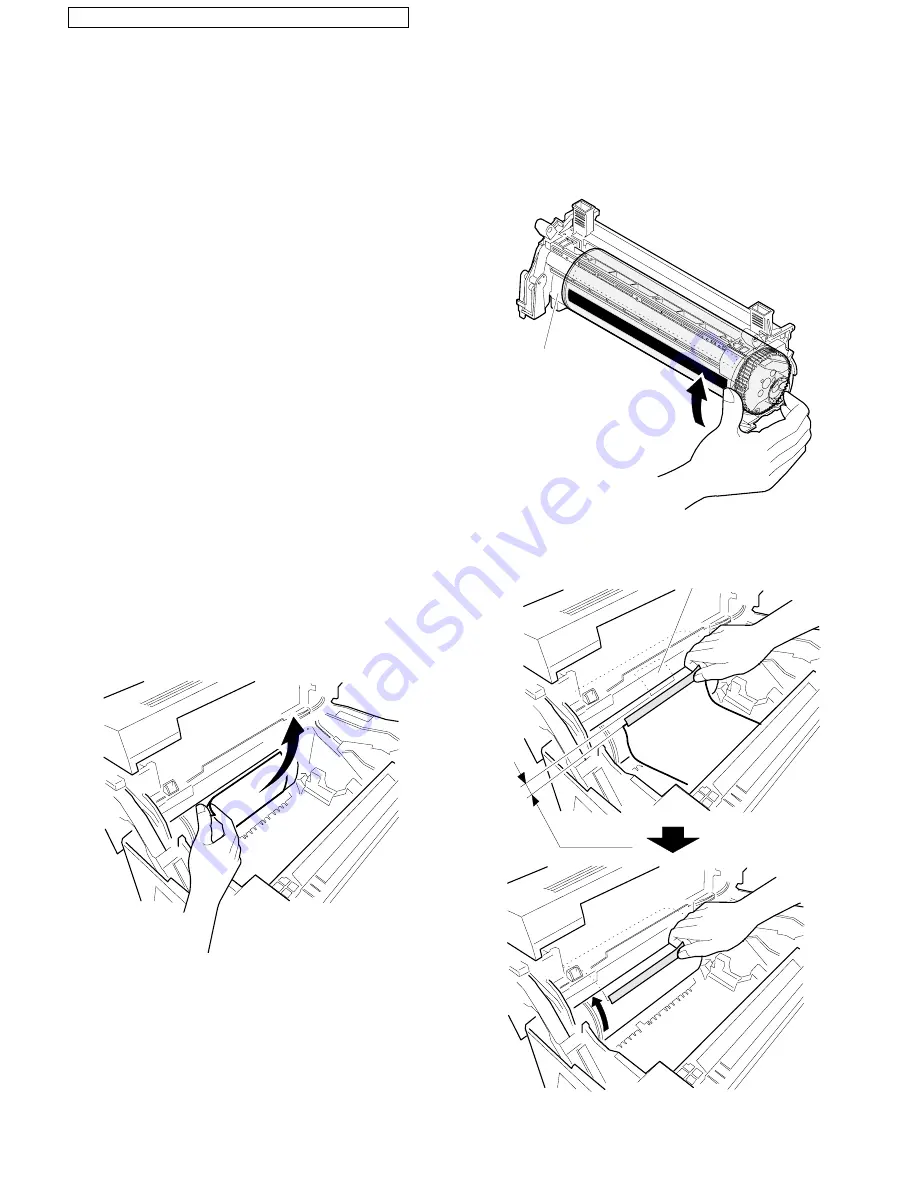
1) Form cyan images on the OPC drum.
a. Enter the normal diag mode. (While pressing the MENU key
and the ENTER key, turn on the power.)
b. Select the TEST PRINT mode with the MENU key.
c. Press the FORM FEED key. (Color print mode)
Color printing is started.
d. In the above procedure, paper is passed and the LCD dis-
play turns from "P=XXX H=XXX T=XXX" to "P=XXX H=XXX
CT=XXX". Then after 2 sec, turn off the power switch.
2) Open the transport section and remove the paper.
3) Remove the OPC drum unit from the printer body.
4) Manually turn the gear section of the OPC drum in the arrow
direction, and move the cyan image on the OPC drum to the
position shown in the figure below.
Note: Be sure to turn the gear section in the arrow direction. If it
is turned reversely, the cleaning blade in the OPC drum
unit or the OPC drum itself may be damaged.
5) Attach paper (A4 or Letter size, 75
∼
80g/m
2
) to the position on
the transfer drum shown below.
Scratches
made by contact
with the drum.
10~20mm
White sheet
SHARP SERVICE MANUAL JX8200SM [8] ADJUSTMENTS
8 – 8
Содержание JX-8200
Страница 201: ...14 2 ...
Страница 202: ...14 3 ...
Страница 203: ...14 4 ...
Страница 204: ...14 5 ...


