Receiver sockets
F X - 4 0
14
NEW CHANNEL SEQUENCE
In order to ensure that the PCM-G3 system remains compati-
ble with small 5 / 6-channel receivers, the second aileron out-
put has been assigned to channel 5. This results in a different
receiver channel sequence compared to the PCM 1024 sys-
tem. The larger number of channels has also made this neces-
sary.
For compatibility with the PCM 1024 system it is possible to
set the transmitter to any channel sequence you wish by cal-
ling up the “Function” menu.
NOTE:
If you change the channel sequence of the PCM-G3 system,
please ensure that associated functions are assigned to chan-
nels 1 … 6 or 7 … 12. Don’t assign such functions to channels
6 + 7, as this could result in timing differences.
The new method of selecting the model type using graphic
images is used as the basis for selecting the mixer functions;
the software automatically generates a suggested array of
mixer functions according to your selected model type, stick
mode and channel sequence. We recommend that you keep
to these suggestions as far as possible, as this produces a
standard channel assignment which avoids potential confu-
sion.
The “Function” menu clearly displays the outputs to which
particular servos have to be connected, and the transmitter
controls which will operate them. Where two or more servos
are assigned to one function, the corresponding transmitter
controls are also configured correctly.
Within a given model type the configuration is unlikely to vary
significantly. The main difference is that models with more
control surfaces will simply make use of more channels.
This is by no means the case when you switch model types.
For example, if you change the model type from a normal tail
to a tail with two elevator servos (ailvator), the channel
sequence necessarily changes.
As you would expect, the same applies to model gliders, with
and without motor, and to flying wing models with and without
winglets.
The following section contains tables and sketches of servo
connection sequences arranged by model type. The tables
vary according to the selected stick mode; in this case Mode 2
(elevator and aileron right).
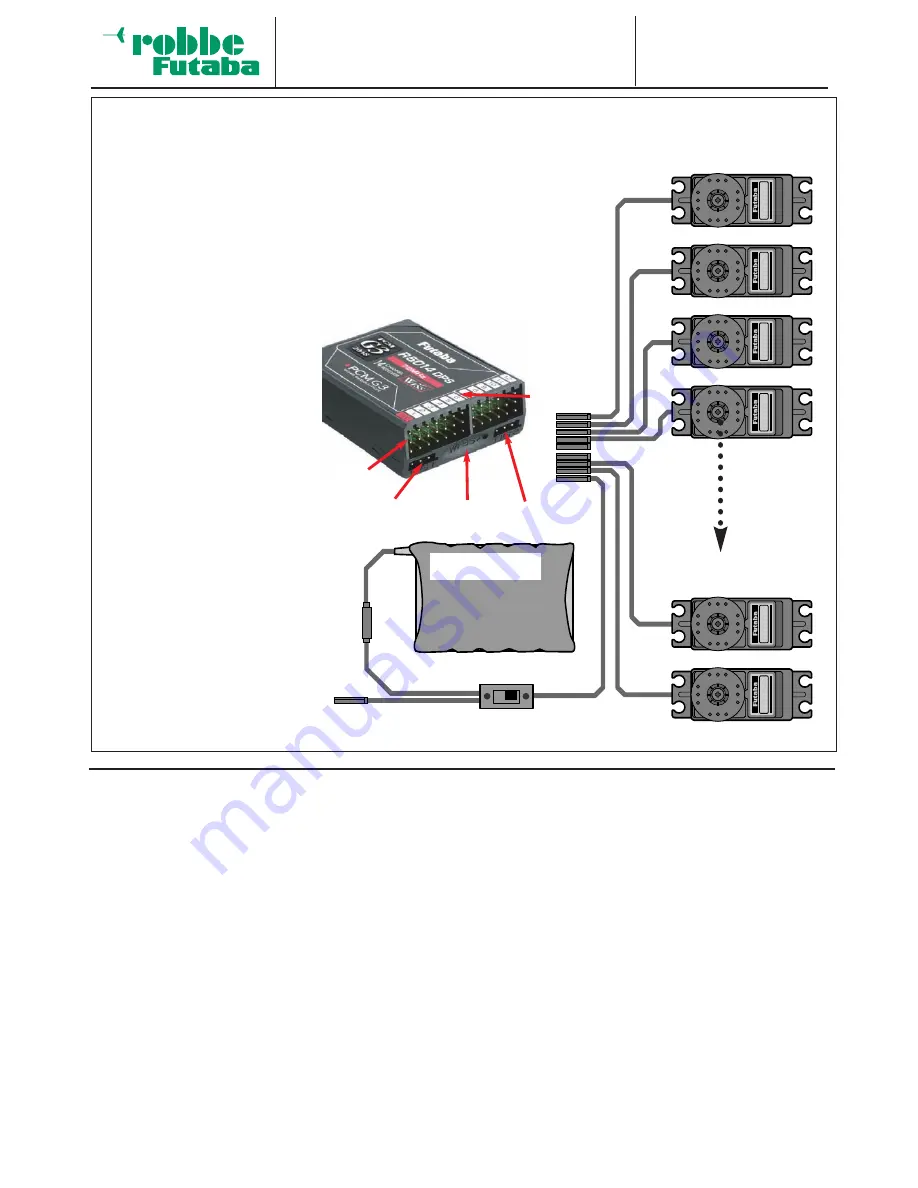
6. CONNECTING SERVOS AND RECEIVER
Connect the servos and the receiver as shown in the diagram.
Socket: B/C
= Receiver battery or DSC lead.
Output 1 … 12
= 1 … 12 proportional channels for servos. As an option two of these
outputs can be expanded to eight channels each by connecting Multi-Decoders.
Outputs DG 1 + 2= 2 switched channel outputs for servos.
Monitor LED
= Indicates status of Wireless Frequency Setting System (WFSS).
1 x flash
= OK, channel changed
Continuous flash = Problem; channel not changed
NOTE:
If a large number of powerful analo-
gue or digital servos is connected,
the standard switch harness supp-
lied in the set will not be capable of
handling the heavy currents drawn.
In such cases it is necessary to use
a suitable high-current power supply
(a so-called Power battery backer)
to supply the servos and receiver.
Ask at a specialist model shop for
details.
On / Off switch
Servos 1..12
Charge socket
Receiver battery
Servos 1...12
DG 2
Monitor LED
DG 1
B/C
B/C


