background image

Chapter 11 Troubleshooting

191

11

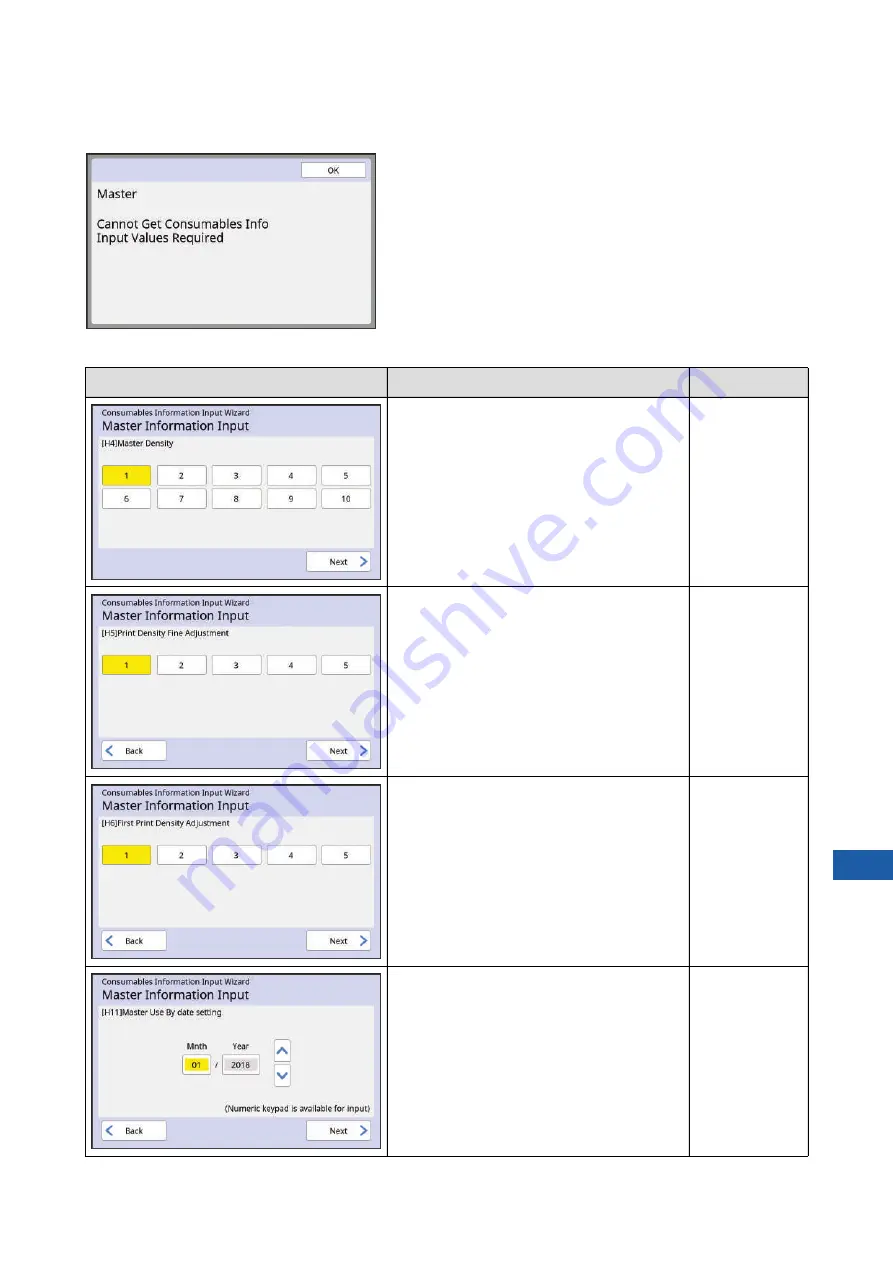
[Master Information Input]

1

 Touch [OK] on the following screen.

2

 Set the items according to the following table.

Screen display

Description

Value

[H4]Master Density

Select the value to obtain the appropriate mas-
ter making density according to the master.

1 (light)
to 10 (dark)

[H5]Print Density Fine Adjustment

Select the value to obtain the appropriate print 
density according to the master.

1 (light)
to 5 (dark)

[H6]First Print Density Adjustment

Select the value to obtain the appropriate print 
density for the first print according to the mas-
ter.

1 (light)
to 5 (dark)

[H11]Master Use By date setting

Set the month and year to display the [F56] 
warning (

A

 185).

Mnth:
01 to 12
Year:
2001 to 2099

Содержание MH 9350

Страница 1: ...ance Troubleshooting Appendix 069 36005 1 2 3 4 5 6 7 8 9 10 11 12 The RISO MH9450 9350 Basic Guide which supports the Read Out Loud feature in Adobe Acrobat Reader is stored in the attached RISO Printer Driver DVD ROM It contains excerpts from the User s Guide this guide explaining the basic operations for printing using paper originals Directory Manual MH9x5x_BasicGuide pdf Recommended operating...

Страница 2: ...na Increase the separation between the equipment and receiver Connect the equipment into an outlet on a circuit different from that to which the receiver is connected Consult the dealer or an experienced radio TV technician for help Contains IC 4819A RFR6 Operation is subject to the following two conditions 1 this device may not cause interference and 2 this device must accept any interference inc...

Страница 3: ...ent of the product Please note that we do not assume any responsibility for the effect of outcomes resulting from the use of this guide and the operation of this machine Trademarks and are trademarks or registered trademarks of RISO KAGAKU CORPORATION in the United States and other countries Microsoft and Windows are either registered trademarks or trademarks of Microsoft Corpora tion in the Unite...

Страница 4: ...r printing using paper origi nals It supports the Read Out Loud feature in Adobe Acrobat Reader Directory Manual MH9x5x_BasicGuide pdf Recommended operating environment for Read Out Loud Windows 10 Adobe Acrobat Reader DC RISO Printer Driver User s Guide This user s guide is included as a PDF file on the attached DVD ROM It explains the operation procedures for printing on this machine from a comp...

Страница 5: ...for installation 12 Precautions for use 13 Consumables 13 Printing of original data 14 Software 14 Originals 15 Printing papers 15 Printing area 17 Materials not to be printed 18 Chapter 1 About This Machine Name and Function of Each Part 20 Paper feeding side 20 Paper receiving side 21 Option 22 Control panel 23 Touch Panel Displays 24 HOME screen 24 Authentication screen 24 Master making basic s...

Страница 6: ... 48 Performing authentication before using this machine 49 Performing authentication operation 49 Releasing the authentication status 50 Chapter 3 Functions for Master Making Functions for Master Making 52 Image Processing That Is Suitable for the Original Image 53 Selecting a Method to Process the Gradation of Photos Dot Process 55 Adjusting the Darkness and Lightness of Photos Contrast Adj 55 Ad...

Страница 7: ...DF 86 Using Paper Memory Original Paper Memory Print 87 Managing the Saved Original Data Storage USB Job List 89 Changing the display style of the list 89 Deleting original data 89 Details of original data 90 Changing to the USB Job List screen 90 Overlaying Original Data on a Paper Original Overlay Mono Color Mode 91 Overprinting Original Data and Paper Originals in Different Colors Stamp Dual Co...

Страница 8: ...112 Changing the settings of Program 113 Changing the name of Program 113 Erasing Program 114 Inserting Slip Sheet Slip sheet sorting 114 Using the Job Separator Job Separation 115 Using the Registered Settings Job Memory 115 Registering Job Memory 115 Retrieving Job Memory 116 Changing the name of Job Memory 116 Erasing Job Memory 116 Extending the Reserve Period Reservation 117 Preventing Blurri...

Страница 9: ... Basic Tab Screen DirectAccess Entry 144 Registering Frequently Used Functions in the Selections Tab Screen Selections Entry 145 Registering the Custom Size Paper Custom Paper Entry 146 Registering the paper size 146 Changing the paper size 147 Changing the name of the paper size 147 Erasing the paper size 148 Connecting to the Network Network Settings IPv4 Network Settings IPv6 148 When connectin...

Страница 10: ... Chapter 9 Replacing Consumables Checking the Remaining Amount of Consumables 164 Setting the Master Roll 165 Replacing the Ink Cartridge 168 Emptying the Master Disposal Box 170 Replacing the Print Drum Cylinder 171 Removing the print drum cylinder 171 Installing the print drum cylinder 172 Collecting and Disposing of Depleted Consumables 173 Ink cartridge 173 Master core 174 Used master 174 Chap...

Страница 11: ...essage Is Displayed 180 How to view the message 180 Example of message 181 When the Consumables Information Input Wizard screen is displayed 189 Troubleshooting 193 Chapter 12 Appendix Optional Accessories 204 Specifications 205 Index 209 ...

Страница 12: ... plug or unplug the power cord with wet hands It may result in electric shock When unplugging do not pull the power cord be sure to hold the plug It could damage the cord and this may result in fire or electric shock If this machine is not used for a long time due to consecutive holidays etc be sure to unplug the power cord to ensure safety Unplug the power cord at least once a year and clean the ...

Страница 13: ... the machine over and may result in injury Do not perform any procedures adjustment repair etc that are not described in this guide When you want to adjust or repair consult your dealer or authorized service representative Allow plenty of ventilation during printing Do not directly touch the thermal print head with your fingers The thermal print head may be heated and cause burns Do not touch the ...

Страница 14: ...ne requires the following space When the optional auto document feeder is installed the values of A to C in the figure above are as fol lows A 1495 mm 58 7 8 inches B 1150 mm 45 3 32 inches C 775 mm 30 1 2 inches This section describes the precautions to be observed and the information that you need to be aware of before using this machine B C A 1570mm 61 13 16 inches 740mm 29 1 8 inches 1115mm 43...

Страница 15: ...cord during operation Do not open covers or move this machine during operation Open and close covers gently Do not put any heavy objects on this machine Avoid excessive impact on this machine This machine contains precision parts and drive mechanisms Perform only the procedures described in this guide Consumables For the ink and master rolls it is recommended to use the products specified by RISO ...

Страница 16: ...7 For more information see the user s guide PDF file included in the DVD ROM RISO Utility Software The following two software programs are included in the CD ROM RISO USB PRINT MANAGER You can manage the information of the original data in the USB flash drive on a computer RISO COPY COUNT VIEWER You can manage the copy count data that was saved or sent by ID Counter Report A 122 For more informati...

Страница 17: ... mm to 310 mm 432 mm 1 31 32 inches 3 17 32 inches to 12 7 32 inches 17 inches Weight 10 kg 22 lb at maximum Size 100 mm 148 mm to 300 mm 432 mm 3 15 16 inches 5 13 16 inches to 11 13 16 inches 17 inches Weight Single sided transfer 50 g m2 to 128 g m2 13 lb bond to 34 lb bond Double sided transfer 52 g m2 to 105 g m2 14 lb bond to 28 lb bond BThe following originals cannot be used in the auto doc...

Страница 18: ...5 Custom size 100 mm 148 mm to 320 mm 432 mm 3 15 16 inches 5 13 16 inches to 12 19 32 inches 17 inches Mono color print with drum cylinder 2 when drum cylinder 1 is set in place Standard size MH9350 B5p A4p B4p A3p Foolscapp C4p MH9450 Ledgerp Letterp Legalp Catalog envelope 10 13 Catalog envelope 9 12 2 Custom size 100 mm 246 mm to 320 mm 432 mm 3 15 16 inches 9 11 16 inches to 12 19 32 inches 1...

Страница 19: ... cylinder In this case lower the print position to allow a larger margin at the top or rotate the top and bottom direction of the original and then make a master again Paper storage Store paper in a dry area Paper containing moisture can result in paper jams or poor print quality Inappropriate paper for printing Do not use the types of paper listed below as it can result in a paper jam Extremely t...

Страница 20: ...nner which violates the laws or infringes on established copyrights even when making copies for personal use Consult your local authorities for further details In general use dis cretion and common sense BThe master making area does not exceed the maximum printing area even when you set large paper BEven when you set Max Scan A 73 master making is not performed within the area of 5 mm 3 16 inches ...

Страница 21: ...Chapter 1 19 1 About This Machine ...

Страница 22: ...idth to prevent misalignment of the paper 5 Paper feed tray A 30 Place the paper on this tray 6 Platen cover A 34 Open close this cover when placing an original 7 Platen cover pad A 177 8 Gauge cover A 34 Useful for adjusting the position of an original 9 Glass platen A 34 Place the original facing down 0 Control panel A 23 Perform the required operations a Memory card slot A 43 Insert a memory ca...

Страница 23: ...ton is lit When the button is not lit press the button to light it up and then pull out the master making unit b Master making unit removal lever A 165 Grip this handle to open the pull out cover of the master making unit c Power switch A 35 d Paper receiving tray A 31 e Paper stopper A 31 Slide this stopper to fit the paper size f Receiving tray paper guides A 31 Slide these guides to fit the pap...

Страница 24: ...occurs to remove the original 2 ADF original guides A 34 Slide these guides to fit the original width to prevent misalignment of the original 3 ADF original receiving tray The original that has been scanned is output to this tray 1 2 3 BFor details about other options A 204 refer to their respective User s Guide ...

Страница 25: ...position after master making c MASTER MAKING key A 35 Press this key to display the master making basic screen d PRINT key Press this key to display the printing process basic screen e AUTO PROCESS key A 28 Press this key to turn on off AUTO PROCESS When AUTO PROCESS is turned on the lamp above the key is lit f WAKE UP key When this machine is in the sleep power sav ing status the key lamp is lit ...

Страница 26: ... func tion A 149 is enabled Operate according to the guidance When PIN Code is used for authentica tion When USB Flash Drive is used for authentication When IC Card is used for authentica tion Master making basic screen This screen is used to set functions for master making Some display items are different between when a paper original is used and when a data original is used For paper original 1 ...

Страница 27: ...s been registered A 72 Using Custom Size Paper Paper Size 4 Auto Process You can change the operation stop timing during printing A 40 Printing from Computer 5 Job Separation This is displayed when the optional Job Separator has been installed Master making mode Quick Master Making A 59 Idling Action A 118 Display Description Touch I to show the information such as Consumables Amount The color of ...

Страница 28: ...er making basic screen Scan basic screen This screen is used to configure settings for scanning a paper original on this machine and saving it as data 1 Message area Shows the status of this machine and operation instructions Touch End to save the scanned original data 2 Basic information area You can configure settings for the original data to be saved File Name A 131 Directory A 131 Owner A 132 ...

Страница 29: ...ursor moving buttons You can move the position to enter a character to the left or right 2 Erase one character button Touch this button to erase characters one by one 3 Change character type buttons You can change the type of characters to enter 4 Character buttons Touch these buttons to enter characters 1 2 3 4 ...

Страница 30: ...hen Auto Process is on After the master making process the printing process starts After the printing process is complete if there is a next original on the optional auto document feeder master mak ing for it starts If the original is placed on the glass platen the operation stops after the completion of the printing process Use this setting when you do not need to check the proof copy or change t...

Страница 31: ...29 2 Chapter 2 Basic Operations ...

Страница 32: ...s the procedure to set up the paper feed tray and paper and the procedure to set up the paper receiving tray Placement of originals A 33 Describes the procedure to place originals on the glass platen and the optional auto document feeder Printing of paper originals A 35 Describes the procedure to scan and print paper originals Dual color printing A 35 Mono color printing A 37 Printing from a compu...

Страница 33: ...eceiving tray 1 Open the paper receiving tray While holding the paper receiving tray with your hand open it until it stops BThis machine identifies the paper size according to the position of the feed tray paper guides If the feed tray paper guides do not fit tightly to the paper the paper size cannot be identified correctly BWhen you are using custom size paper specify the paper size on the contr...

Страница 34: ...per arranger press down the paper arranger knob To close a paper arranger pull up the paper arranger knob For normal paper Open all four of the paper arrangers When a printed area is concen trated on one side of the page Open the paper arrangers on the side with more printed ink For thick paper Open only the paper arrangers that are close to the machine BThe optimal position of the receiving tray ...

Страница 35: ... tray Placement of Originals Relation of original and paper orienta tions Make sure that the orientations of the original and the paper are as shown below Short edge paper feed Long edge paper feed Originals can be scanned by using the glass platen or the optional auto document feeder BWhen Layout A 73 Multi Up Print A 75 or 2 Up A 80 is selected the ori entations of the original and the paper var...

Страница 36: ... width of the original BWhen a gauge cover is attached on the glass platen place the original under the gauge cover You can lift the gauge cover from the lower right BClose the platen cover gently Forcefully closing the platen cover will cause damage to the glass platen or original scanning errors Gauge cover BFor the auto document feeder the size and the number of originals to be placed are limit...

Страница 37: ...the paper feed tray and the paper This section describes the procedure to scan and print paper originals BBy using the following functions you can assign one area of an original to print drum cylinder 1 and another area of the original to print drum cylinder 2 in order to per form master making separation for dual color printing C Separation A 59 C Rec Preview A 69 C Editor BWhen an authentication...

Страница 38: ...n the proof copy A 96 Functions for Printing 15 Press the START key The printing process starts 16 Remove the printed copies Fold the receiving tray paper guides outward so the printed paper can be removed easily BThe size of the placed paper is dis played in Paper in the master mak ing basic screen If the displayed size is different from the size of the placed paper place the paper again BThe pos...

Страница 39: ...ent feeder and the ADF Semi Auto setting A 84 is turned on master making for the next original starts automatically Repeat the procedure from step 14 for each original BTo cancel the authentication status press the WAKE UP key The authentication status is also cancelled when the time that is set in Auto Sleep A 143 or Auto Clear A 141 elapses BWhen using print drum cylinder 2 for mono color printi...

Страница 40: ...ch the print drum cylinder that is used CWhen the reproduction size becomes a standard size that exceeds the A4 Letter size print drum cylinder 2 is used CWhen the reproduction size becomes a standard size that does not exceed the A4 Letter size print drum cylinder 1 is used BIf print drums cylinders 1 and 2 have the same color and size you cannot select l BThe size of the placed original is dis p...

Страница 41: ... output several proof copies to ensure the usability and stability of the ink You can out put proof copies continuously by holding down the PROOF key BA warning message appears dur ing printing if you use only print drum cylinder 2 with the com pleted master still loaded on print drum cylinder 1 Follow the instructions on the screen BTo stop the printing process press the STOP key BTo print more c...

Страница 42: ...per or do other necessary work ID print This setting is useful for printing highly confidential originals Coloring tab screen You can configure the mono color and dual color printing settings Other printing settings For more information see the RISO Printer Driver User s Guide DVD ROM 6 Click OK The Print dialog box is displayed 7 Click Print 2 The original data is printed according to the printer...

Страница 43: ...s 4 to 5 for each page When Pause before Print is selected After master making of each page is performed auto matically a proof copy is output and then the opera tion pauses 1 Check the printing conditions Check the printing position and density on the proof copy Perform the required settings as necessary 2 Press the START key The printing process starts After the printing process is complete mast...

Страница 44: ...ss is complete the operation pauses and then master making of the next page starts Repeat steps 2 to 5 for each page When ID print is set 1 Check that the master making basic screen is displayed If a screen other than the master making basic screen is displayed press the MASTER MAK ING key A 23 2 Touch Pause 3 Touch ID Print Job Perform job identification according to the instructions on the scree...

Страница 45: ...n this machine A 45 Printing the Saved Original Data Printing the original data that is overlaid on a paper original A 91 Overlaying Original Data on a Paper Origi nal Overlay Mono Color Mode A 92 Overprinting Original Data and Paper Originals in Different Colors Stamp Dual Color Mode BTo use Storage it is necessary to install a memory card in this machine BThe original data that was saved uses th...

Страница 46: ...inal position and then turn the thumbscrew clockwise to tighten it Removing the memory card 1 Push in the card until you hear a click sound 2 Slowly release your finger The card is ejected With your fingers pinch and pull out the card BDo not loosen or remove any screws other than the screw that is specified in the figure BBe sure to insert the card into the correct direction If the card is insert...

Страница 47: ...the paper feed tray and the paper 4 Check the paper receiving tray A 31 Setting up the paper receiving tray BWhen you place several originals on the optional auto document feeder at the same time the same scan ning conditions are applied to all of the originals BTo exit the scan mode press the HOME key You can print the original data that is saved using the following methods Storage Original data ...

Страница 48: ... the following page A 24 Touch Panel Displays 12 Enter the number of copies to be printed using the numeric keys 13 Press the START key When Auto Process is ON Master making is followed by the printing pro cess When Auto Process is set to other than ON Perform the necessary operation according to the settings A 41 When Auto Process is set to other than ON BDepending on the type of original data on...

Страница 49: ...saved in another folder touch the folder tab When there are 6 or more original data files touch F or G to change the display 4 Touch Details 5 Check the original data to be printed 6 Touch Retrieve Follow steps 10 to 13 in Printing from Stor age for the rest of the procedure BYou cannot print any original data PDF file etc that is saved with another method BDo not remove the USB flash drive until ...

Страница 50: ... Print set in the scan mode A 43 Saving Paper Original as Data Original data with ID print set in the printer driver For the setting procedure see the RISO Printer Driver User s Guide DVD ROM Follow the steps below to display ID data in the Stor age Selection screen or the USB Job List screen 1 Touch View edit 2 Touch ID Print Job 3 Touch OK The ID data is displayed in the Storage Selec tion scree...

Страница 51: ...ayed as j 2 Touch OK When the authentication screen disappears this machine can be used Using a USB flash drive 1 Insert the registered USB flash drive into the USB slot When the authentication screen disappears this machine can be used Remove the USB flash drive from the USB slot The authentication status remains even after the USB flash drive has been removed Using the IC card reader option 1 To...

Страница 52: ...ntication status 1 Press the WAKE UP key that is lit In the authentication status the WAKE UP key A 23 is lit even when the machine is not in sleep mode If you press the WAKE UP key in this status authentication is released BIf the authentication status is not released this machine will become available to other users BThe authentication status is auto matically released after the speci fied time ...

Страница 53: ...51 3 Chapter 3 Functions for Master Making ...

Страница 54: ...dow A 57 You can erase or reduce the shadow in the binding section of books Ink Saving A 58 You can reduce the amount of ink consumption Quick Master Making A 59 You can shorten the time required for master mak ing Separation A 59 You can separate an original by color for dual color printing Rec Preview A 69 You can easily select a separation method that is suitable for the original Size A 70 You ...

Страница 55: ... if this machine cannot be connected to a com puter you can still perform high resolution printing similar to printing that is performed directly from a computer Storage USB Job List A 89 You can manage the original data that is saved in this machine or a USB flash drive Overlay A 91 You can overlay the original data that is saved in Storage or USB Job List on a paper original Stamp A 92 When perf...

Страница 56: ...he condi tion for Portrait below does not apply to the original Portrait Select this option for photos that show the upper half of the body of up to two persons The image is processed so that the faces are especially printed clearly Type Description Standard Select this option when you want to reproduce characters and pho tos with good balance This option is also suitable for colored originals Lin...

Страница 57: ...es 4 Equivalent to 53 lines 3 Touch OK Adjusting the Darkness and Light ness of Photos Contrast Adj 1 Touch Contrast Adj in the Func tions tab screen 2 Touch a target setting button OFF The Contrast Adj processing is not performed Lighter Darker parts are expressed more clearly Select this option when a dark object is not clearly seen in an overall dark photo Darker Lighter parts are expressed mor...

Страница 58: ...hoto in incremental levels B Tone Curve can only be selected when a setting other than Line is specified for Image A 53 BCannot be used with the following function C Color Separation Photo Color Separation Setting Description 1 Reduces the range that is expressed in bright colors The fine parts within the bright range becomes more visible 0 Applies standard processing 1 Enlarges the range that is ...

Страница 59: ...hen you scan an original that is bound at the cen ter such as a book it is possible to erase or reduce the shadow of the binding section BBe sure to align the original to the cen ter along the left side of the glass platen and place the original in the direction shown below BWhen a gauge cover is attached on the glass platen remove it If you use Book Shadow with the gauge cover attached the area a...

Страница 60: ...ther than Auto the shadow gener ated around the original is not erased BWhen Page split is set the origi nal is scanned twice Do not move the original until the scan ning is complete Paper feeding direction Short side Long side By turning on Ink Saving when making a master you can reduce the amount of ink consumption dur ing printing BWhen Ink Saving is turned on the print density becomes lower BE...

Страница 61: ...5 C 2 Up A 80 C Book Shadow A 57 C Binding Margin Adj A 82 C Preview A 83 C Editor C Paper Memory Print A 87 C Storage A 89 C USB Job List A 89 C Overlay A 91 C Stamp A 92 BWhen Quick Master Making is set Auto 90 Rotation A 141 under Admin can not be used Quick Master Mak ing Icon OFF ON When Quick Master Making is turned on the icon in the message area is changed This function is dedicated for du...

Страница 62: ...p the paper feed tray and the paper 4 Set the paper receiving tray A 31 Setting up the paper receiving tray 5 Touch Separation in the Func tions tab screen BYou cannot use this function with the fol lowing functions C Rec Preview A 69 C Multi Up Print A 75 C 2 Up A 80 C Layout A 73 C Binding Margin Adj A 82 C Book Shadow A 57 C Stamp A 92 C OneSide MasterMake A 101 BYou can select one of the Separ...

Страница 63: ... yel low green parts and the rest BThe lower right part of the screen displays the print drum cylinder to which the original is assigned k Print Drum 1 or l Print Drum 2 Touch Sw Color to switch the print drums BThe print result varies with the ink colors The following illustrations show examples of when k Print Drum 1 and l Print Drum 2 are black and red respectively The illustrations do not accu...

Страница 64: ...ing conditions A 52 Functions for Master Making 12 Press the START key Scanning of the original starts 13 Check if separation is performed as intended The Preview screen A 83 is displayed after scanning the original Touch Continue to start master making Touch Editor to move to the Editor editing screen You can use the touch panel to change the areas that you want to separate Original Separation re...

Страница 65: ...Separation in the Func tions tab screen 6 Touch Color Separation 7 Touch Photo Color Separation 8 Touch Next 9 Check the settings Using Auto is recommended in most cases Black Red When printing with black and red drum colors the original is separated at optimum conditions Blue Red When printing with blue and red drum colors the original is separated at optimum conditions BIf you use Photo Color Se...

Страница 66: ...on the original A range of 1 mm to 3 mm 3 64 inch to 1 8 inch is available for the pen width The original is separated into inside and outside of the specified area 1 Draw pen frames to enclose the areas that you want to separate on the original Original Separation result BWhen using Specified area you can not select Auto under Contrast BEnsure that the ends of the pen frame are connected If the e...

Страница 67: ...ing more than 20 frames results in an error BKeep at least 3 mm 1 8 inches between pen frames If frames are too close to each other or over lap the frames are not recog nized as pen frames BKeep a pen frame approximately 3 mm 1 8 inches away from any letter or image on the original The area within approximately 3 mm 1 8 inches from the frame will be missing BDo not double a pen frame The inside fr...

Страница 68: ...tracing paper that has the same size as the original 2 Display the master making basic screen for dual color mode In the HOME screen A 24 touch m Dual Color 3 Place the tracing paper When using the glass platen Place the tracing paper with the scanning side the side on which pen frames are drawn fac ing down and align the center of the tracing paper with the H mark Then close the platen cover When...

Страница 69: ...Touch Editor to move to the Editor editing screen You can use the touch panel to change the areas that you want to separate Color editor Select this option for originals that do not contain pho tos You can perform separation by using the touch panel to specify the area You can perform separation not only for paper origi nals but also for original data that is saved in Storage or USB Job List BThe ...

Страница 70: ...ation in the Func tions tab screen 6 Touch Color editor 7 Touch OK 8 Touch Scan New Page 9 Touch OK Scanning of the original starts When scanning is complete the edit screen is displayed For information on further operations see the separate volume RISO Editor User s Guide BYou can skip this step when you separate original data that is saved in Storage or USB Job List Print drum cylinder 1 Outside...

Страница 71: ...n making a mas ter for each drum separation When you use Rec Preview the results of the three types of separation are displayed in the pre view screen before making a master for compari son You can check the preview images and intuitively select the most appropriate separation method BWhen you use Rec Preview Image and Contrast are automatically set to Line and Auto respectively For orig inals tha...

Страница 72: ...e paper are a standard size BThe preview image shows the result when printing is performed with the colors of the print drums cylinders that are installed on this machine Touch Sw Color to switch between the images of print drums cylin ders 1 and 2 BBy touching Preview you can enlarge and check the selected pre view image You can scan an original so that it is enlarged or reduced in size BImage pa...

Страница 73: ...te using either of the following methods Entering a numeric value using the numeric keys Touching F or G 4 Touch OK Zoom 1 Touch Size in the Basic tab screen 2 Touch Zoom 3 Change the magnification rate You can change the magnification rate using either of the following methods Entering a numeric value using the numeric keys Touching F or G 4 Touch OK B Margin cannot be selected when you have sele...

Страница 74: ...owever when custom size paper is set the paper size is not detected automatically You need to select an appropriate paper size for Paper Size before master making BIf you use custom size paper while Auto is selected for Paper Size the printed image may be missing or the print drum cylinder may be stained BThe paper sizes that can be used depend on the print mode A 15 Paper size BThe paper size to ...

Страница 75: ...ntire area of the glass platen is not stained Even a stain that is located outside the origi nal may cause the rollers in this machine to be stained with ink as this stain is also included in the master to be made BTightly close the platen cover during master making If there is a gap under the platen cover the shadow of the original is included in the master causing the rollers in this machine to ...

Страница 76: ...ylinder 1 over pages 1 to 4 of the original for print drum cylin der 2 BIn dual color mode the number of pages of the original for print drum cylinder 1 must be the same as the specified number of copies When you have less pages than copies add blank sheets to the pages so that the numbers of pages of the original and copies become equal BUse a standard size of paper You cannot use custom size pap...

Страница 77: ...aper Multi Up Print Single Original Lays out multiple copies of one original on a single sheet of paper Mono color mode Prepare a sheet of the original Dual color mode Prepare a set of originals for print drums cylinders 1 and 2 BTo cancel Layout perform step 4 again and display the setting screen Touch OFF and then OK The process for laying out multiple originals on a single sheet of paper is ref...

Страница 78: ...r placing the original varies depending on the number of copies of original to be laid out on a single sheet of paper 2 up 1 4 up 1 8 up 2 16 up 2 2 1 1 1 2 2 4 3 2 1 4 3 2 1 1 1 1 1 2 2 2 2 3 3 3 3 4 4 4 4 Original Final Original Final 1 1 1 1 1 For 2 up and 8 up printing For 4 up and 16 up printing BThe glass platen cannot be used with the optional auto document feeder If you place the first ori...

Страница 79: ...ch OK 12 Set the other required printing conditions A 52 Functions for Master Making BUse a standard size of paper You cannot use custom size paper or paper sizes that are registered in Admin BFor 4 up and 16 up printing touch an original size button that shows a i symbol Paper feeding direction Short side Long side BThe magnification rate is automati cally calculated using the selected original s...

Страница 80: ... of the original can be specified between 50 mm and 210 mm 2 inches and 8 1 4 inches Note that a margin of 5 mm 3 16 inches or more is required around the original Example Short side of the original 50 mm 2 inches Long side of the paper 297 mm 11 11 16 inches A4 size 297 50 5 remainder 47 Five copies of the original are laid out on a single sheet of paper and the remaining area will be a blank spa...

Страница 81: ...f the original You can specify the short side length using either of the following methods Entering a numeric value using the numeric keys Touching F or G 12 Touch OK 13 Set the other required master mak ing conditions A 52 Functions for Master Making A 108 Useful Functions BUse a standard size of paper You cannot use custom size paper or paper that are registered in Admin BWhen you set Size in st...

Страница 82: ... and then OK The process for laying out multiple originals on a sin gle sheet of paper is referred to as Multi Up Print The 2 Up function enables 2 up printing laying out two copies of an original side by side of Multi Up Print A 75 to be performed with fewer steps BYou cannot use this function with the fol lowing functions C Book Shadow A 57 C Layout A 73 C Top Margin Adj A 81 C Binding Margin Ad...

Страница 83: ... G 4 Touch OK BThe reduction and enlargement rates are different from the standard magnification rates Specify a mag nification rate that is shown in the tables below Original A4 B5 A5 B6 Printing Paper A3 100 116 141 163 B4 87 100 122 141 A4 71 82 100 116 B5 61 71 87 100 Original A6 B7 A7 B8 Printing Paper A3 200 B4 173 200 A4 138 163 200 B5 122 141 173 200 Original Letter Statement Printing Pape...

Страница 84: ...le originals on the optional auto document feeder you can perform master making for all originals with the master making position shifted BIf there is insufficient margin for an original and you shift the master mak ing position to extend the margin on one side some images may be missing on the other side BYou cannot use this function with the fol lowing functions C Layout A 73 C Multi Up Print A ...

Страница 85: ...ange the magnification rate so that the whole view of the original data image fits in the display area 6 Use these buttons to move the display position 7 Shows the original data image Touch an image to move its display position so that the touched image is displayed in the center of the screen 8 In the case of originals for dual color printing the tab buttons below are displayed Touch the tab butt...

Страница 86: ...Close ADF Semi Auto is displayed when the optional auto document feeder has been installed When you place originals on the auto document feeder and turn on ADF Semi Auto the printing flow will be as shown below As the operation stops after master making is complete you can check a proof copy before a large amount of printing As master making for the next page starts auto matically after the printi...

Страница 87: ...tart of master making 8 Touch Yes Master making starts The basic screens for master making and print ing for a data original are displayed You can print in reverse order of the scanning order of paper originals This option is useful when you want to place the first page of the printed paper on the top in the paper receiving tray BTo use Output reversal it is necessary to install a memory card in t...

Страница 88: ...You can specify which side of the original is scanned when the optional auto document feeder is used BYou can change the default setting in Scanning Side ADF A 139 under Admin BYou cannot use this function with the fol lowing function C Top Margin Adj A 81 1 2 3 1 2 3 Original Printed paper k l k l k l Set 1 Set 2 Set 3 Set 3 Set 2 Set 1 k and l represent the originals from which the masters are m...

Страница 89: ... the RISO Printer Driver function you can convert original data created on a computer into a digital pattern and then print it with a laser printer The paper is called a Paper Memory Original You can use the Paper Memory Print function of this machine to reproduce and print the source original data from the Paper Memory Original A laser printer of 600 dpi or more is required to create a Paper Memo...

Страница 90: ...tion of paper originals A 35 Printing of Paper Originals BThis machine may not be able to scan the Paper Memory Original properly in the following cases CThe glass platen or platen cover pad is stained CThe Paper Memory Original is stained wrinkled or creased BUse the margin as shown below to write notes on the Paper Mem ory Original If anything is written in other areas of the Paper Mem ory Origi...

Страница 91: ...that you want to delete You can also select multiple original data items 3 Touch Clear This section describes how to use the screen to retrieve the saved original data Operation in the Storage Selection screen is explained as an example The operation procedure is the same in the USB Job List screen For the saving method see the page below A 43 Saving Paper Original as Data For the printing method ...

Страница 92: ...t Touch this button to display the Output screen You can change the printing order ascending descending and limit the pages to be printed odd even specified pages Preview Touch this button to display the Preview screen You can check the original data image A 83 Checking the Original Data Image Pre view 5 Touch Retrieve Touch Retrieve to print the original data Touch Cancel to immediately close the...

Страница 93: ...b List 3 Touch Details The Storage Retrieve screen is displayed If you use a USB flash drive the USB Job List screen is displayed instead 4 Touch Retrieve 5 Perform the operations required for printing The rest of the procedure is the same as the normal printing operation of paper originals A 35 Printing of Paper Originals This function is dedicated for mono color mode You can overlay the original...

Страница 94: ... saved data that you want to register This function is dedicated for dual color mode By making a master of the paper original using print drum cylinder 1 and by making a master of the original data stored in Storage using print drum cylinder 2 you can perform dual color printing For example logo marks and the like that are saved in advance can be printed in a different color from the main text of ...

Страница 95: ...fore making a master if the directions of Stamp Data and the paper origi nal are aligned BOnly one page in one color can be registered to Stamp Data For saved data with multiple pages or dual color display the thumbnail of the page in the color that you want to use BTouch Change Data to return to step 3 and select the data again BIn the Stamp Data screen you can perform the following operations in...

Страница 96: ...Chapter 3 Functions for Master Making 94 7 Press the START key The subsequent operations are the same as steps 13 A 36 and later in Dual color print ing ...

Страница 97: ...95 4 Chapter 4 Functions for Printing ...

Страница 98: ...ter again using the image that was used for the latest master making Auto Page Renewal A 101 Master making is automatically performed again each time a specified number of sheets has been printed OneSide MasterMake A 101 During dual color printing you can replace the origi nal and remake a master for only one of the print drums cylinders Special Paper Ctrl A 102 You can adjust the paper feeding an...

Страница 99: ...r printing while print drum cylinder 1 is removed High Speed cannot be used when the standard size of paper is A4 portrait or B5 B High Speed is available when the temperature in the print drum cylinder is 15 C 59 F or higher If the print drum cylinder is cool increase the room temperature or print at speed 5 for a while and wait until the print drum cylinder is sufficiently warm BSome types of pa...

Страница 100: ... the standard position during the printing process press and hold the P key BWhen Fine Adjust Mode in the Functions tab screen is turned on you can adjust the print position by approximately 0 1 mm 1 254 inches If Fine Adjust Mode is not displayed consult your dealer or authorized service representative Vertical direction Horizontal direction BThe shifted length that is displayed on the screen is ...

Страница 101: ...ric keys Touching F or G 4 Touch OK BIf you individually adjust the posi tions of both drums the positions are aligned at the latest adjusted position of the drum Printed paper is output at a high speed on this machine Depending on the paper ink on a printed sheet may not be dried sufficiently This ink may smear on the back surface of the next printed sheet In this case set a longer interval until...

Страница 102: ...eteriorated during the printing process of a large amount of sheets In this case as the master is replaced with a new one by selecting Renew Page while the current setting remains as it is the print quality can be maintained at a constant level BNote that Renew Page is not available under the following conditions CMaster making has never been per formed after turning on the power switch of this ma...

Страница 103: ...ster is made again automatically each time a specified number of sheets has been printed Therefore the printing process can be continued As the master is replaced with a new one before it is deteriorated the print quality can be maintained at a constant level BIt is necessary to select ON for Auto Page Renewal A 142 under Admin B Auto Page Renewal turns off in the following cases CWhen Program is ...

Страница 104: ...Conditions Special Paper Ctrl Paper feeding adjustment for special paper You can adjust the paper feeding conditions depend ing on the characteristics of the paper 1 Touch Special Paper Ctrl in the Functions tab screen 2 Touch Paper Feed Adj 3 Touch Manual You can adjust the paper feeding and paper receiv ing conditions when using special paper or when unevenness and blurring occur in printed imag...

Страница 105: ...4 Touch OK The Special Paper Ctrl screen is displayed 5 Touch Close Registering the adjustment values It is useful if you register the adjustment values that you have set in Paper Feed Adj and Paper Eject Adj as the values can be used repeatedly 1 Change the settings for Paper Feed Adj and Paper Eject Adj For the procedure to perform settings see A 102 2 Touch Entry Call BIt is useful if you regis...

Страница 106: ...the Functions tab screen 2 Touch Entry Call 3 Touch Retrieve 4 Touch the button for the settings that you want to retrieve The Special Paper Ctrl screen is displayed Check that the name of the retrieved adjust ment values is displayed Changing the adjustment value set tings 1 Retrieve adjustment values Perform steps 1 to 4 in Retrieving the adjust ment values 2 Change the settings for Paper Feed A...

Страница 107: ...hange 5 Change the name A 27 Rename screen 6 After entering a new name touch OK The Parameter List screen is displayed 7 Touch Close The Special Paper Ctrl screen is displayed Erasing the adjustment values 1 Touch Special Paper Ctrl in the Functions tab screen 2 Touch Entry Call 3 Touch Clear 4 Touch the button that you want to erase 5 Touch OK in the confirmation screen The Parameter List screen ...

Страница 108: ...cial settings are required For more information consult your dealer or authorized service representative BYou can change the default setting in Jump Wing Control A 139 under Admin Paper jumping wings This machine is equipped with the D Feed Check function which automatically stops printing when the feeding of overlapped sheets of paper double feeding is detected D Feed Check is on as a factory def...

Страница 109: ...107 5 Chapter 5 Useful Functions ...

Страница 110: ...Display A 121 You can check the accumulated results for the count of master making processes and the number of copies that have been printed ID Counter Report A 122 You can output the total results for the count of mas ter making processes and the number of printed copies Service Info Mail A 126 You can send the operation history of this machine to e mail addresses that have been specified in adva...

Страница 111: ...ti Page Mode A 111 Setting Combination dual color mode For printing by retrieving a registered Program set ting A 112 Retrieving Program Setting Single Page Mode 1 Touch Program in the Functions tab screen The Program Type screen is displayed 2 Touch Single 3 Enter a value in Cps using the numeric keys You can enter a value into the active entry field 1st original 10 copies 20 copies 30 copies Up ...

Страница 112: ...ntry field 4 Change the target for entry to the next field Press the key or the U key It is also possible to select the entry field by directly touching the target Repeat steps 3 to 4 as necessary BTo clear all entered values touch Clear All BThe total of the entered number of copies is displayed at the top of the screen BIf you want to register the pro grams that are set in this screen touch Entr...

Страница 113: ...layed When you press the START key printing can be performed according to the program that you set When printing from a computer When Combination print is set in the printer driver this machine stops after master making of the first page The Combination setting screen is displayed on the control panel Set the number of printed copies for each group After setting press the START key to start printi...

Страница 114: ... to 7 in Setting Combination dual color mode A 111 2 Touch Entry Call 3 Touch a button for which nothing has been registered The button for which nothing has been regis tered is outlined with a solid line You cannot touch a grayed button as the settings have already been registered A confirmation screen is displayed 4 Touch OK in the confirmation screen The program that has been set is registered ...

Страница 115: ...to the changed program settings When you touch Cancel the basic screen is displayed with Program remaining off Changing the name of Program 1 Touch Program in the Functions tab screen The Program Type screen is displayed 2 Touch Program List 3 Touch Rename 4 Touch the button whose name you want to change 5 Change the name A 27 Rename screen 6 After entering a new name touch OK The Program List set...

Страница 116: ...he auto document feeder turn on Slip sheet sorting to insert a slip sheet blank sheet each time the original changes When you use Program A 108 together with Slip sheet sorting a slip sheet blank sheet is inserted between each separation of the printing When used with Auto Page Renewal A 101 a slip sheet blank sheet is inserted before master making again B Slip sheet sorting can be used when the f...

Страница 117: ... on the auto document feeder turn on Job Separation to insert a piece of tape each time the original changes When you also use Program A 108 together a piece of tape is inserted in each separation of the printing When used with Auto Page Renewal A 101 a piece of tape is inserted before master making again For more information see the user s guide for the Job Separator BThis function works only whe...

Страница 118: ...er entering a new name touch OK The Job Memory screen is displayed 6 Touch Close The basic screen is displayed Erasing Job Memory 1 Touch Job Memory in the Func tions tab screen The Job Memory screen is displayed BWhen you want to change the set ting of any function touch Cancel and then Close to go back to the basic screen Then revise the set ting of the function BYou can also display the Job Mem...

Страница 119: ... the next day 1 Touch Reservation in the Func tions tab screen This function is useful when this machine is con nected to a computer During the printing operation on this machine another person may send a print instruction for the original data from a computer Even if this machine has been left untouched after the operation stops master making of the received original data does not start until a c...

Страница 120: ... master making As this function enables clear printing from the beginning you can save paper B Idling Action is a function that is per formed during master making If you perform the printing process only Idling Action is not performed BWhen Idling Action is performed the time required for master making becomes longer BYou can set Idling Action to be performed automatically during the next master m...

Страница 121: ...master that has been made is still loaded on the print drum cylinder in the print ready status When Confidential is turned on the master that has been made is discarded Therefore you can prevent improper printing of confidential docu ments As a blank master is loaded on the print drum cylin der the master also plays the role of a cover to prevent ink in the print drum cylinder from drying out when...

Страница 122: ...ot touch a function name that has already been registered 5 Touch OK The My Direct Access screen is displayed When you want to register another function but ton repeat steps 3 to 5 6 Touch OK If you perform the authentication operation to use this machine you can change the functions to be registered in the Direct Access Area in the Basic tab screen as you want You can register a function to the D...

Страница 123: ...ulated count of master mak ing processes that have been performed on this machine The value includes the count of Idling Action and Confidential that have been performed Print Drum 1 Meter Print Drum 2 Meter Shows the accumulated number of copies that have been printed using the current print drum cylinder The value includes the count of proof copies that were output during master making To check ...

Страница 124: ... CSV format file to a USB flash drive Before touching ID Counter Report you must insert the USB flash drive into the USB slot You can print the total counts of master making pro cesses and the total number of printed sheets of all users You can also save these data to a file BTo manage and calculate the total num ber of copies High Full Management must have been set for Management Level in User Ma...

Страница 125: ...eys Touching G or F 5 Touch OK The ID Counter Report screen is displayed 6 Touch Close BWhen you set any date from 29 to 31 the report screen is displayed on the last day of the month if the specified date does not exist in the month for example February BOnce you specify a date for Set Date a warning screen is displayed each time the power is turned on until Report Output A 122 is per formed If y...

Страница 126: ...me for SMTP authentication Password When you have selected the Use option for Use SMTP Authentication enter the pass word for SMTP authentication SMTP Server Name Enter the SMTP server name Sender Address Enter an e mail address of a person such as a person in charge of managing this machine Receiver Address Port No Enter the port number of the SMTP server You can send the total count report of ID...

Страница 127: ... Subject Enter a subject for the e mail that indicates the result of e mail transmission as necessary Signature Enter a signature to be contained in the body of the e mail that indicates the result of e mail transmission as necessary 8 Click OK located at the bottom of the screen The settings that you changed are applied 9 Check that the E mail button is available in the ID Counter Report screen o...

Страница 128: ...ve selected the Use option for Use SMTP Authentication enter the pass word for SMTP authentication SMTP Server Name Enter the SMTP server name Sender Address Enter an e mail address of a person such as a person in charge of managing this machine Receiver Address You can specify any e mail destination Port No Enter the port number of the SMTP server Subject Enter a subject for the e mail as necessa...

Страница 129: ...e mail that indicates the result of e mail transmission as necessary Signature Enter a signature to be contained in the body of the e mail that indicates the result of e mail transmission as necessary 8 Click OK located at the bottom of the screen The settings that you changed are applied 9 Check that the Service Info Mail button is available in the Func tions tab screen of this machine Sending e ...

Страница 130: ...Chapter 5 Useful Functions 128 ...

Страница 131: ...129 6 Chapter 6 Functions for Scanning ...

Страница 132: ...n set the processing that is suitable for the type of original Dot Process A 55 You can set the processing method to express the gradation of a photo Contrast Adj A 55 You can change a blurry photo to a sharp final output Tone Curve A 56 You can adjust the tone of bright parts and dark parts in originals such as a photo Contrast A 56 You can adjust the contrast according to the paper color and the...

Страница 133: ... no USB flash drive is inserted you cannot select USB 4 Touch ID Print or Non ID Print You can set the name of the original data that is to be displayed The set File Name is displayed in the Storage Selection screen or the USB Job List screen A 89 Managing the Saved Original Data Stor age USB Job List Set the directory of the original data You can specify the folder into which the data is to be sa...

Страница 134: ...cation opera tion This function is useful when you want to control highly confidential originals Non ID Print The data is saved in the list of Non ID Print under Storage or USB The original data that is saved in this list is always dis played when someone performs the authentication operation BYou can change the name of the Storage folder in Folder Renam ing A 140 under Admin BYou can change the n...

Страница 135: ...e Original Data Format 1 Touch Format in the scan basic screen 2 Touch the size that you want to set 3 Touch OK You can set the saving size in the following cases If the size of an original has not been automati cally detected If you want to save original data with a size that is different from the original size BThis item is set to Auto by default When a standard size original A4 B5 etc is used t...

Страница 136: ...he print drum cylinder whose color you want to change 4 Touch the button of the color that you want to specify 5 Touch OK The Color screen is displayed 6 Touch OK In saved data you can specify in advance the print modes and colors that will be used for later printing This function is useful because the specified colors are shown in the screen when you perform printing You can also use colors other...

Страница 137: ...135 7 Chapter 7 Setting the Operation Conditions ...

Страница 138: ...uttons display a setting screen when they are touched and other buttons switch between on and off when they are touched 3 Description For some items the current settings are dis played Exiting the Admin screen 1 Touch Exit The basic screen is displayed You can change the default values and set the sys tem control related settings in order to make this machine more convenient for use BIf the Admin ...

Страница 139: ...an change the method for displaying the long file names on the screens that display a list of original data Job List Storage Selection and USB Job List From top From bottom Metric Inch Switch displayed only for MH9450 You can switch the unit to be used for the screen display The types of papers to be handled also switch in accordance with the displayed unit When inch is selected Legal Ledger etc W...

Страница 140: ...he Separation function button becomes disabled Text Color Sep Set You can change the default setting of Color Separation Text Color Separation A 60 Red Separation Blue Separation Green Sep aration Warm Cool Color Sep Chromatic Separation Reproduction Size You can change the default setting of Size A 70 100 Auto Print Speed You can change the default setting of the print speed A 96 1 2 3 4 5 Print ...

Страница 141: ...default setting of Directory A 131 in the scanning mode 1 to 6_FOLDER Quick Master Making You can change the default setting of Quick Master Making A 59 OFF ON BWhen this setting is ON the default state of the Pre view A 83 is OFF even in dual color mode Scanning Side ADF You can change the default setting of Scanning Side ADF A 86 when single sided originals are scanned with the optional auto doc...

Страница 142: ...B cable For more information on how to use the IS300 see the user s guide for the IS300 OFF ON Network Settings IPv4 This item is set for connecting this machine to the network Set this item when you allocate an Internet Protocol version 4 address to this machine Manual Input Use DHCP A 148 Network Settings IPv4 Network Settings IPv6 This item is set for connecting this machine to the network Set ...

Страница 143: ...aced 5 minutes Limitless Reserve Period Even if this machine has been left untouched after the operation stops master making of the received original data does not start until a certain amount of time has elapsed This certain amount of time is referred to as a reserve period OFF 15 seconds 30 seconds 60 seconds Ex Reserve Period You can change the extended time of Reservation A 117 5 minutes 10 mi...

Страница 144: ...our dealer or authorized service representative Service Info Mail This item is set for sending e mails by Service Info Mail A 126 A 126 Sending E Mails of the Operation His tory Service Info Mail BThis setting item may not be displayed depending on your system configuration For more information consult your dealer or authorized service representative Copy Count Mail This item is set for sending e ...

Страница 145: ...cify how the standard paper of which size is similar to the size of the original will be processed on this machine when it is placed on the paper feed tray When Confirmation Screen Display is set to Displayed press the START key on the basic screen for master making or print ing Then the confirmation screen for selecting the paper size will be displayed When Confirmation Screen Display is set to N...

Страница 146: ...h a function name that has already been registered 5 Touch OK The DirectAccess Entry screen is displayed When you want to register another function but ton repeat steps 3 to 5 6 Touch OK The Admin screen is displayed You can register frequently used functions in the Direct Access Area in the basic screen You can register a function to the Direct Access Area in the following modes Master making mod...

Страница 147: ... function name to be reg istered Touch E or D to change the display If you do not want to register any function touch No Entry You cannot touch a function name that has already been registered 5 Touch OK The Selections Entry screen is displayed When you want to register another function but ton repeat steps 3 to 5 6 Touch OK The Admin screen is displayed You can register frequently used functions ...

Страница 148: ...rints in extended paper mode A 72 For paper width that are less than 100 mm 3 15 16 inches papers may not be arranged properly depending on the paper type or paper size Registering the paper size 1 Touch Custom Paper Entry in the Admin screen 2 Touch a button for which nothing has been registered 3 Specify the paper size You can specify the paper size using either of the following methods Entering...

Страница 149: ...the button of the paper that you want to change 4 Change the paper size 5 Touch OK The Custom Paper Entry screen is displayed Changing the name of the paper size 1 Touch Custom Paper Entry in the Admin screen 2 Touch Rename 3 Touch the button whose name you want to change A 27 Rename screen 4 Touch OK The Custom Paper Entry screen is displayed ...

Страница 150: ...n Internet Protocol version 4 address to this machine 1 Touch Network Settings IPv4 in the Admin screen 2 Select a setting method Touch either Manual Input or Use DHCP according to the connection environment 3 Enter a value You can enter a value into the active entry field You can change the target for entry by using either of the following methods Pressing the U key Directly touching the entry fi...

Страница 151: ...ion entry of PIN code inser tion of USB flash drive for authentication or holding of IC card over reader Performing the authentication operation can limit the use of this machine to only the registered users It can also limit the operation of Admin to only the administrator It also enables the following functions My Direct Access A 120 My Counter for IInfo A 165 ID Counter Report A 122 ID Print in...

Страница 152: ...Computer A 45 Printing the Saved Original Data 2 The administrator can access the authentication data of any user Recognized by Select one of the following methods that is to be used for identifying the user PIN Code USB Flash Drive IC Card when the optional IC Card Reader is installed 1 Touch User Management in the Admin screen 2 Touch Recognized by 3 Touch the authentication method to be used A ...

Страница 153: ...r User No 0 to 99 Those users are categorized into administrator and general user What is administrator Authentication registration numbers are assigned to the users who have been registered in this machine The user who has been registered for authentication registration number 0 is called administrator The administrator can use all of the functions of this machine Once the administrator is regist...

Страница 154: ... is displayed you cannot change this number 4 Set the user information Set the following items as necessary Rename You can change the user name The name that is set here will be displayed in USERNAME in the CSV file that is saved in ID Counter Report A 122 A 153 Changing the user name Group You can set the group department etc to which the user belongs Once this item is set the total count for eac...

Страница 155: ...screen is displayed Setting the upper limit number of copies that can be used 1 Touch Limit 2 Enter the upper limit number of copies for printing and master making Touch the entry field of Limit T C or Limit M C and then enter the upper limit number of copies using the numeric keys When the upper limit number of copies is set to 0 no limit is applied 3 Touch OK The Register screen is displayed Tem...

Страница 156: ...reen 2 Touch the group whose name you want to change 3 Enter the group name A 27 Rename screen 4 Touch OK Clearing the counter for all users You can clear Present M C and Present T C for all users collectively 1 Touch Reset Counter in the User Management screen 2 Touch OK BYou can also change the information of the administrator BYou cannot erase the administrator from this screen To erase the adm...

Страница 157: ...is displayed in the following cases When the RESET key is pressed When the time that is set in Auto Clear A 141 elapses After restored from sleep mode When the power is turned on BOnce you have erased the authentica tion settings it is not possible to return to the status before the settings were erased After printing the master that has been made is still loaded on the print drum cylinder in the ...

Страница 158: ...es CWhen a new print drum cylinder for which Confidential has not been exe cuted is installed CWhen this machine has been restored from sleep mode that was activated while a confirmation screen prompting you to execute Confidential was dis played CWhen the power is turned on while a print drum cylinder for which Confi dential has not been executed is installed BThe master disposal box can be locke...

Страница 159: ...157 8 Chapter 8 RISO Console ...

Страница 160: ...on sole It is the same as this machine s serial number at the time of factory shipment For the serial number of this machine check the System Info tab screen A 159 in the Monitoring menu 3 Click OK Logging out 1 Click Logout When you log out the user name display goes off and Login is displayed RISO Console is a function for remotely operating this machine using a Web browser You can check the sta...

Страница 161: ...ce Shows the remaining amount of space in the master disposal box If the amount of space is low the remaining amount indicator blinks Drum Information Shows the size and color of the print drum cylinder that is set in this machine Count Total Print Count Shows the accumulated number of copies that have been printed on this machine The value does not include proof copies that were output during mas...

Страница 162: ...t the number of items to be listed from Show 50 items and Show 100 items Delete Click the job name of the original data that you want to delete The original data is highlighted When you click Delete the highlighted original data is deleted Print Click the job name of the original data that you want to print The original data is highlighted When you click Print the highlighted original data is prin...

Страница 163: ... highlighted original data is moved to the folder Folder tab screen You can change the folder name of Storage 1 Click the folder whose name you want to change 2 Enter a new folder name in the Folder Name field 3 Click OK The Done screen is displayed 4 Click OK Network Menu Network setting screen This screen is used for the connection settings of this machine to the network Clicking OK updates the ...

Страница 164: ...ates the changes SMTP Setting screen This screen is used for the SMTP Simple Mail Trans fer Protocol settings Perform the settings when using E mail for ID Coun ter Report A 124 and Service Info Mail A 126 Clicking OK updates the changes BThis screen may not be displayed depending on your system configuration For more information consult your dealer or authorized service representative ...

Страница 165: ...163 9 Chapter 9 Replacing Consumables ...

Страница 166: ...isplay etc that requires the information from the consum ables cannot be activated A 189 When the Consumables Information Input Wizard screen is displayed Display Description Shows the remaining amount of the master roll that is set in this machine BIf this machine could not acquire the information from the master roll the remaining amount is not displayed and the icon blinks Shows the color name ...

Страница 167: ...ated users in the My Counter screen A 122 Calculating the Total Number of Cop ies ID Counter Report Setting the Master Roll 1 Check that the Master Making Unit Release Button lamp is lit If the lamp is off press Master Making Unit Release Button to light it up 2 Open the pull out cover of the master making unit Grasp the master making unit removal lever and open the cover to the front If a master ...

Страница 168: ...depleted master core accord ing to the disposal regulations of your local community A 173 Collecting and Disposing of Depleted Consumables Clean the thermal print head A 176 Maintenance 7 Set a new master roll Remove the package transparent film of the master roll Set the master roll so that the I symbol is located on the left Handle Master making unit cover Lever BTake care not to scratch the I s...

Страница 169: ...the master roll using the following steps 1 Turn the dial at the edge of the master guide flap toward the rear and raise the master guide flap 2 Align the leading edge of the master roll to the line indicated by the arrow 3 Return the master guide flap to its original position 10 Close the master making unit cover 11 Slowly return the master making unit to the original position until you hear a be...

Страница 170: ...t drum cylinder Take care not to smudge your hands or clothes with the ink Wash immediately with soap if you get ink on your hands etc BIt is recommended to use products specified by RISO when replacing the ink cartridge BKeep the power on while replacing the ink cartridge BReplace with an ink cartridge of the same ink color If you want to change the ink color replace the entire print drum cylinde...

Страница 171: ...cartridge as far as it will go Locate the protrusion of the ink cartridge to the right 5 Lock the ink cartridge Turn the ink cartridge clockwise to lock it 6 Close the front door BDo not touch or knock the edge of the ink cartridge BDo not peel off or scratch the label that is attached to the edge of the ink cartridge BCheck the orientation of the ink cartridge carefully when setting it in place F...

Страница 172: ...f the used masters Tilt the master disposal box to the front above a garbage box Grasping the push out handle drops the used masters Used masters are sent to the master disposal box When the master disposal box becomes full a mes sage is displayed and this machine stops Dispose of the used masters BKeep the power on while emptying the master disposal box Wash immediately with soap if you get ink o...

Страница 173: ...to print in a different color replace the print drum cylinder When you want to remove jammed paper inside this machine you can also remove the print drum cylin der Ink may be left on the area around the print drum cylinder or the inside of this machine after the print drum cylinder unit has been removed Take care not to smudge your hands or clothes with the ink Wash immediately with soap if you ge...

Страница 174: ...rizontally 2 Return the print drum cylinder to this machine Push in the print drum cylinder slowly as far as it will go BWhen the master making unit is pulled out you cannot pull out the print drum cylinder Return the master making unit to its original position and then press Print Drum Cylinder Release Button BDo not touch the connector on the print drum cylinder Neglect ing this may result in a ...

Страница 175: ...es according to the disposal regulations of your local community If required separate the specific components using the following procedures as a reference Remove the label at the edge of the ink cartridge by peeling it off from the section indicated with the arrow in the illustration below and then dispose of it separately Parts Materials Ink cartridge and cap Plastic polypropylene or polyeth yle...

Страница 176: ...ora tion and dispose of it separately Used master Dispose of the used masters according to the dis posal regulations of your local community If required separate the specific components using the following procedures as a reference Parts Materials Core Paper Master roll Plastic Japanese paper Cutout section marked with I Plastic metal included paper Parts Materials Master roll Plastic Japanese pap...

Страница 177: ...175 10 Chapter 10 Maintenance ...

Страница 178: ...document feeder or other parts are contaminated with dust dirt white out etc We rec ommend that you perform maintenance periodically Do not perform any procedures adjustment repair etc that are not described in this guide When you want to adjust or repair consult your dealer or authorized service representative Caution Do not directly touch the thermal print head with your fingers The thermal prin...

Страница 179: ...nd gently wipe it off Glass platen and platen cover pad If the glass platen or platen cover pad is stained gen tly wipe it off several times with a soft cloth or tissue paper BPlastic is used for the machine exterior Do not use alcohol or solvent for clean ing BDo not coat or spray the cleaner solu tion directly onto the touch panel Doing so may result in malfunctions BThe glass platen is extremel...

Страница 180: ...r glass is extremely delicate Avoid creating excessive impacts or scratches with a hard object Scanner glass White sheet Be sure to turn off the power to this machine when cleaning the pressure roller Ink may be left on the inside of this machine after the print drum cylinder unit has been removed Take care not to smudge your hands or clothes with the ink Wash immediately with soap if you get ink ...

Страница 181: ...179 11 Chapter 11 Troubleshooting ...

Страница 182: ...essory error This type of error is displayed when an error has occurred in any of the optional accessories that are currently con nected C00 0000 Consumables error This type of error is displayed when any consumables such as ink and master rolls are depleted D00 0000 Installation check error This type of error is displayed when any of the sections is installed incorrectly E00 0000 Maintenance call...

Страница 183: ...Disposal Box 1 and Remove Jammed Master Take out master disposal box 1 and then remove the jammed master A 170 Emptying the Master Disposal Box If the error display does not disappear consult your dealer or autho rized service representative A06 Set SW on Standard Feed Tray is Activated Reset paper on Standard Feed Tray Check for any obstacles under the paper feed tray or on the paper If there are...

Страница 184: ...ain 3 Press the START key Code Message Action B29 Can not identify USB hub A USB hub is set in the USB slot of this machine Set a USB flash drive that is usable for this machine A 14 Method to use a USB flash drive B30 B38 B39 Can not identify Set a USB flash drive that is usable for this machine A 14 Method to use a USB flash drive B33 No IP Address Assigned to This Printer Contact Your Network A...

Страница 185: ...s are used it may result in malfunc tions or problems Check if the label at the edge of the ink cartridge has been peeled off or stained The label at the edge of the ink cartridge contains the necessary infor mation for printing Set an ink cartridge in place on which an unstained label is properly attached A 168 Replacing the Ink Cartridge D17 Wrong type Master Installed or Cannot Read Master Info...

Страница 186: ...essage Action E01 Low Battery Call Service The internal battery of this machine is almost depleted Consult your dealer or authorized service representative for battery replacement E02 Maintenance Call Service Consult your dealer or authorized service representative for periodic inspection B Cancel or Continue may be displayed on the screen To interrupt the operation touch Cancel Touch Continue to ...

Страница 187: ...dge under optimal conditions use it within approximately 24 months after its manufacture date F56 MASTER Near expiration Use or replace soon In order to use the master roll under optimal conditions use it within approximately 24 months after its manufacture date F57 INK 1 MASTER Near expiration Use or replace soon In order to use the ink cartridge and the master roll under optimal con ditions use ...

Страница 188: ...do not want to perform Report Output for the current month touch Stop Reminder under ID Counter Report A 122 G02 Decoding Paper Memory Print failed Check the position of the original If the Paper Memory Original is not placed straight on the glass platen it may not be scanned properly Place the Paper Memory Original again If the glass platen or platen cover pad is stained the Paper Memory Original...

Страница 189: ...450 Ledgerp Legalp or Letterp Custom sizes 210 mm x 315 mm to 320 mm x 432 mm 8 1 4 inches x 12 13 32 inches to 12 19 32 inches x 17 inches For custom size select the desired paper size for Paper Size A 72 BIn order to prevent a paper jam use appropriate papers for printing A 15 Printing papers BWhen placing originals on the optional auto document feeder use an appropriate original A 15 Originals ...

Страница 190: ... print drum cylinder unit has been removed Take care not to smudge your hands or clothes Wash immediately with soap if you get ink on your hands etc When you put your hands inside the main unit take care not to touch the paper separation hook or master removal hooks The sharp tips of these hooks can hurt your hands Paper receiving side Check the paper receiving side and remove any jammed papers Er...

Страница 191: ... setting If appro priate values for setting are unknown we recommend that you adjust by changing values from 1 and on while checking the print results at the same time BIf the following operations are performed the entered values will be erased In this case it is necessary to re enter those values CThe power switch is turned off and then on again CThe WAKE UP key is pressed while this machine is i...

Страница 192: ...sity Adjustment for print drum 1 H9 First Print Density Adjustment for print drum 2 Select the value to obtain the appropriate print density for the first print according to the ink 1 light to 5 dark H10 Ink Use By date setting Set the month and year to display the F51 warning A 185 G05 warning A 186 and so on Mnth 01 to 12 Year 2001 to 2099 Screen display Description of setting Value ...

Страница 193: ...ensity according to the master 1 light to 10 dark H5 Print Density Fine Adjustment Select the value to obtain the appropriate print density according to the master 1 light to 5 dark H6 First Print Density Adjustment Select the value to obtain the appropriate print density for the first print according to the mas ter 1 light to 5 dark H11 Master Use By date setting Set the month and year to display...

Страница 194: ...Chapter 11 Troubleshooting 192 3 When setting is complete a confirmation screen is displayed Check the value and then press the START key The basic screen is displayed ...

Страница 195: ...er the paper feed tray to the bottom Then raise the lock handles for the feed tray paper guides widen the feed tray paper guides up to the limit and close the paper feed tray A 30 Setting up the paper feed tray and the paper Check if the power was turned off before the paper feed tray was lowered to the bottom The print drum cylinder cannot be placed into posi tion Check if the print drum cyl inde...

Страница 196: ...if the original is placed so that it faces up Place the original so that it faces down A 33 Placement of Originals Closing the platen cover without setting an original automatically switches print ing mode to master making mode Check if you forcefully closed the platen cover If an original is set and detected when the platen cover is closed in printing mode this machine auto matically switches to ...

Страница 197: ... the print output by print drum cylinder 1 is missing Check if an A4 Letter drum is installed as print drum cyl inder 1 The area that exceeds the maximum printing area of the print drum cylinder will not be printed In partic ular if Rotate is set the original will be inverted and cause unintended results To print an original that is larger than A4R replace the print drum cylinder with an A3 drum B...

Страница 198: ...master when it is being printed Perform master making again Use papers that are suitable for this machine A 15 Printing papers Check if a considerable time elapsed for the master roll that was used after the previ ous master making Perform master making again The back of the printed paper is smudged with ink Check if the pressure roller is smudged with ink Remove the print drum cylinder and then w...

Страница 199: ...isplayed If the specified time has elapsed before the second and subsequent originals are placed master making automatically starts Any sections that could not be scanned remain as margins If the time is too short change Multi Up Interval A 141 under Admin Check if the STOP key was pressed while an original was being scanned If you press the STOP key while an original is scanned scanning is interr...

Страница 200: ...ition of the paper feed setting lever is appropriate Select the position of the paper feed setting lever according to the paper type A 30 Setting up the paper feed tray and the paper Printed papers go over the paper stopper of the paper receiving tray Level the paper receiving tray using the following steps 1 Fold the receiving tray paper guides and the paper stopper 2 Lift up the sides of the pap...

Страница 201: ...d setting lever to the position of CARD A 30 Setting up the paper feed tray and the paper Check if the angle of the stripper plate is appropriate Turn the adjustment dial for the stripper plate angle to adjust the angle of the stripper plate in accor dance with the paper conditions BBefore the adjustment be sure to remove any papers from the paper feed tray and then confirm that the paper feed tra...

Страница 202: ... tend to produce paper dust are used When papers are skipped When the back side of postcards is peeling Turn the dial counterclockwise When multiple papers are fed Turn the dial clockwise Check if Paper Feed Adj is set properly Set Paper Feed Adj A 102 as necessary For appropriate adjustment values consult your dealer or authorized service representative The printed paper is peeling or the leading...

Страница 203: ...iple pages have been sent from a computer Even though mul tiple copies are set for print ing this machine repeats master making one page at a time Check if the Collate option is selected in the printing dialog box on a computer Temporarily delete the original data that this machine has received To delete the data touch Clear All A 25 in the basic screen Deselect Collate in the printing dialog box ...

Страница 204: ...ments on the right Check that at least all of the following requirements are met and then print the Paper Memory Original again Printing with a laser printer Printing resolution is 600 x 600 dpi or higher Printing at 100 no resizing However even if the requirements above are met the machine may not be able to scan correctly depending on the print quality and other conditions Problem Point to check...

Страница 205: ...203 12 Chapter 12 Appendix ...

Страница 206: ...f printed papers simply by inserting tape strips when using Job Separation func tion A 115 Card Feed Kit A unit for feeding paper of the following range of weights 100g m2 to 400g m2 27 lb bond to 221 lb index Envelope Feed Kit A unit for feeding envelopes RISO Controller IS300 A dedicated controller that enables this machine to be used as a network connected PostScript 3 printer RISO Printer Driv...

Страница 207: ...ge feed Dual color print Approx 53 seconds Mono color print with drum cylinder 1 Approx 22 seconds Mono color print with drum cylinder 2 Approx 32 seconds Printing Method Fully automatic printing Scanning Resolution 600 dpi x 600 dpi Printing Resolution When Quick Master Making is OFF 600 dpi x 600 dpi When Quick Master Making is ON 600 dpi x 400 dpi Original Type Book 10 kg 22 lb or less or sheet...

Страница 208: ...m x 246 mm to 320 mm x 432 mm 3 15 16 inches x 9 11 16 inches to 12 19 32 inches x 17 inches Standard size B5p A4p B4p A3p Foolscapp C4p Custom size 100 mm x 246 mm to 320 mm x 432 mm 3 15 16 inches x 9 11 16 inches to 12 19 32 inches x 17 inches Mono color print with drum cylin der 2 when drum cyl inder 1 is removed 3 Standard size Ledgerp Letterp Legalp Cata log envelope 10 13 Custom size 100 mm...

Страница 209: ... Power OFF Power OFF Schedule Protect RISO iQuality System Color Change Print drum cylinder replacement method Ink Supply Full automatic 1000 ml cartridge Master Supply Disposal A3 Ledger drum cylinder Full automatic Approx 215 sheets per roll Full automatic Approx 220 sheets per roll A4 Letter drum cylinder Full automatic Approx 373 sheets per roll Power Source AC 100 240 V 50 60 Hz 7 3 3 0 A MH9...

Страница 210: ...t drum cylinder 2 while print drum cylinder 1 is removed use paper with a length of 364 mm to 432 mm 14 11 32 inches to 17 inches in the horizontal direction 6 Usable when the optional auto document feeder is installed 7 Usable when the optional Job Separator is installed 8 When all the following optional accessories are installed Auto Document Feeder Job Separator IC Card Reader 9 The height incl...

Страница 211: ...uto Process 28 41 46 84 AUTO PROCESS key 23 Auto Process Mode 138 Auto Sleep 143 B Beep Sound 142 Binding Margin Adj 82 Blocked 25 Book Shadow 57 C C key 23 Clear All 25 Clock Calendar 141 Color 134 Color editor 67 Combination 109 Confidential 119 Consumables 13 Consumables Amount 164 Consumables Information Input Wizard 189 Contrast 56 Contrast Adj 55 Control panel 20 Copy Count Mail 142 Copy Mov...

Страница 212: ...Image Processing 138 Initialize Network 142 Ink cartridge 21 Ink Information Input 189 Ink Saving 58 Interval 99 IP address 148 Irregular Fitter 140 J Job Count 121 Job List 25 41 Job list display 137 Job Memory 115 Job Separation 25 115 138 Jump Wing Control 106 139 L LAN connector 20 LAN Interface 140 Layout 73 Limit 152 Limit M C 153 Limit T C 153 Line 53 Logging in 158 Low Admin Tab Only 151 M...

Страница 213: ...3 Padlock 156 Page Orientation 143 Paper 72 146 Paper arranger knob 21 Paper Eject Adj 103 Paper Ejection Adj 139 Paper Feed Adj 102 Paper feed setting lever 20 Paper feed tray 20 Paper jumping wing 21 Paper Memory Print 87 Paper receiving tray 21 Paper Size 72 Paper stopper 21 Password 158 Pause 25 Pencil 54 Photo 53 Photo Color Separation 63 PIN code 150 Platen cover 20 Platen cover pad 20 Power...

Страница 214: ...ntact 137 Service Info Mail 142 Set Date 123 Single Page Mode 108 Single Original 75 Size 70 Skip Page 25 Slip sheet sort set 139 Slip sheet sorting 114 SMTP Setting screen 162 SNMP Setting screen 162 Special Paper Ctrl 102 SPEED 96 SPEED keys 23 Stamp 92 Stamp Data 140 Standard ratio 70 START key 23 Start Up Screen 137 STOP key 23 Storage 43 45 Storage Retrieve 90 Storage Selection 90 Storage tab...

Страница 215: ...Chapter 12 Appendix 213 12 V View edit 48 W WAKE UP key 23 Z Zoom 71 ...

Страница 216: ...ht for cadmium except for the exemptions set in Schedule 2 of the Rule You can t dispose of our used products as household waste Used products contain many hazardous substances which may have a serious detrimental effect on the environment and or human health What does the crossed out wheeled bin symbol mean The crossed wheeled bin symbol indicates this product must be disposed of sepa rately to h...

Страница 217: ...na Increase the separation between the equipment and receiver Connect the equipment into an outlet on a circuit different from that to which the receiver is connected Consult the dealer or an experienced radio TV technician for help Contains IC 4819A RFR6 Operation is subject to the following two conditions 1 this device may not cause interference and 2 this device must accept any interference inc...

Страница 218: ...ance Troubleshooting Appendix 069 36005 1 2 3 4 5 6 7 8 9 10 11 12 The RISO MH9450 9350 Basic Guide which supports the Read Out Loud feature in Adobe Acrobat Reader is stored in the attached RISO Printer Driver DVD ROM It contains excerpts from the User s Guide this guide explaining the basic operations for printing using paper originals Directory Manual MH9x5x_BasicGuide pdf Recommended operating...

Отзывы: