Ricoh LD260c Скачать руководство пользователя страница 176

BAT092S

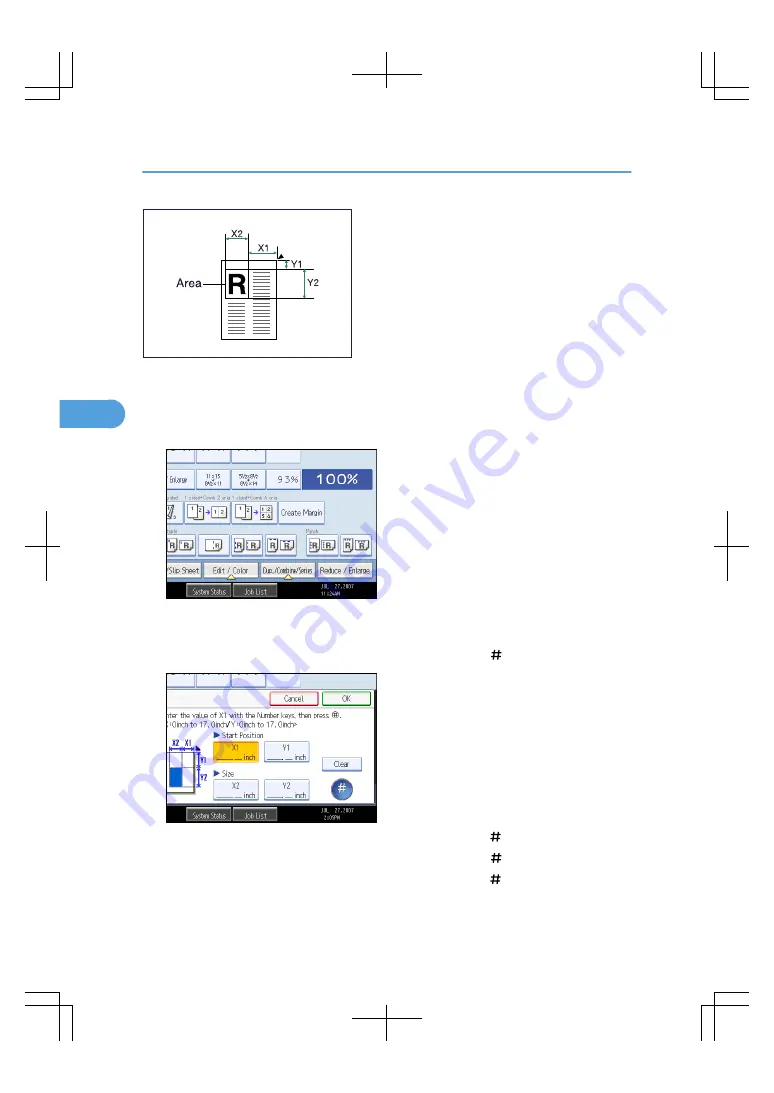
X1, X2: 0 - 432 mm (0 - 17 inches)
Y1, Y2: 0 - 432 mm (0 - 17 inches)

1.

Press [Edit / Color].

2.

Press [Erase].

3.

Press [Erase Outside].

4.

Enter the length of [X1] with the number keys, and then press [ ].

5.

Enter the length of [Y1] with the number keys, and then press [ ].

6.

Enter the length of [X2] with the number keys, and then press [ ].

7.

Enter the length of [Y2] with the number keys, and then press [ ].

If you want to erase the image on the back side of the original, press [2 Sided Setting] and then [Back].

4. Advanced Copying

174

4

Содержание LD260c

Страница 1: ...rver Appendix 1 2 3 4 Read this manual carefully before you use this machine and keep it handy for future reference For safe and correct use be sure to read the Safety Information in About This Machin...

Страница 2: ...f actual copies Colors on color keys or the color circle may differ slightly from the colors of actual copies This machine is equipped with a function that prevents making counterfeit bank bills Due t...

Страница 3: ...and other consumables Copy Document Server Reference Explains Copier and Document Server functions and operations Also refer to this manual for explanations on how to place originals Facsimile Refere...

Страница 4: ...Explains how to set up and use PostScript 3 UNIX Supplement For UNIX Supplement please visit our Web site or consult an authorized dealer This manual includes descriptions of functions and settings t...

Страница 5: ...rtain color in the original or add a background color to the whole page See p 109 Selecting a Color Mode Primary Colors Colors can be created by combining the three primary colors yellow magenta and c...

Страница 6: ...in the original to another color See p 110 Convert Colors BAS167S Erase Specified Color Copies by erasing a certain color in the original See p 111 Erase Color BAS168S Color Background Copies by addi...

Страница 7: ...rs etc The stamp color can be yellow red cyan magenta green blue and black BAT170S Printed inserts types Background Numbering See p 140 Background Numbering Preset Stamp See p 141 Preset Stamp User St...

Страница 8: ...ou can adjust the color tone of copies Color Balance Adjusts the overall color tone of copies See p 114 Color Balance BAT171S Adjust Color Adjusts the specific colors yellow red magenta blue cyan and...

Страница 9: ...sting Image Qualities You can adjust image qualities See p 118 Image Adjustment Sharp Soft Adjusts the outline of an image See p 119 Sharp Soft BAT173S Contrast Adjusts the shades of an image See p 12...

Страница 10: ...BAT174S Background Density Adjusts the background density of an image See p 120 Background Density BAT175S 8...

Страница 11: ...ations Reducing Enlarging Originals by Specifying the Paper Size The machine automatically detects the original size and then selects an appropriate reproduction ratio based on the paper size you sele...

Страница 12: ...ne Combines up to eight pages of originals onto one side of a sheet See p 72 One Sided Combine BAS038S BAS041S Two Sided Combine Combines up to 16 pages of originals onto two sides of one sheet See p...

Страница 13: ...pes and thick paper BAS025S See p 46 Copying onto Tab Stock See p 49 Copying from the Bypass Tray See p 61 Copying from the Wide Large Capacity Tray Wide LCT Creating a Booklet or Magazine Copies two...

Страница 14: ...2 Open to right BAT106S 1 Open to left 2 Open to right Magazine Copies two or more originals to make copies in page order when they are folded and stacked See p 185 Booklet Magazine BAT107S 1 Open to...

Страница 15: ...ls Such as Books Copies bound originals onto one side or both sides of a sheet Series Copies Separately copies the front and back of a 2 sided original or the two facing pages of a bound original onto...

Страница 16: ...isplay contain the functions you use most often For example if the default selection is the Duplex function but the function you use most frequently is 1 sided copying you can change the default selec...

Страница 17: ...ing Originals Such as Books 13 Registering the Initial Display s Default Functions 14 How to Read This Manual 21 Symbols 21 Functions Requiring Optional Configurations 22 Display 23 Simplified Display...

Страница 18: ...onto Envelopes 56 Loading Tab Stock in the Bypass Tray 59 Copying from the Wide Large Capacity Tray Wide LCT 61 Loading Tab Stock in the Wide LCT 61 Loading Envelopes in the Wide LCT 62 Reducing or En...

Страница 19: ...s 106 3 Color Copying Color Functions 109 Selecting a Color Mode 109 Convert Colors 110 Erase Color 111 Color Background 113 Adjusting Color and Image Quality 114 Color Balance 114 Color Balance Progr...

Страница 20: ...158 Advanced Copier Functions 162 Scan Position 162 Margin Adjustment 163 Erase Center Border 165 Erase Inside 171 Erase Outside 173 Image Repeat 175 Double Copies 178 Centering 179 Positive Negative...

Страница 21: ...r and Other Functions 221 Document Server Display 222 Simplified Display 223 Preview Display 224 Using the Document Server 226 Storing Data 226 Changing the User Name of a Stored Document 230 Changing...

Страница 22: ...User Tools Menu Copier Document Server Features 262 INDEX 269 20...

Страница 23: ...s could result in moderate or minor injury or damage to the machine or to property Be sure to read these notes They can be found in the Safety Information section of About This Machine Indicates point...

Страница 24: ...010 Finisher SR4020 Finisher SR5000 Staple Finisher SR4010 Finisher SR4020 Finisher SR5000 Staple Center Finisher SR4020 Punch Finisher SR4010 Finisher SR4020 or Finisher SR5000 and punch unit Z fold...

Страница 25: ...Ratio in User Tools For details see Copier Document Server Features General Settings Guide 4 Displays the numbers of originals scanned copies set and copies made 5 Press the key to confirm the current...

Страница 26: ...isplay Letters and keys are displayed at a larger size making operations easier BAV033S Example of a simplified display BAT189S 1 Key Color Press to increase screen contrast by changing the color of t...

Страница 27: ...zes and Weights of Recommended Originals The following describes recommended paper sizes and non recommended originals for the ADF Auto Document Feeder Metric version Original location Original size O...

Страница 28: ...conductive paper Originals with perforated lines Originals with indexes tags or other projecting parts Sticky originals such as translucent paper Thin or highly flexible originals Thick originals such...

Страница 29: ...11 51 2 81 2 10 14 71 4 101 2 Original location Exposure glass 5 ADF 1 2 3 4 Detectable size Undetectable size 1 Default is 11 17 If you want to switch the detectable size from 11 17 to 11 15 contact...

Страница 30: ...riginals so select the paper size manually Originals with indexes tags or other projecting parts Transparent originals such as OHP transparencies or translucent paper Dark originals with a lot of text...

Страница 31: ...nch 3 0 4 0 mm 0 0 16 inch 4 3 0 6 0 mm 0 12 0 24 inch The total missing vertical image area 1 3 is less than 4 0 mm 0 16 inch For paper heavier than 127 5 g m2 34 0 lb the missing leading edge image...

Страница 32: ...hen using the ADF place it face up BAT020S 1 ADF 2 Exposure glass When you cannot place the original as the above you may not make copies as you want with particular functions If this happens change t...

Страница 33: ...BAT021S 1 Press Special Original 2 Select the original orientation and then press OK Placing Originals 31 1...

Страница 34: ...ier Document Server Features General Settings Guide Placing Originals on the Exposure Glass Place originals on the exposure glass Do not lift the ADF forcefully Otherwise the cover of the ADF might op...

Страница 35: ...splay a paper misfeed message Also be sure not to place originals or other objects on the top cover Doing so may cause a malfunction BAS002S 1 Sensors Settings should be made in the following situatio...

Страница 36: ...e original before placing it on the ADF Set the original squarely p 34 Batch Mode p 35 SADF Mode p 36 Mixed Sizes Mode p 38 Custom sizes Batch Mode In Batch mode the machine copies an original of more...

Страница 37: ...witch to Batch in User Tools For details about Switch to Batch see Copier Document Server Features General Settings Guide To copy subsequent originals in this mode repeat step 4 When the Sort Combine...

Страница 38: ...cified time after the previous original has been fed You can adjust this time under SADF Auto Reset in User Tools For details see Copier Document Server Features General Settings Guide Mixed Sizes Mod...

Страница 39: ...widest original size 5 Place originals in the ADF 6 Press the Start key For details about weights of paper that can be used with this mode and other relevant information see Supplementary Information...

Страница 40: ...t key Custom sizes When placing custom size originals in the ADF specify the size of the originals Paper that has a vertical length of 128 297 mm 5 1 11 6 inches and a horizontal length of 128 1260 mm...

Страница 41: ...en press 5 Enter the vertical size with the number keys and then press 6 Press OK twice 7 Place the originals and then press the Start key To change the value you entered press the item you want to ch...

Страница 42: ...1 Placing Originals 40 1...

Страница 43: ...e and password For details see When the Authentication Screen is Displayed About This Machine To copy onto paper other than plain paper specify the paper type under Tray Paper Settings in User Tools F...

Страница 44: ...e Clear Stop key or Cancel on the screen To confirm settings press Check Modes You can change the maximum copy quantity under Max Copy Quantity in User Tools For details about Max Copy Quantity see Co...

Страница 45: ...that you were copying and then press the Start key Following the instructions on the display The previous copy job settings are restored Simply press the Start key to continue copying from where it le...

Страница 46: ...as original 2 Face up reverse order of original 1 Press Reverse Ejection Face Up Down 2 Place the originals and then press the Start key For details about the default delivery order setting see Suppl...

Страница 47: ...ait for it to finish you can use this function to set up the next copy job in advance When the current copy job is finished the next job will start automatically 1 Press New Job when Copying appears 2...

Страница 48: ...aper Type in User Tools For details about Paper Type see System Settings General Settings Guide BAS026S 1 Original width 2 Index width Specify the size of tab stock under Tray Paper Size in User Tools...

Страница 49: ...e without the tab first When loading tab stock in Tray 2 or 3 adjust the back fence position so that the tab sheet holder will fit the tab stock BAS005S Tab stock is fed starting from the top tab BAT0...

Страница 50: ...want to copy by checking the position of the index tab If the image extends beyond the index tab the backs of sheets may get soiled with toner To copy onto tab stock from the bypass tray see Loading T...

Страница 51: ...owing sizes as regular size copy paper Metric version A3 A4 A5 8 13 Inch version A3 11 17 81 2 14 51 2 81 2 If you want to use the size of paper other than the above be sure to specify the size When c...

Страница 52: ...ess OK 6 Place the originals and then press the Start key 7 When the copy job is finished press the Clear Modes key to clear the settings Load only as much paper as can be held between the guides on t...

Страница 53: ...Face Method in Bypass Mode see Copier Document Server Features General Settings Guide If you select Tab Stock you cannot have copies delivered face up If you use paper larger than 458 mm 18 1 inches i...

Страница 54: ...press the Start key Copying onto Custom Size Paper Makes copies onto custom size paper from the bypass tray 1 Open the bypass tray and then insert the paper face up until you hear the beep 2 Align th...

Страница 55: ...press the Start key To change the value you entered press the item you want to change and then enter a new value Registering a custom size Register a custom paper size 1 Press Bypass and then press t...

Страница 56: ...then press the key 2 Press Custom Size 3 Press Recall The registered size is displayed Copying onto OHP Transparencies or Thin Paper When copying onto OHP transparencies or thin paper select the type...

Страница 57: ...hin Paper in Special Paper 5 Specify the paper size and then press OK 6 Place the originals and then press the Start key Printing on special paper such as OHP transparencies and thin paper may be slow...

Страница 58: ...lb and 249 9 g m2 66 9 lb Select Thick Paper 3 when paper weight is between 250 0 g m2 67 0 lb and 300 0 g m2 80 0 lb 6 Specify the paper size and then press OK 7 Place the originals and then press t...

Страница 59: ...ey 4 Press Custom Size 5 Specify the envelope size and then press OK 6 Place the originals and then press the Start key When placing an original on the exposure glass place the original with the botto...

Страница 60: ...ray Check there is no air in the envelopes before loading To get better print quality it is recommended that you set the right left top and bottom print margin to at least 15 mm 0 6 inch each You cann...

Страница 61: ...Settings Guide Tab stock is fed starting from the top tab BAT028S 1 Originals 2 Tab Stock 3 Copies 1 Open the bypass tray and then insert the tab stock with the side you want to copy face up until th...

Страница 62: ...For details about how to load tab stock in paper trays see Copying onto Tab Stock p 46 Copying onto Tab Stock 2 Basic Copying 60 2...

Страница 63: ...ttings General Settings Guide For the procedure for loading paper in the Wide LCT see Changing the Paper Size in the Wide Large Capacity Tray Troubleshooting If you select Thick Paper 2 Thick Paper 3...

Страница 64: ...o the paper feed direction Before you can use this function you must specify the size of your envelope under Tray Paper Size LCT in User Tools For details see System Settings General Settings Guide 1...

Страница 65: ...et Reduce Enlarge This function allows you to reduce or enlarge images by selecting a preset ratio You can register up to three frequently used reproduction ratios other than the preset Reduce Enlarge...

Страница 66: ...atio and then press OK 3 Place the originals and then press the Start key You can change reproduction ratios shown on the initial display under Reproduction Ratio in User Tools For details about Repro...

Страница 67: ...e 2 Select a preset ratio which is close to the desired ratio 3 Adjust the ratio with and Press or changestheratioinincrementsof1 Pressingandholdingdown or changes it in increments of 10 4 Press OK 5...

Страница 68: ...Enter the desired ratio with the number keys and then press 4 Press OK twice 5 Place the originals and then press the Start key To change the value you entered press Clear and then enter a new value A...

Страница 69: ...placed is different from that of the paper you are copying onto the machine rotates the original image by 90 degrees and fits it on the copy paper Rotate Copy For example to reduce A3 11 17 originals...

Страница 70: ...S A5 B6 JIS 11 17 81 2 11 81 2 13 Inch version Original location Original size and orientation Exposure glass 11 17 81 2 14 81 2 11 ADF A3 A4 11 17 81 2 14 81 2 11 51 2 81 2 10 14 71 4 101 2 1 Press A...

Страница 71: ...function is 64 163 g m2 17 43 lb 1 Sided 2 Sided Copies two 1 sided pages on one 2 sided page BAS034S 2 Sided 2 Sided Copies one 2 sided page on one 2 sided page BAS035S Original orientation and comp...

Страница 72: ...BAT036S 1 Press Dup Combine Series 2 Make sure that Duplex is selected If Duplex is not selected press Duplex 2 Basic Copying 70 2...

Страница 73: ...glass or in the ADF using Batch mode press the key after all the originals have been scanned You can specify the margins under Edit in User Tools For details about Edit see Copier Document Server Feat...

Страница 74: ...Duplex Mode and Copy Orientation in Duplex Mode in User Tools For details see Copier Document Server Features General Settings Guide One Sided Combine Combine several pages onto one side of a sheet Y...

Страница 75: ...1 sided originals to one side of a sheet BAS039S 1 Sided 8 Pages Combine 1 Side Copies eight 1 sided originals to one side of a sheet BAS040S 2 Sided 1 Page Combine 1 Side Copies one 2 sided original...

Страница 76: ...o 2 sided originals to one side of a sheet BAS042S 2 Sided 4 Pages Combine 1 Side Copies four 2 sided originals to one side of a sheet BAS043S Orientation of the original and image position of combine...

Страница 77: ...nals BAS045S Placing originals originals placed in the ADF Originals read from left to right BAT046S Originals read from top to bottom BAT047S 1 Press Dup Combine Series 2 Press Combine Duplex Combine...

Страница 78: ...press the key after all the originals have been scanned If you selected 2 Sided for Original you can change the orientation See Originals and copy orientation You can change the initial settings for 1...

Страница 79: ...ur pages per side BAT048S 1 Front 2 Back 1 Sided 16 Pages Combine 2 Sides Copies 16 1 sided originals to one sheet with eight pages per side BAT049S 1 Front 2 Back 2 Sided 2 Pages Combine 2 Sides Copi...

Страница 80: ...s Copies four 2 sided originals to one sheet with four pages per side BAT051S 1 Front 2 Back 2 Sided 8 Pages Combine 2 Sides Copies eight 2 sided originals to one sheet with eight pages per side BAT05...

Страница 81: ...iginals and then press the Start key When placing originals on the exposure glass start with the first page to be copied When placing originals in the ADF set the first page on top When placing origin...

Страница 82: ...r To use the Rotate Sort function two paper trays loaded with paper of the same size and type but in different orientation are required You cannot use the bypass tray with Rotate Sort Sort Shift Sort...

Страница 83: ...1 Press Finishing 2 Select Sort or Rotate Sort When a finisher is not installed When Finisher SR4010 or SR5000 is installed When Finisher SR4020 is installed Finishing 81 2...

Страница 84: ...ed You can change the settings for Sort under Input Output in User Tools For details see Copier Document Server Features General Settings Guide For details about standard paper sizes that can be used...

Страница 85: ...You can change the settings However depending on the combination of functions you may not be able to change some settings Changing the number of sets You can change the number of copy sets during copy...

Страница 86: ...to have separation sheets inserted between sets or jobs BAS180S Before using this function select the tray for separation sheet under Separation Sheet Tray in User Tools For details see System Settin...

Страница 87: ...together copies of each page in a multi page original BAS055S If a finisher is installed each time the copies of one page are delivered the next copy is shifted when delivered so you can separate each...

Страница 88: ...all the originals have been scanned Staple Each copy set can be stapled together BAS056S You cannot use the bypass tray with this function If you select staple without having the stapler cartridge for...

Страница 89: ...taple positioning The orientation of the paper does not indicate orientation of delivery 2 You cannot staple at this position when copying onto A3 or B4 JIS size paper 3 If you want to staple at this...

Страница 90: ...the first page is on the top When placing originals on the exposure glass or in the ADF using Batch mode press the key after all the originals have been scanned If you specify Staple Center you must...

Страница 91: ...S059S 3 holes BAS182S Original orientation and punch hole position Place all the originals in the ADF in the orientation in which they can be read normally When placing the original on the exposure gl...

Страница 92: ...BCU035S 1 Press Finishing 2 Select one of the punch hole positions When Finisher SR4010 or SR5000 is installed When Finisher SR4020 is installed 2 Basic Copying 90 2...

Страница 93: ...s General Settings Guide Z fold Makes two parallel folds one of which faces in and the other facing out BAS061S You cannot use the bypass tray with this function You cannot use Punch with this functio...

Страница 94: ...BAT062S 1 Press Finishing 2 Select the folding direction and then press OK When Finisher SR5000 is installed When Finisher SR4020 is installed 2 Basic Copying 92 2...

Страница 95: ...r of Z folded copies that can be stacked on each tray see Supplementary Information p 248 Supplementary Information Using the Z fold support tray When using the Z fold function together with the Stapl...

Страница 96: ...y while keeping the front cover open BAS013S Close the front cover of the finisher The Z fold support tray is lowered to complete the installation BAS014S RemovetheZ foldsupporttraywhendeliveringcopie...

Страница 97: ...for any damage that might result from the loss of data 1 Press Store File 2 Enter a file name user name or password if necessary 3 Press OK 4 Place the originals 5 Make the scanning settings for the o...

Страница 98: ...ument has been stored press the Document Server key If you want to store another document do so after copying is complete For details about the Document Server see Using the Document Server For detail...

Страница 99: ...Tools For details about this setting see System Settings General Settings Guide To print jobs continuously without intervals press Start Printing in the right side of the control screen Start Printin...

Страница 100: ...nted using copy function Job printed using printer function Job printed using Document Server function Job printed using DeskTopBinder Job printed using Web Image Monitor Checking Jobs in the Job List...

Страница 101: ...ress Job List 2 Select the job whose order you want to change 3 Press Change Order 4 Change the order using Top Previous or Next 5 Press OK Holding Jobs You can hold jobs that are queued or currently...

Страница 102: ...are suspended To resume the suspended jobs press Resume Printing This function is available only if Job Order is specified Deleting Jobs You can delete a job that is queued or currently printing 1 Pre...

Страница 103: ...tory and contents of completed print jobs 1 Press Job List 2 Press Job History A list of completed print jobs appears 3 Select the job whose contents you want to check 4 Press Details and then check t...

Страница 104: ...s Default Functions Paper settings are stored based on paper size So if you place more than one paper tray of the same size the paper tray prioritized under Tray Paper Settings in User Tools will be...

Страница 105: ...program number followed by the program name The screen returns to the initial copy display after a short time Program numbers with against them already have settings made for them Changing a Stored Pr...

Страница 106: ...ntents of a program recall the program When it is overwritten the previous program is deleted Recalling a Stored Program Recalls a stored program to make copies using the stored settings 1 Press the P...

Страница 107: ...2 Press Delete 3 Press the program number you want to delete 4 Press Yes The program is deleted and the display returns to the initial copy display Registering Frequently Used Functions 105 2...

Страница 108: ...is 1 sided copying you can change the default selection to 1 sided copying instead The settings you can program as defaults are Color Mode Paper Tray Original Type Density Special Original OriginalOr...

Страница 109: ...faults The screen returns to the initial display To restore the factory default settings on the initial display press Restore Factory Defaults The default settings can be programmed separately for the...

Страница 110: ...2 Basic Copying 108 2...

Страница 111: ...ect Judges the color of the original automatically and copies either in full color or black and white Full Color Copies by overlaying yellow magenta cyan and black Black White Copies in black regardle...

Страница 112: ...g a certain color in the original to another color Up to four colors can be converted at the same time To use this function Full Color must be selected If any other color mode is selected you cannot s...

Страница 113: ...Wider under Color Sensitivity in User Tools and red has been specified colors close to orange and purple will be converted You can change the setting For details about Color Sensitivity see Copier Doc...

Страница 114: ...specified colors close to orange and purple will be converted You can change the setting For details about Color Sensitivity see Copier Document Server Features General Settings Guide To cancel the se...

Страница 115: ...Select the background color and then press OK twice You can adjust the density of the color in four steps To select user color press User Color and then select the color 5 Place the originals and the...

Страница 116: ...t Color 3 Press Color Balance 4 Adjust the color balance by pressing Lighter or Darker 5 Press OK twice The adjusted settings will be deleted and the initial values will be reset when Auto Clear has b...

Страница 117: ...will be overwritten Registering the adjusted color balance Register adjusted color balance settings so that you can use them later 1 Adjust the color balance 2 Press Program Color Balance 3 Press Prog...

Страница 118: ...program number to be overwritten 8 Press Yes The program is overwritten 9 Press OK twice Recalling the color balance Applies settings registered in color balance programs to the copy job 1 Press Edit...

Страница 119: ...Press OK twice Color Adjustment Adjusts the specific colors yellow red magenta blue cyan and green by mixing them with adjacent colors in the color circle You can adjust up to three colors from yellow...

Страница 120: ...ctions Color Adjustments p 3 What You Can Do with This Machine Color Functions Color Adjustments Image Adjustment Adjusts image qualities The following five types of image adjustments are available Sh...

Страница 121: ...leted and the initial values will be reset when Auto Clear has been performed when the Clear Modes key has been pressed or when the power has been turned off For types and examples of the image adjust...

Страница 122: ...pressing Lighter or Darker 2 Press OK Adjustments should be made lighter when copying dark textured originals such as newspaper or recycled paper Adjustments should be made darker when darkening the c...

Страница 123: ...sing Text Photo 1 Adjust the image quality by pressing Text or Photo 2 Press OK Specify the original type to Text when parts of the texts are faded or are not clear Set it to Photo when the outline of...

Страница 124: ...81 2 11 A3 or 11 17 size paper When printing a list of user colors the full color counter will advance by 1 For explanations about and examples of what you can do with the color adjustment function se...

Страница 125: ...7 Press OK twice Selecting a user color key that is indicated by a solid line will change overwrite the contents of that color Creating colors by specifying the density of primary colors with number k...

Страница 126: ...djust with 7 Check the settings and then press OK 8 Press OK twice Selecting a user color key that is indicated by a solid line will change overwrite the contents of that color Changing the user color...

Страница 127: ...nd then press User Color 3 Press Delete 4 Select the number of the user color you want to delete 5 Press Yes 6 Press OK twice Printing a list of user colors Prints a list of user colors 1 Press Edit C...

Страница 128: ...3 Color Copying 126 3...

Страница 129: ...al image density You can adjust the density of the overall original in nine steps Combined auto and manual image density Adjusts the density of an image only for dark texture originals Auto Image Dens...

Страница 130: ...e density indicator moves Combined Auto and Manual Image Density Adjusts the density of an image only for dark texture originals 1 Make sure Auto Density is selected If Auto Density is not selected pr...

Страница 131: ...copies or originals generated by color copiers Text Photo For originals that contain both text and photographs or pictures Generation Copy For originals that are copied The copy image can be reproduc...

Страница 132: ...under General Features in User Tools For details see Copier Document Server Features General Settings Guide You can select whether or not to display the keys for the original on the initial display un...

Страница 133: ...Select when copying at a ratio of 100 Metric version Original location Original size and orientation Exposure glass A3 B4 JIS A4 B5 JIS 81 2 13 8K 16K ADF A3 B4 JIS A4 B5 JIS A5 B6 JIS 11 17 81 2 11...

Страница 134: ...ation in which your original is placed is different from that of the paper you are copying onto the machine rotates the original image by 90 to fit it on the paper BAT065S You cannot use Rotate Copy w...

Страница 135: ...s changed to Without Image Rotation or Off For details about Auto Tray Switching see Copier Document Server Features General Settings Guide Depending on the settings for the Punch Staple or Z fold fun...

Страница 136: ...py functions see Reducing or Enlarging Images p 63 Reducing or Enlarging Originals Size Magnification This function calculates a reproduction ratio based on the lengths of the original and copy BAT067...

Страница 137: ...ess OK twice To change the value you entered press the key you want to change and then enter a new value Directional Magnification Specify the horizontal and vertical reproduction ratios individually...

Страница 138: ...changes the ratio in increments of 1 Pressing and holding down or changes it in increments of 10 6 Press Vertical 7 Adjust the ratio with and 8 Press OK twice To change the value you entered readjust...

Страница 139: ...Press OK twice 8 Place the originals and then press the Start key To change the value you entered press the key you want to change and then enter a new value Directional Size Magnification inch Speci...

Страница 140: ...the original and copy by comparing A with a and B with b 1 Press Reduce Enlarge 2 Press Dir Size Mag inch 3 Enter the horizontal size of the original with the number keys and then press You can enter...

Страница 141: ...te Margin Reduces the image to 93 of its original size and places the reduced image at the center By combining it with the Reduce Enlarge functions you can further increase a margin 1 Press Create Mar...

Страница 142: ...Numbering Use this function to have numbers printed on the background of copies If this function is used in conjunction with Sort the same numbers are printed on each set of copies helping you keep tr...

Страница 143: ...e by 1 The default color is black You can enter a number between 1 and 9999 You can change the settings for Background Numbering under Stamp in User Tools For details about Stamp see Copier Document S...

Страница 144: ...ailable for Preset Stamp COPY URGENT PRIORITY For Your Info PRELIMINARY For Internal Use Only CONFIDENTIAL DRAFT Stamp position and original orientation The stamp positions differ according to the ori...

Страница 145: ...ack You can change the settings for Preset Stamp under Stamp in User Tools Depending on the setting density may change For details about Stamp see Copier Document Server Features General Settings Guid...

Страница 146: ...tly can be registered BAS073S You have to register a user stamp before using this function You cannot use the bypass tray with this function Only one message can be stamped each time Stamp position an...

Страница 147: ...BAT074S 1 Press Edit Color 2 Press Stamp 3 Press User Stamp 4 Select the stamp you require You can change the stamp color and position Stamps 145 4...

Страница 148: ...ngs for User Stamp under Stamp in User Tools For details about Stamp see Copier Document Server Features General Settings Guide p 30 Original Orientation p 147 Registering the user stamp Changing the...

Страница 149: ...10 297 mm 0 4 11 7 inches high and 10 432 mm 0 4 17 0 inches wide However ifthevalueexceedsthemaximumvalueofthearea 5 000mm2 7 75inch2 itiscorrected within the range of the area automatically Up to f...

Страница 150: ...nal will be scanned and the stamp will be registered 11 Press Exit 12 Press Exit The display returns to the User Tools Counter Inquiry screen 13 Press Exit Exits settings and gets ready to copy Stamp...

Страница 151: ...s User Stamp 5 Press Program Delete Stamp 6 Press Delete and then press the stamp number you want to delete 7 Select Yes and then press Exit 8 Press Exit The display returns to the User Tools Counter...

Страница 152: ...u can select from the following styles MM DD YYYY MM DD YYYY DD MM YYYY DD MM YYYY YYYY MM DD Stamp position and original orientation The date stamp positions differ according to the orientation in wh...

Страница 153: ...ct the print page 6 After making all settings press OK 7 Press OK The default color is Black You can change the settings for Date Stamp under Stamp in User Tools For details about Stamp see Copier Doc...

Страница 154: ...nge Format under Current Date 2 Select the date format and then press OK Changing the date stamp position Changes the stamp position 1 Press Change under Stamp Position 2 Select the stamp position and...

Страница 155: ...this function There are six types of page numbering P1 P2 1 5 2 5 1 2 P 1 P 2 1 2 1 1 1 2 Stamp position and original orientation The page stamp positions differ according to the orientation in which...

Страница 156: ...der Stamp in User Tools For details about Stamp see Copier Document Server Features General Settings Guide You can change the stamp position if Combine or Duplex is specified for use with this functio...

Страница 157: ...K Specifying the first printing page and start number P1 P2 1 2 P 1 P 2 1 2 Specify the first printing page and start number The example below shows when the first printing page is 2 and the start num...

Страница 158: ...ge the number entered press Clear and then enter a new number 5 After making all settings press OK 6 Press OK twice The last number is the last page number to print For example if Total Pages is ten w...

Страница 159: ...h the number keys and then press To change the number entered press Clear and then enter a new number 6 After making all settings press OK 7 Press OK twice The last number is the last page number to p...

Страница 160: ...he page number from which to start printing with the number keys and then press 5 When page designation is complete press OK 6 Press OK twice You can set a value from 1 to 9999 for First Printing Page...

Страница 161: ...ion and original orientation The stamp positions differ according to the orientation in which you place the originals BAT083S 1 Press Edit Color 2 Press Stamp 3 Press Stamp Text 4 Press Change Text St...

Страница 162: ...To save the typed text you can register them in a program For details about Program see Registering Frequently Used Functions You can change the settings for Stamp Text under Stamp in User Tools For d...

Страница 163: ...2 Select the stamp position and then press OK Stamps 161 4...

Страница 164: ...f originals BAT084S 1 Point from which the machine begins scanning You can move the scanning position up to 30 mm 1 2 inches in 1 mm 0 1 inch increments upward downward to left and to right BAT085S 1...

Страница 165: ...position of the back side of the original press OK To change the value you entered press or or press Clear and then specify a new value Press and to set the top or bottom position Press and to set the...

Страница 166: ...not need to specify the margins for the back side pages press OK To change the value you entered press or or press Clear and then specify a new value Press and to set the top or bottom position Press...

Страница 167: ...rder This function erases the center and or all four sides of the original image This function has the following three types Erase Border Erases the edge margin of the original image BAS087S Erase Cen...

Страница 168: ...e original press 2 Sided Setting and then Back Erasing the image on the back side is valid when you copy 2 Sided originals The erase width is set to 10 mm 0 4 inch as a default You can change this set...

Страница 169: ...essing or changes the width in increments of 1 mm 0 1 inch Pressing and holding down the relevant key changes the width in increments of 10 mm 1 inch 7 Press OK twice To change the value you entered p...

Страница 170: ...Border 5 Press Different Width 6 Press the key you want to change and specify an erase width with and 7 Press OK twice To change the value you entered press and and then specify a new value Erase Cent...

Страница 171: ...ess Erase Center 5 Specify the erase width with and 6 Press OK twice To change the value you entered press and and then specify a new value Erase Center Border same width Erases both the center and ed...

Страница 172: ...Center and then specify the erase width with and 7 Press Border and then specify the erase width with and 8 Press OK twice To change the value you entered press and and then specify a new value Erase...

Страница 173: ...ess Different Width 6 Press the key you want to change and specify an erase width with and 7 Press OK twice To change the value you entered press and and then specify a new value Erase Inside Use this...

Страница 174: ...1 X2 and Y2 on the original Measure the area you want to specify before entering the area settings BAT092S X1 X2 0 432 mm 0 17 inches Y1 Y2 0 432 mm 0 17 inches 1 Press Edit Color 2 Press Erase 3 Sele...

Страница 175: ...de is valid when you copy 2 Sided originals 8 Press OK 9 To specify multiple areas select areas 1 to 5 and then repeat steps 3 to 8 10 Press OK To change the value you entered press the key you want t...

Страница 176: ...ith the number keys and then press 5 Enter the length of Y1 with the number keys and then press 6 Enter the length of X2 with the number keys and then press 7 Enter the length of Y2 with the number ke...

Страница 177: ...eated Whole Area Repeat Repeatedly copies the entire image Specified Area Repeat Repeatedly copies a specified area of the image You can change the settings for Image Repeat under Edit in User Tools F...

Страница 178: ...riginal 51 2 81 2 Copy paper 81 2 11 or Original 51 2 81 2 Copy paper 81 2 11 2 repeats 100 8 repeats 50 32 repeats 25 BAT086S BAT087S BAT088S 1 Select the size of copy paper and the reproduction rati...

Страница 179: ...asure the area you want to specify before entering the area settings BAT097S 1 Set the original on the exposure glass X1 0 412 mm 0 16 2 inches X2 20 432 mm 0 8 17 0 inches Y1 0 277 mm 0 10 8 inches Y...

Страница 180: ...then press 10 Press OK twice Double Copies One original image is copied twice on one sheet BAS098S You cannot use the bypass tray with this function Originals with a size of A5 B6 JIS and 51 2 81 2 ca...

Страница 181: ...4 Press OK 5 Select the paper size You can change the settings for Double Copies under Edit in User Tools For details about Edit see Copier Document Server Features General Settings Guide Centering Y...

Страница 182: ...iginal location Original size and orientation Exposure glass A3 B4 JIS A4 B5 JIS 81 2 13 8K 16K ADF A3 B4 JIS A4 B5 JIS A5 B6 JIS 11 17 81 2 11 81 2 13 Inch version Original location Original size and...

Страница 183: ...tive Copies an image inverted If your original is black and white copy images are inverted If your original is color the density darkness and brightness of each color will be reversed and inverted to...

Страница 184: ...ted in a mirror BAS101S If Margin Adjustment is selected cancel the setting 1 Press Edit Color 2 Press Edit Image 3 Press Mirror Image 4 Press OK 3 Edges Full Bleed You can make full image copy by cut...

Страница 185: ...jam if you do Series Copies Separately copies the front and back of a 2 sided original or the two facing pages of a bound original onto two sheets You cannot use the Book 1 Sided function from the ADF...

Страница 186: ...of Series Copies Book 1 Sided You can make 1 sided copies from two facing pages of a bound original book BAS103S 2 Sided 1 Sided You can make 1 sided copies from 2 sided originals BAS104S 1 Press Dup...

Страница 187: ...have been scanned p 71 Originals and copy orientation Booklet Magazine Copies two or more originals in page order You cannot use the bypass tray with this function The following table shows the paper...

Страница 188: ...en to right 2 Sided Booklet Make 2 sided originals to copies in page order for a folded booklet as shown BAT106S 1 Open to left 2 Open to right 1 Sided Magazine Copies two or more originals to make co...

Страница 189: ...er when they are folded and stacked BAT108S 1 Open to left 2 Open to right Book 2 Sided Copies a two page spread original onto one sheet with one page per side BAS109S Front Back 2 Sided Copies each t...

Страница 190: ...the centerline and open BAT111S 1 Open to left 2 Open to right How to fold and unfold copies to make a magazine Fold and stack copies to make a magazine and open BAT112S 1 Open to left 2 Open to right...

Страница 191: ...ult setting for the orientation of Booklet and Magazine is Open to Left You can change the default under Orientation Booklet Magazine in User Tools For details see Copier Document Server Features Gene...

Страница 192: ...ep value with and 7 Press OK twice You can adjust the creep value between 0 to 99 mm 0 to 3 9 inches in 1 mm 0 1 inch steps To change the value you entered press and and then specify a new value Mix 1...

Страница 193: ...ct 1 Sided or 2 Sided for the copy 5 Place the originals and then press the Start key 6 Ifyouspecify 2Sided foreithertheoriginalsorcopies press ChangeSetting ifthenumber of originals that you want to...

Страница 194: ...g this function select the trays for covers under Front Cover Sheet Tray and Back Cover Sheet Tray in User Tools For details see System Settings General Settings Guide You cannot specify the bypass tr...

Страница 195: ...function copies the last page of an original onto paper that has been specified for covers or places a cover sheet after the last copy page Copy BAS116S Blank BAS117S 1 Press Cover Slip Sheet Advanced...

Страница 196: ...the main sheets For example when the main sheet is A5 you can staple the copies with the front cover sheet of A4 but you cannot staple them with that of A4 When you specify both front and back covers...

Страница 197: ...System Settings General Settings Guide You cannot specify the bypass tray as the Main Sheet Tray If you have selected Interposer for Designation Sheet 1 Tray or Designation Sheet 2 Tray in System Set...

Страница 198: ...tions can be specified 8 Select the main sheet tray that contains the paper to copy the originals 9 After making all settings press OK twice To change the value you entered press the key you want to c...

Страница 199: ...apter number To select chapters 11 to 20 press 11 20 5 Enter the page location of the first page of the chapter with the number keys and then press the key Up to 100 locations can be specified 6 To sp...

Страница 200: ...eet 1 Tray or Designation Sheet 2 Tray in User Tools For details see System Settings General Settings Guide 1 Press Cover Slip Sheet 2 Press Designate Chapter 3 Press Designation Sheet Copy 4 Enter th...

Страница 201: ...he designated pages is copied on the front side of a designation sheet The designation sheets should be the same size and orientation as the main sheet To change the value you entered press the key yo...

Страница 202: ...enumber keys and the press the key 8 To specify another location where to insert sheets repeat steps 4 to 7 9 Select the main sheet tray that contains the paper to copy the originals 10 After making a...

Страница 203: ...parencies BAS122S If 1 Sided 2 Sided is set cancel the setting Before using this function select the tray for slip sheets under Slip Sheet Tray in User Tools For details see System Settings General Se...

Страница 204: ...originals When copying onto OHP transparencies use the bypass tray When setting OHP transparencies on the bypass tray press the key and select OHP Transparency in Special Paper The slip sheets should...

Страница 205: ...s can be completed in shorter time For example when connected together two Type 2 machines can make 150 copies per minute in black and white mode or 140 copies per minute in full color mode A4 81 2 11...

Страница 206: ...inisher or the LCT However to use the Staple Punch Saddle Stitch and or Z fold functions a finisher equipped with those functions must be installed on both machines Interrupt Copy You can use the Inte...

Страница 207: ...when it is processing an Interrupt Copy job the sub machine will return to its initial condition and the Interrupt Copy job will be canceled To change the settings see System Settings General Setting...

Страница 208: ...Select Displays the size type and orientation of the paper set on both machines 3 Numbers of originals Displays the number of originals scanned into memory of the main machine 4 Number of sets Display...

Страница 209: ...if Connect Copy has been selected on the main machine the sub machine will still continue to show the initial copy display To switch to the Connect Copy initial display follow the procedure below 1 Pr...

Страница 210: ...ings Guide When Basic Authentication Windows Authentication LDAP Authentication or Integration Server Authentication is set enter your login user name and password so that the machine accepts copy job...

Страница 211: ...f copysetsdifferonthemainandsubmachines Ifthetransferreddataismassive thedifferencebetween the numbers of copies made by the main machine and sub machine will increase Both machines may not finish cop...

Страница 212: ...n using the Staple function the processing of one copy set cannot be divided between the two machines When copying with the Stack function Example Making 2 copies of each page of a six page original B...

Страница 213: ...to its initial condition Printing Stored Documents Using Connect Print You can print a document stored in the Document Server using the Connect Print function The main machine is the one on which the...

Страница 214: ...desired order You can also cancel all your selections by pressing the Clear Modes key If you are selecting two or more files you can check the file names and printing order by pressing and to scroll t...

Страница 215: ...als in the main machine 4 Confirm that Ready is displayed and then make settings for the job 5 Press the Start key on the main machine Scanning begins As soon as the current job is finished the next j...

Страница 216: ...Preset jobs in Connect Copy mode can only be changed when copying has yet to begin on either machine p 45 Job Preset 5 Connect Copy 214 5...

Страница 217: ...hen One of the Two Machines is Idle Explains the job flow when one of the machines is copying Original A BAT130S Using the idle machine as the main machine Connect Copy 1 Make Connect Copy settings fo...

Страница 218: ...ne Using the machine currently copying as the main machine Connect Copy Job Preset 1 Make Connect Copy settings for Original B on machine 1 the machine currently in use BAT133S 2 When machine 1 has fi...

Страница 219: ...nd the other Original B BAT135S When both machines are copying the same number of originals Connect Copy Job Preset 1 Make Connect Copy settings for Original C on machine 1 BAT136S 2 When machine 1 ha...

Страница 220: ...ginals Connect Copy Job Preset 1 Make Connect Copy settings for Original C on machine 1 BAT139S 2 When machine 1 has finished with Original A it begins copying Original C If machine 1 finishes copying...

Страница 221: ...2 Sub machine Connect Copy Job Flow 219 5...

Страница 222: ...5 Connect Copy 220 5...

Страница 223: ...Available Printing Available Transmission Unavailable Facsimile functions Storing method Fax List display Available Printing Available Transmission Available The data can be transferred by the facsim...

Страница 224: ...o the memory copies set and copies made 4 Displays keys for the operation 5 Displays an icon that indicates the function and color mode used to stored the document 6 Displays keys for switching the di...

Страница 225: ...not be displayed depending on the security function specified Simplified Display This section explains how to switch to the simplified display When you press the Simplified Display key the screen cha...

Страница 226: ...key again Certain keys do not appear on the simplified display Preview Display This section explains the items that appear on the preview display and how to preview stored documents To preview stored...

Страница 227: ...switch between them 5 Display Page Displays the number of the currently displayed page total number of pages and page size 6 Switch Flips the page of the selected file 7 Display Position Indicates the...

Страница 228: ...essed by other users After the operation be sure to press the Clear Modes key to cancel the document selection The user name registered to a stored document in the Document Server is to identify the d...

Страница 229: ...anning job press Continue in the confirmation display To delete saved images and cancel the job press Stop The original placed in the ADF will be ejected If a password is set the key icon appears on t...

Страница 230: ...ad of User Name For details about specifying Access Privileges consult the administrator For details about how to enter text see Entering Text About This Machine Specifying a User Name You can specify...

Страница 231: ...ument name and then press OK You can enter up to 20 characters for a document name In the list however up to 16 characters are displayed as the document name If above limits are exceeded the list will...

Страница 232: ...For double check enter the password again and then press OK Changing the User Name of a Stored Document You can change the user name for a stored document 1 Select the document whose user name you wa...

Страница 233: ...ng Access Privileges consult the administrator For details about how to enter text see Entering Text About This Machine Changing the File Name of a Stored Document You can change the file name of a st...

Страница 234: ...t to change If a password is set enter it and then press OK 2 Press File Management 3 Press Change Password 4 Enter a new password and then press OK 5 For double check enter the password again and the...

Страница 235: ...ancel the selection press the selected highlighted key Pressing Exit restores the document selection screen Searching for Stored Documents Searches for stored documents by user name or file name You c...

Страница 236: ...ng by file name Searches for stored documents by file name 1 Press File Name 2 Enter the document name to be searched and then press OK Document names that match completely from the starting character...

Страница 237: ...aracter will be searched and displayed on the screen Pressing Display All displays all stored documents Printing Stored Documents Prints stored documents Web Image Monitor allows you to print document...

Страница 238: ...ser name file name or creation date Press the item to be used for the sorting on the top of the list Some of the selected documents may not be printed due to the difference in the size or resolution W...

Страница 239: ...nting conditions set for the first document are applied to all the remaining documents When two or more documents are selected press to confirm the user name document name and printing order of the do...

Страница 240: ...g will be resumed The number of sets you can enter in step 3 differs depending on when the Clear Stop key is pressed Sample Print When the number of sets is massive you can print a single set in advan...

Страница 241: ...ted on the Select File screen When two or more documents are selected the first page of the respective documents is printed 1 Select the document to be printed If a password is set enter it and then p...

Страница 242: ...of the document selected on the Select File screen 1 Select the document to be printed If a password is set enter it and then press OK 2 Press Print Specified Page 3 Press Specify Range 4 Specify the...

Страница 243: ...Settings Guide Web Image Monitor allows you to print a document stored in the Document Server from your computer It is also possible to select two or more documents and delete them You can search the...

Страница 244: ...nt Backup Default Resolution in User Tools For details see System Settings General Settings Guide If you select PDF Single Page or PDF Multi page you can make encoding and privilege settings under Sec...

Страница 245: ...ame of this machine in the address bar When entering an IPv4 address do not begin segments with zeros For example If the address is 192 168 001 010 you must enter it as 192 168 1 10 to connect to the...

Страница 246: ...6 Document Server 244 6...

Страница 247: ...rt given below shows which modes can be used together Blank These modes can be used together These modes cannot be used together The first mode selected will be the mode you are working in These modes...

Страница 248: ...BAT196S 7 Appendix 246 7...

Страница 249: ...top of Punch Top Top Slant Bottom of Staple with 2 holes top of Punch Center of Staple with 2 holes top of Punch 3 Top 2 of Staple with Right Fold Left 2 of Staple with Bottom Fold Bottom of Staple wi...

Страница 250: ...t the total BAT146S Copy Face Up Copies are delivered face down in the same order as the original if Thin Paper Plain Paper 1 Plain Paper 2 Middle Thick or Thick Paper 1 is specified Copies are delive...

Страница 251: ...17 93 85 81 2 13 81 2 11 78 81 2 14 81 2 11 73 11 15 81 2 11 65 11 17 81 2 11 50 Area ratio 1 4 times 11 17 51 2 81 2 25 You can select a ratio regardless of the size of an original or copy paper Wit...

Страница 252: ...ed to allow for the binding margin Combine In this mode the machine selects the reproduction ratio automatically This reproduction ratio depends on copy paper sizes and the number of originals The rep...

Страница 253: ...B4 JIS 81 2 14 or larger 50 sheets Finisher SR4010 Shift Tray A4 81 2 11 3000 sheets A3 B4 JIS A4 B5 JIS 11 17 81 2 14 81 2 11 12 18 1500 sheets A5 500 sheets A5 B6 JIS A6 51 2 81 2 100 sheets Finish...

Страница 254: ...iginals or 16 Originals of Combine 2 Sides specify paper for orientation originals and specify paper for orientation originals To specify Left 2 Top 2 or Slant together with Double Copies specify pape...

Страница 255: ...0 to 50 leaf binding 150 to 60 copies 2 to 19 leaf binding 150 copies A4 B5 JIS 81 2 11 15 to 50 leaf binding 100 to 30 copies 2 to 14 leaf binding 100 copies A3 B4 JIS 11 17 81 2 14 12 18 15 to 30 le...

Страница 256: ...ected When Left 2 or Top 2 is selected the following settings are useful to rotate images appropriately Auto Reduce Enlarge or Auto Paper Select Replace Auto Tray Switching with With Image Rotation in...

Страница 257: ...2 A4 to A5 81 2 11 51 2 81 2 2 and 4 holes type 4 holes A3 B4 JIS 11 17 A4 B5 JIS 81 2 11 2 and 3 holes type 2 holes A3 to A6 11 17 to 51 2 81 2 A4 to A5 81 2 11 51 2 81 2 2 and 3 holes type 3 holes...

Страница 258: ...place different size originals in the ADF appropriate size of copy paper can be automaticallyselectedandZ foldedusingtheMixedSizesmodeandAutoPaperSelectfunction Load the paper you want to use in the p...

Страница 259: ...old Size Magnification If the calculated ratio is over the maximum or under the minimum ratio it is automatically adjusted to within available range However with some ratios parts of the image might n...

Страница 260: ...age Numbering When Page Numbering is used with Combine Magazine or Booklet function page numbers are printed as follows Per Original is selected in Page Numbering in Combine With 1 Sided 2 Sided using...

Страница 261: ...n varies depending on the reproduction ratio Image Repeat Depending on the paper size ratio and orientation parts of repeated images may not be copied Centering Though the original is set to a differe...

Страница 262: ...ted the cover will not be counted as a copy The settings made under Front Cover Sheet Tray and Back Cover Sheet Tray in User Tools determine whether or not the front and back covers are duplex printed...

Страница 263: ...king settings Connect Copy will be canceled Even if the sub machine is in Energy Saver Mode the main machine can still connect to make copies When an Interrupt job on the sub machine has finished pres...

Страница 264: ...e original types shown on the initial display Paper Display Choosetohavetheavailablepapertraysandsizesshownontheinitial display Original Orientation in Duplex Mode Set the original orientation when ma...

Страница 265: ...e Enlarge ratio and have them shown on the initial display You can also change registered Reduce Enlarge ratios Reproduction Ratio Specify the enlargement and reduction ratios that appear if Reduce En...

Страница 266: ...on the front cover sheet when you select Front Cover mode Copy Order in Combine You can set the copy order in Combine mode to Left to Right or Top to Bottom Orientation Booklet Magazine Select the ope...

Страница 267: ...nge or delete user stamps Stamp Format 1 to 4 Specify how each of registered User Stamps 1 to 4 is printed Stamp Color 1 to 4 Sets the color registered in User Stamp color 1 to 4 Date Stamp Format You...

Страница 268: ...Specify how each of stamps is printed Superimpose You can have page numbers printed in white when they overlap black parts of the image Stamp Color Sets the selected priority color when printing the p...

Страница 269: ...ation sheet from 1 to 999 pages in increments of 1 page Letterhead Setting If you select Yes in this function the machine rotates images correctly Staple Position Specify which Top 2 staples or Bottom...

Страница 270: ...Color when Auto Color Select is selected Inkjet Output Type When copying inkjet paper documents specify the final image quality appropriate to the color of the document Administrator Tools Item Descri...

Страница 271: ...hanging the order of jobs 99 Changing the password 232 Changing the user color name 124 Chapters 196 Checking the contents of jobs 98 Checking the details of a stored document 232 Checking the job his...

Страница 272: ...e Color 111 Erase Inside 171 Erase Outside 173 Erase Specified Color 3 Exiting Connect Copy 210 Exposure glass 25 26 32 F Face down 43 Face up 43 Facsimile functions 221 Finishing 80 First Printing Nu...

Страница 273: ...isplay 224 Primary colors 6 Print Backup 242 Printer functions 221 Printing a list of user colors 125 Printing a specified page 239 Printing a specified range 240 Printing stored documents 235 Printin...

Страница 274: ...mp density 143 Stamp position 141 143 144 146 149 152 155 160 Stamp size 143 Stamp Text 5 158 259 Stamping on copies 5 Staple 22 80 86 252 Staple Center 22 Stapling position 86 Storing data 226 Storin...

Страница 275: ...in the United States and or other countries Adobe Acrobat Acrobat Reader PostScript and Reader are either registered trademarks or trademarks of Adobe Systems Incorporated in the United States and or...

Страница 276: ...Type for C6055 MP C6000 LD260c Aficio MP C6000 Type for C7570 MP C7500 LD275c Aficio MP C7500 Printed in Japan Operating Instructions Copy Document Server Reference D015 7652 EN USA D0157652...

Отзывы: