14
This opening(s) can be ducted to a point not more than 18"
(450 mm)
nor less than 6"
(152 mm) above the floor level.
The duct can also “goose neck” through the roof. The duct
is preferred to be straight down 18" (450 mm) from the
floor, but not near piping. Refer to the B149 Installation
Code for additional information.
Water Piping
General
The heater should be located so that any water leaks will
not cause damage to the adjacent area or structures.
NOTE:
Minimum pipe size for the heater inlet/outlet
connections is dependent on the equivalent length of
piping between the load loop and the heater loop, the
operating conditions and the size of the heater. See
Table J and Table L.
Relief Valve Piping
A
A
WARNING:
Pressure relief valve discharge piping
must be piped near the floor and close to a drain to
eliminate the potential of severe burns. Do not pipe
to any area where freezing could occur. Refer to local
codes.
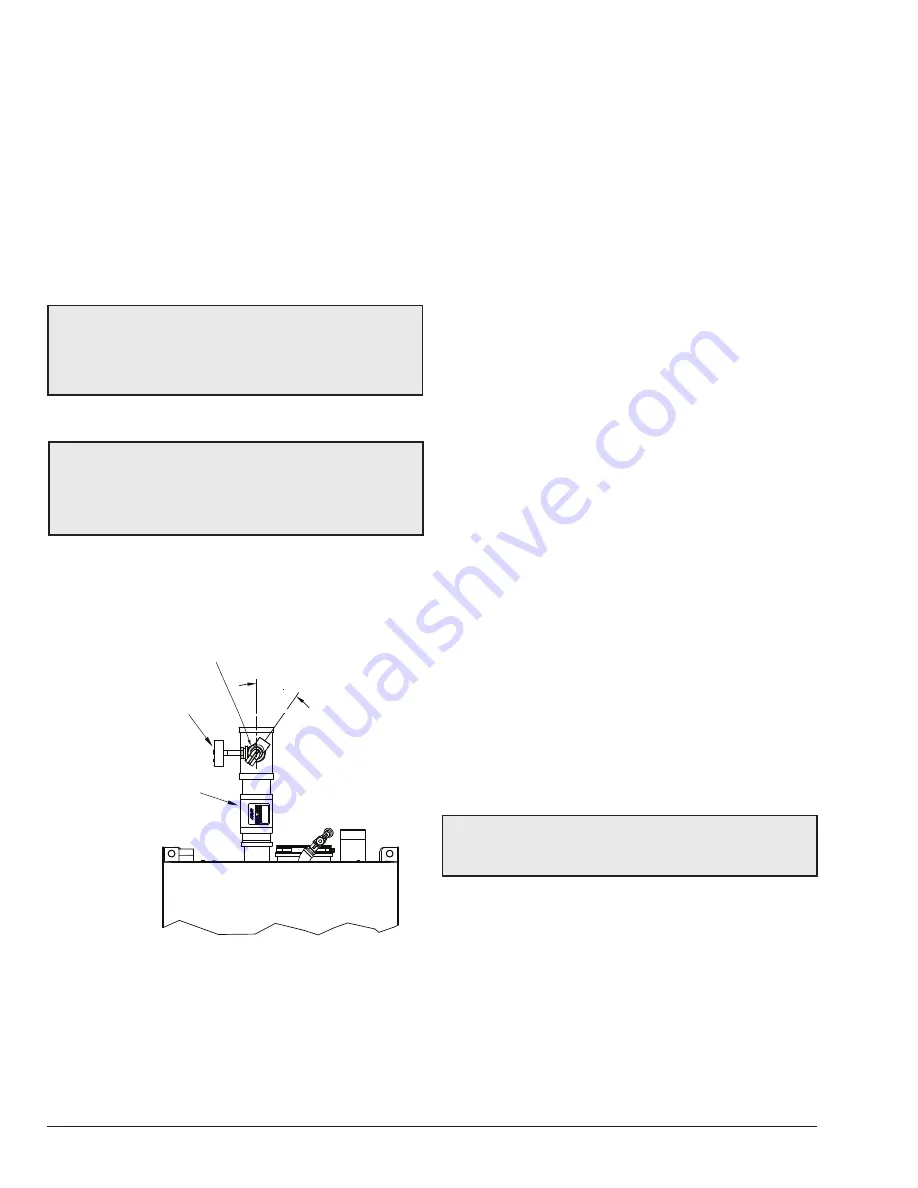
The pressure relief valve (PRV) is shipped loose in the
Shipped Loose Items carton inside the crating.
All PRVs are shipped loose to protect them from damage
during shipping/rigging into place.
PRESSURE RELIEF
VALVE
TEMPERATURE &
PRESSURE GAUGE
F10613
WATER OUTLET
35°
Figure 13. Recommended PRV Orientation
Temperature and Pressure Gauge
The temperature and pressure gauge is shipped loose.
Hydrostatic Test
Unlike many types of heaters, this heater does not require
hydrostatic testing prior to being placed in operation. The
heat exchanger has already been factory-tested and is
rated for 160 psi (1100 kPa) operating pressure. However,
Raypak does recommend hydrostatic testing of the piping
connections to the heater and the rest of the system prior
to operation. This is particularly true for hydronic systems
using expensive glycol-based anti-freeze. Raypak
recommends conducting the hydrostatic test before
connecting gas piping or electrical supply. Leaks must be
repaired at once to prevent damage to the heater. NEVER
use petroleum-based stop-leak compounds.
Isolate heater water connections from the system prior to
performing a hydrostatic test.
Flushing/Cleaning of System Piping
Many of the chemicals used to perform this function will
harm the heat exchanger as well as some of the gaskets
and seals within the unit, causing a non-warrantable
failure. When required, Raypak recommends the heater
be isolated from the system piping prior to flushing or
cleaning, using any cleaning agent.
System Sensor Installation
The System Sensor (S3) is required for all cascade or
primary/secondary piping configurations unless the units
firing rate will be controlled by an external source such
as our Temp Tracker MOD+ Hybrid sequencer. Proper
placement and method of installation are critical for proper
operation of the system.
The sensor must be installed in a drywell in conjunction
with heat conductive compound as shown in
Figure 14
.
The drywell must be installed no more than 5 equivalent
feet (1.52 m) of pipe/tubing downstream of the de-coupler
and installed in such a way that ensures the sensor bulb is
in the flow path on primary/secondary configurations or 5
equivalent feet (1.52 m) downstream of the last heater in
Primary Cascade systems.
A
A
CAUTION:
Be careful when installing the drywell not
to over-tighten the well as this can damage the well and
may prevent the sensor from fitting properly.
Содержание Xfiire 1000B
Страница 54: ...54 6 WIRING DIAGRAM For a full size drawing visit www raypak com ...
Страница 70: ...70 NOTES ...
Страница 71: ...71 NOTES ...


