3 – Managing Fabrics
Zoning a Fabric
3-44
59097-01 A
0
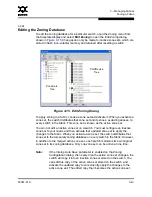
The Edit Zoning dialog has a Zone Sets tree on the left and a Port/Device (or
members) tree on the right. Both trees use display conventions similar to the
fabric tree for expanding and contracting zone sets, zones, and ports. An
expanded port shows the port Fibre Channel address; an expanded address
shows the port World Wide Name. You can select zone sets, zones, and ports in
the following ways:
Click a zone, zone set, or port icon.
Right-click to select a zone set or zone, and open the corresponding popup
menu.
Hold down the Shift key while clicking several consecutive icons.
Hold down the Control key while clicking several non-consecutive icons.
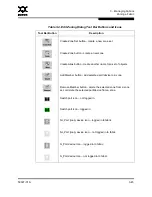
Using tool bar buttons, popup menus, or a drag-and-drop method, you can create
and manage zone sets and zones in the zoning database.
Table 3-4
describes the
zoning tool bar operations.
Use the Edit Zoning dialog to define zoning changes, and click the
Apply
button
to open the Error Check dialog. Click the
Error Check
button to have SANsurfer
Switch Manager check for zoning conflicts, such as empty zones, aliases, or zone
sets, and ACL zones with non-domain ID/port number membership. Click the
Save Zoning
button to implement the changes. Click the
Close
button to close
the Error Check dialog. On the Edit Zoning dialog, click the
Close
button to close
the Edit Zoning dialog.

