


E-40
Source Select/Picture/Volume
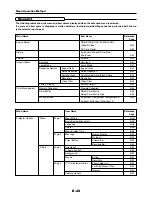
Item Name
Brightness
Contrast
Color
Tint
Sharpness
SELECT
Button
SELECT
Button
Darker
Less contrast
Less dense color
More red
Softer image
Brighter
More contrast
Denser color
More green
Sharper image
Source Select
Use the following procedure to select the viewer or signal being input to the projec-
tor.
The currently selected input signal is indicated by a check mark (
).
RGB .......................... Select this to project the analog RGB signal input to the RGB terminal.
DVI (DIGITAL) .......... Select this to project the digital signal input to the DVI terminal.
DVI (ANALOG) .......... Select this to project the analog signal input to the DVI terminal.
Video ........................ Select this to project the video signal input to the VIDEO terminal.
S-Video ..................... Select this to project the S-video signal input to the S-VIDEO terminal.
PC Card Viewer ......... Select this to display slides.
For instructions on using the viewer, see “Using the PC Card Viewer function”
on page E-65.
Note:
When automatic identification is not possible, the source setting must be made to project compo-
nent signals connected to the RGB and DVI terminals.
See “Signal Select” on page E-53.
Picture
Use this to adjust the brightness, contrast, etc., to suit the lighting of the room in
which the projector is being used.
These adjustments can be made separately for the different input terminals.
Items that cannot be adjusted with the currently selected input signal are displayed in
white characters.
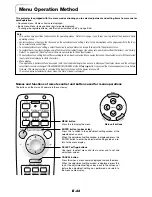
Use the SELECT
▲▼
buttons to select the item, then use the SELECT
buttons to
adjust the value.
Volume
Use this to adjust the volume of the projector’s built-in speaker. This adjusts the
volume of the audio input signals connected to the AUDIO terminal.
Press the SELECT
button to increase the volume, the SELECT
button to decrease
the volume.
• The adjustment is stored separately for the individual sources.
• The sound of the device connected to the AUDIO terminal is produced even when the
input is switched.


