


E-33
Menu Operation Method
ENTER
CANCEL
SELECT
MENU
MENU
PJ
R-CLICK /CANCEL
RGB
DVI
(
Digital
)
DVI
(
Analog
)
VIDEO
S-VIDEO
AUTO
ON
OFF
KEYSTONE
HELP
POINTER PC-CARD
MAGNIFY
SLIDE
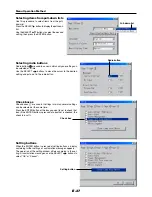
This projector is equipped with two menu modes allowing you to select adjustment and setting items from menus for
quick operation.
• Advanced menu: All menu items are displayed.
• Basic menu: Menu items you have registered are displayed.
To change the registered items, see “Basic/Custom Menu Edit” on page E-46.
Note:
• This section only describes the procedure for operating menus. Refer to this page if you forget how to perform the procedure while
operating menus.
• For instructions on the menu functions and on the adjustments and settings, refer to the descriptions on the pages specific to the func-
tions, adjustments and settings.
• To make adjustments and settings, select the desired input and project an image, then adjust to the optimum status.
• To restore the various items changed using the menus to their default values (the values set upon shipment from the factory), see “Factory
Default” on page E-44. (Note that some items are not restored to their default values.)
• The adjustment and setting items differ according to which input is selected. Menu names that cannot be adjusted or set with the selected
input signal are displayed in white characters.
• Menu display
If no operation is performed for 45 seconds (with the standard setting) while a menu is displayed, the display closes and the settings/
adjustments remain unchanged. If the MENU, ENTER, CANCEL or SELECT
or
button is pressed, the menu reappears as it was before
it closed. This reopen function is canceled if the input is switched or if the power is turned off.
The menu display automatically closes when the “Help” window is displayed.
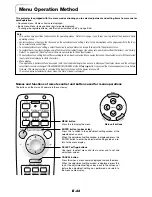
Names and functions of remote control unit buttons used for menu operations
The buttons on the main unit operate in the same way.
Main unit buttons
MENU button
Press this to display the menu.
ENTER button (on back side)
Press this to switch to the adjustment/setting window of the
selected menu name.
When the adjustment/setting window is displayed, press the
ENTER button to enter the adjustment/setting value and re-
turn to the menu display.
SELECT
▲▼
buttons
Use these to select menu and item names and to set and
adjust item values.
CANCEL button
Press this when a menu name is displayed to close the menu.
When the adjustment/setting window is displayed, press this
to set the adjustment/setting values back to the values set
before the adjustment/setting was performed and return to
the menu name display.


