background image


Other connections

16


117


En


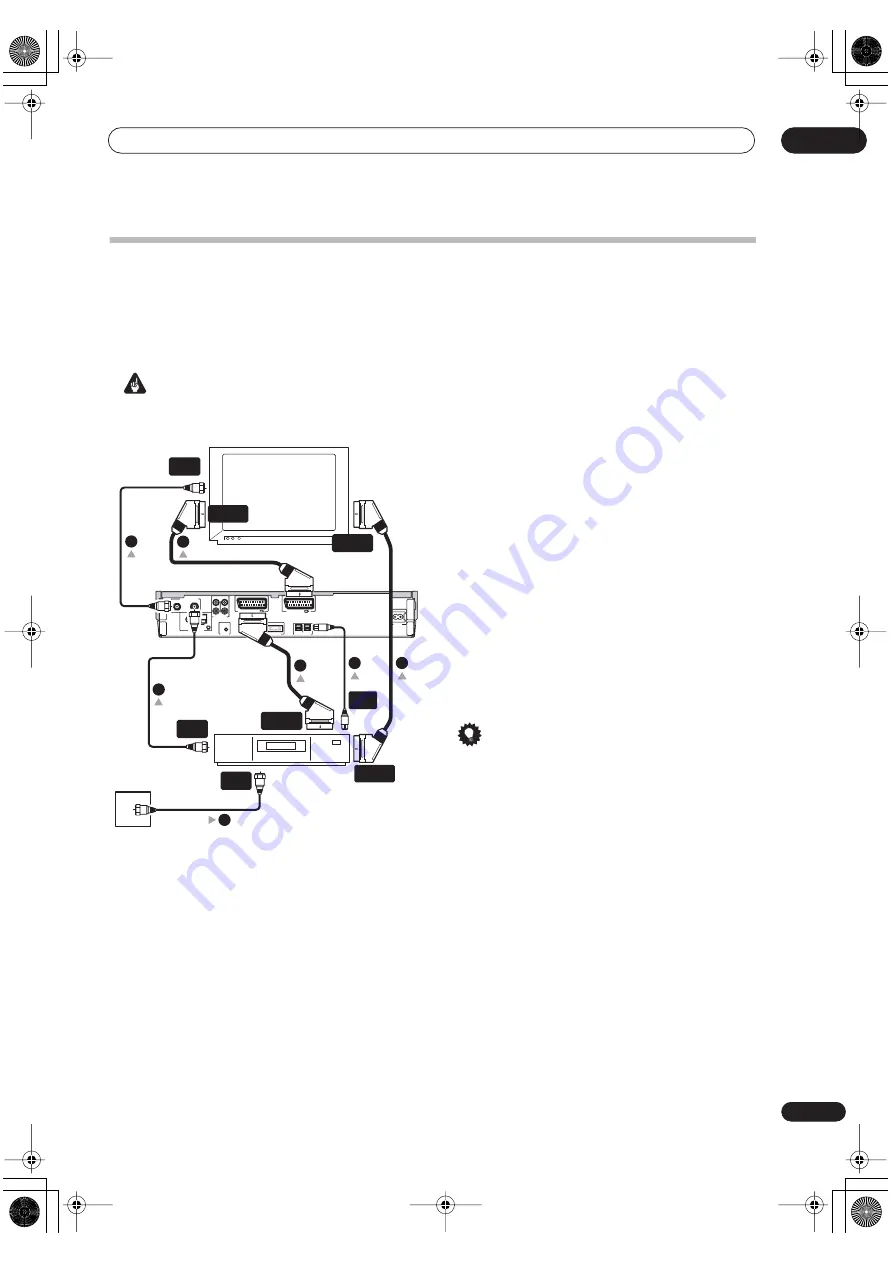
Connecting to a cable box or satellite receiver


If you have a cable box or satellite receiver with a built-in decoder, connect it to this system and your TV as shown on 
this page. If you are using a separate decoder box for your cable/satellite TV, set up following the instructions on the 
next page.

Using the setup on this page you can:

• Record any channel by selecting it on the cable box/satellite receiver.


 Important


• Do not connect this system ‘through’ your VCR, satellite receiver or cable box to your TV.


1

Connect RF antenna cables as shown.


This enables you to watch and record TV channels.


2

Use a SCART cable to connect the AV1(RGB)-TV 

AV connector to a SCART AV connector on your TV.


This enables you to watch discs.


3

Use another SCART cable to connect the 

AV2(LINE 1/DECODER) AV connector to a SCART AV 
connector on your satellite receiver/cable box.


This enables you to record scrambled TV channels.


4

Use an optical digital audio cable to connect the 

OPTICAL DIGITAL AUDIO IN jack to an optical digital 
audio output on your satellite receiver/cable box. 
Use a SCART cable to connect your satellite receiver/
cable box directly to your TV.


This enables you to listen to digital broadcasts, watch 
satellite/cable channels directly on your TV (while 
recording something else).


 Tip


• This system has a ‘through’ function which allows 

you to record a TV program from the built-in TV tuner 
in this system while watching a video playing on your 
VCR (see also 


Tip


 on page 47).

• To use this feature when the system is in standby, 


Power Save


 must be set to 


Off


—see 


Power Save


 on 

page 102.

VHF/UHF  ANTENNA

AM/FM ANTENNA

CONTROL

ANALOG AUDIO

FM UNBAL

75

AM

LOOP

OUT

IN

IN

IN

L

R

OUT

AV 1 (RGB) - TV

USE ONLY  WITH  S-DVR727H SW

OPTICAL DIGITAL AUDIO

OUT

AC IN

IN

AV 2 (LINE1/ DECODER)

TV

Antenna/cable TV
wall outlet

Cable box/
Satellite receiver

SCART AV

CONNECTOR

SCART AV

CONNECTOR

SCART AV

CONNECTOR

OPTICAL

OUT

SCART AV

CONNECTOR

ANTENNA

IN

ANTENNA

OUT

ANTENNA

IN

1

1

2

3

4

4

1

PT-RW_UK.book 117 ページ 2004年7月26日 月曜日 午後3時41分

Содержание XV-DVR9H

Страница 1: ...DVR9H SPEAKER SYSTEM S DVR9ST POWERED SUBWOOFER S DVR9SW Operating Instructions DVD RW HDD TUNER XV DVR9H SPEAKER SYSTEM S DVR9ST POWERED SUBWOOFER S DVR9SW Operating Instructions PT RW_UK book 1 ページ 2004年7月26日 月曜日 午後3時41分 ...

Страница 2: ...a lighted candle on the equipment D3 4 2 1 7a_A_En Operating Environment Operating environment temperature and humidity 5 ºC 35 ºC 41 ºF 95 ºF less than 85 RH cooling vents not blocked Do not install this unit in a poorly ventilated area or in locations exposed to high humidity or direct sunlight or strong artificial light D3 4 2 1 7c_A_En CAUTION This product is a class 1 laser product but this p...

Страница 3: ...ter or your dealer for a replacement S002_En 5 cm 5 cm 5 cm Powered subwoofer unit S DVR9SW 5 cm 5 cm 5 cm DVD RW HDD Tuner unit XV DVR9H If the AC plug of this unit does not match the AC outlet you want to use the plug must be removed and appropriate one fitted Replacement and mounting of an AC plug on the power supply cord of this unit should be performed only by qualified service personnel If c...

Страница 4: ...c Navigator to browse the contents of a disc 34 Navigating discs and the HDD 36 Scanning discs 36 Playing in slow motion 37 Frame advance frame reverse 38 The Play Mode menu 38 Displaying and switching subtitles 41 Switching DVD soundtracks 42 Switching audio channels 42 Switching camera angles 43 06 Recording Introduction 44 About DVD recording 44 About HDD recording 44 Recording time and picture...

Страница 5: ...12 16 Other connections Extra features for use with compatible TVs 116 Connecting to a cable box or satellite receiver 117 Connecting an external decoder box 1 118 Connecting an external decoder box 2 119 Connecting external antennas 120 Using the front panel connections 120 Connecting auxiliary components 121 Using this unit with a Pioneer plasma display 122 17 Additional information Optional sys...

Страница 6: ...for any stereo source Surround and Advanced Surround modes Used together with the Dolby Digital DTS or Dolby Pro Logic II modes the Surround and Advanced Surround modes are designed to enhance particular types of program material by for example reproducing the acoustic space of a concert hall for music based material Front Surround sound If it s not possible to place the surround speakers behind y...

Страница 7: ...r license from Gemstar Development Corporation One Touch Recording Use One Touch Recording to start recording immediately in 30 minute blocks Each time you press the REC button the recording time is extended by another 30 minutes Optimized recording Optimized recording adjusts the recording quality automatically if a timer recording will not fit onto a disc with the settings that you made Auto Sta...

Страница 8: ... back up feature gives you a convenient way to back up important material on DVD to another recordable DVD disc The material is first copied to the HDD then on to a second DVD disc Recovery Recording When a timer recording is set to use DVD but the disc loaded at the time of the recording is unrecordable the program will automatically be recorded to the HDD Auto Replace Recording This feature is u...

Страница 9: ...he remote control 1 Open the battery compartment cover on the back of the remote control 2 Insert two AA R6P batteries into the battery compartment following the indications inside the compartment 3 Close the cover Caution Incorrect use of batteries can result in hazards such as leakage and bursting Please observe the following Don t mix new and old batteries together Don t use different kinds of ...

Страница 10: ...s superior picture quality and allows two soundtracks to be recorded Super VCD also supports the widescreen size DVD R RW compatibility This system will play and record DVD R RW discs Compatible media DVD RW Ver 1 1 Ver 1 1 2x and Ver 1 2 4x DVD R Ver 2 0 and Ver 2 0 4x 8x Recording formats DVD R DVD Video format Video mode DVD RW Video Recording VR format and DVD Video format Video mode Older mod...

Страница 11: ...t one time if there are more files folders that this on the disc then more can be reloaded PC created disc compatibility Discs recorded using a personal computer may not be playable in this unit due to the setting of the application software used to create the disc In these particular instances check with the software publisher for more detailed information Discs recorded in packet write mode UDF ...

Страница 12: ... Install and use the system on a stable level surface Do not block the rear vent cooling fan Do not use the system in excessively hot or humid places or in places that may be subject to sudden changes in temperature Sudden changes in temperature can cause condensation to form inside the system This can be a cause of HDD failure While the system is switched on do not unplug from the wall socket or ...

Страница 13: ...tc 9 STOP REC Press to stop recording 10 REC Press to start recording 11 DV IN OUT jack page 57 108 120 Digital input output jack for use with a DV camcorder 12 Front panel display See Display on page 14 for details 13 IR remote sensor page 10 14 Front panel inputs and headphones jack page 120 Pull the cover down where indicated to access the front panel input jacks Especially convenient for conne...

Страница 14: ... recording has been set Indicator blinks if the timer has been set to DVD but there isn t a recordable disc loaded or the timer has been set to HDD but the HDD is not recordable page 48 AUTO Lights when Auto Start Recording has been set and during Auto Start Recording page 56 OVER Lights when the LINE1 or LINE2 input level is too high page 108 VPS PDC Lights when receiving a VPS PDC broadcast duri...

Страница 15: ...ntrol Important Functions printed in green on the remote control are accessed by pressing the button indicated while holding down the SHIFT button 1 MUTE Press to mute all audio from the speakers and headphones Press again to cancel and restore the sound 2 STANDBY ON Press to switch the system on or into standby 3 ONE TOUCH COPY page 61 Press to start One Touch Copy of the currently playing title ...

Страница 16: ...nd Play List content on VR mode discs or display the disc menu if a DVD Video disc is loaded SHIFT SYSTEM SETUP Use to access the menu system for surround sound setup tuner settings and so on page 20 91 94 124 13 cursor buttons and ENTER Used to navigate all on screen displays Press ENTER to select the currently highlighted option TUNE Use to tune the radio ST Use to select station presets when li...

Страница 17: ...LE page 41 Displays changes the subtitles included in multilingual DVD Video discs SHIFT ADVANCED Use to select an Advanced Surround mode page 31 ANGLE page 43 Switches camera angles on discs with multi angle scenes SHIFT DIALOGUE Use to select a Dialogue mode page 33 PLAY MODE page 38 Press to display the Play Mode menu for features such as search repeat and program play SHIFT SOUND page 33 Press...

Страница 18: ...n Check the manual that came with your TV for compatibility information 3 Use the cursor up down buttons to choose a language then press ENTER 4 Press ENTER to start setting up using the Setup Navigator If you don t want to use the Setup Navigator press cursor down to select Cancel then press ENTER to exit the Setup Navigator 5 Select the Auto Channel Setting Auto Scan or Download from TV or Do no...

Страница 19: ...en use the cursor left right buttons to select On or Off for summer time then press ENTER Select On if you are currently using summer time Basic Tuner Video In Out Audio In Audio Out Language Recording Playback Clock Set Input Line System On Screen Display Front Panel Display Power Save Setup Navigator Setup Navigator Country Selection Country UK Initial Setup Tuning 11 107 Cancel Downloading Canc...

Страница 20: ... your TV on page 124 Using the Room Setup After you have set up your speakers to your liking see Home theater sound setup on page 30 make sure you calibrate your system for surround sound This is a quick and easy way to get good surround sound for your room For a more detailed surround sound setup see Using the System Setup menu on page 94 1 Press SHIFT and SYSTEM SETUP 2 Use the cursor left right...

Страница 21: ... the front panel lights blue when the HDD is selected Alternatively you can use the HDD DVD button on the front panel Press to switch from one to the other Making your first recording This quick guide shows you how to make a basic recording of a TV program on either the HDD or to a recordable DVD Recording is covered in much more detail in chapter 6 Recording starting on page 44 1 If they aren t a...

Страница 22: ...stop recording press STOP REC If you changed the playback recording function change it back to DVD or HDD as appropriate first Playing back your recording The TV program you just recorded should be on the HDD or DVD disc as a single title with one or more chapters Press PLAY to start playback If you want to stop playback before the end of the recording press STOP Using the built in TV tuner Note t...

Страница 23: ...ve the audio video from the built in TV tuner or external input play on your TV DVD mode or watch the channel that the TV is currently set to TV mode During playback or when a menu is being displayed on screen the sound and video is always routed to your TV and is unaffected by the TV DVD mode setting Note that the system must be connected to your TV using a SCART cable to be able to use this feat...

Страница 24: ...nus When playing video from the HDD playback will automatically stop after the end of a title is reached See the following sections for more details on playing specific kinds of discs 6 To stop playback press STOP You can resume playback of a DVD disc from this point if you don t switch the system into standby you can switch to the FM AM radio tuner without losing the resume point Note that if you...

Страница 25: ...hile paused press to advance a single frame in either direction Press to display the top menu or menu of a DVD Video disc these are often the same Use the cursor buttons to navigate DVD Video disc menus press ENTER to select items Press to return to the previous level of a DVD Video disc menu PLAY STOP PAUSE REV SCAN FWD SCAN PREV NEXT CLEAR ENTER SKIP CM BACK STEP SLOW DVD MENU TOP MENU ST ST TUN...

Страница 26: ... REV SCAN FWD SCAN PREV NEXT CLEAR ENTER Press to start playback Video CD only If RESUME is displayed on screen playback starts from the place last stopped Press to stop playback Video CD only You can resume playback from the same point by pressing PLAY Press STOP again to cancel the resume function Pauses playback or restarts playback when paused Press to start scanning Press repeatedly to increa...

Страница 27: ...D and removable disc DVD etc activity together Press again to show the status of just the currently selected playback recording device HDD or removable disc The on screen display automatically disappears after 150 minutes 2 To hide the information display press DISPLAY repeatedly until it disappears The example displays below are a guide only actual displays vary according to the disc loaded etc H...

Страница 28: ... format WMA MP3 10 Finalized Shows Finalized if a recordable DVD is finalized 11 TV DVD mode Shows the current mode of the system see Switching between TV and DVD on page 23 Stop display 2 1 Date and time 2 Number of titles tracks on disc For a VR mode DVD RW the number of Original and Play List titles are shown separately Play display 1 1 Number of chapters in title 2 Current title and chapter nu...

Страница 29: ...enthesis is calculated based on a 12cm 4 7GB disc at the displayed record setting Recording and playback times for TV recordings are approximately 0 1 shorter than the actual time This is because of the slightly different frame rates of TV broadcasts versus DVD The frame number is shown next to the elapsed time display when the disc is paused Copy Once or Can t Record messages may appear in the st...

Страница 30: ...ding on the source for example 88 2 96 kHz sources or a conflicting system setting See Front panel display error messages on page 133 for more on this Listening with home theater sound You can listen to any source DVD discs the radio an external component in stereo or surround sound as you like If you want to listen to the source as it was mastered select the Auto listening mode This automatically...

Страница 31: ...ound effects are designed for 5 spot speaker setups while others are for 3 spot setups Press SHIFT and ADVANCED then use the buttons to select an Advanced Surround mode You can also hold down the SHIFT button and press ADVANCED repeatedly to select an Advanced Surround mode Select from Adv Movie Gives a movie theater type sound Adv Music Gives a concert hall type sound Expanded Creates an extra wi...

Страница 32: ... turning each surround speaker about 50º towards the closest wall With ExtraPower orient the surround speakers in the same direction as the front speakers towards the listening position When turning you will feel the surround speaker snap into the correct position Do not force the speaker to turn past this point Listening in stereo You can listen to any source stereo or multichannel analog or digi...

Страница 33: ...the sound The bass and treble can be adjusted from 3 to 3 4 Press ENTER to confirm Boosting the bass level There are three bass modes you can use to enhance the bass in a source 1 Press SHIFT and SOUND 2 Use the cursor left right buttons to select Bass Mode 3 Use the cursor up down buttons to select a bass mode Select from Music Can be used with music to give a deeper bass sound Cinema Good for ac...

Страница 34: ...don t allow certain playback controls to operate at certain points in the disc This is not a malfunction When playing Video CDs some functions such as making a program list are not available in PBC mode Stop the disc first then start playback by pressing For discs that contain JPEG picture files see The PhotoViewer on page 89 Using the Disc Navigator to browse the contents of a disc Use the Disc N...

Страница 35: ...s 1 Press HDD or DVD to select the hard disk drive or the DVD drive 2 Press HOME MENU and select Disc Navigator from the on screen display Alternatively you can press DISC NAVIGATOR to go straight to the Disc Navigator screen 3 Select Play from the menu options Press ENTER to move to the thumbnails area of the screen 4 Use the cursor buttons to select a title to play 5 Press ENTER to start playbac...

Страница 36: ...n press CLEAR 2 Optionally Press ENTER Alternatively just wait a few seconds and playback will jump to the new chapter 1 During playback use the number buttons to input a title number For example for title 6 press 6 for title 24 press 2 then 4 To clear and start again press CLEAR 2 Optionally Press ENTER Alternatively just wait a few seconds and playback will jump to the new title 1 During playbac...

Страница 37: ... playback may not be smooth Depending on the disc normal playback may automatically resume when a new chapter is reached on a DVD disc Playing in slow motion You can play video at various slow motion speeds DVDs and video on the HDD can be played in slow motion in either direction while Video CD Super VCDs can only be played forwards in slow motion 1 Press or to start slow motion reverse or forwar...

Страница 38: ...ess to search functions repeat and program play functions Important You can t use the Play Mode features with Video CD Super VCDs playing in PBC mode or while a DVD disc menu is being displayed For other restrictions see the following sections 1 With the input function set to HDD or DVD press PLAY MODE to display the Play Mode menu screen You can also access the Play Mode menu from the Home Menu p...

Страница 39: ...er Important You can t use A B Repeat with WMA MP3 or Super VCD discs 1 During playback select A B Repeat from the Play Mode menu 2 With A Loop Start highlighted press ENTER at the point you want the loop to start After setting the loop start point the highlight will automatically move down to B Loop End 3 With B Loop End highlighted press ENTER at the point you want the loop to end Playback immed...

Страница 40: ...st of titles DVD folders WMA MP3 or tracks CD Video CD Super VCDs On the far right is a list of chapters DVD or tracks WMA MP3 3 Select a title chapter folder or track for the current step in the program list For a DVD disc you can add a whole title or a chapter within a title to the program list To add a title select the title To add a chapter first highlight the title then press cursor right and...

Страница 41: ... next program step Press CLEAR during playback to switch off program play if no menu OSD such as the Disc Navigator is displayed Press while stopped to erase the program list Other Program play functions As well as creating and editing a program list you can start program play cancel program play and erase the program list from the Play Mode menu 1 Press PLAY MODE and select Program from the list ...

Страница 42: ...MENU to access To set subtitle preferences see Subtitle Language on page 109 Switching DVD soundtracks When playing a DVD disc recorded with two or more soundtracks often in different languages you can switch the soundtrack during playback Check the disc packaging for details of the soundtrack options Press AUDIO repeatedly to select an audio soundtrack Note The sound may drop out for a few second...

Страница 43: ...dtrack 1 Right channel 2 Stereo Soundtrack 2 Stereo 2 L Soundtrack 2 Left channel 2 R Soundtrack 2 Right channel Switching camera angles Some DVD Video discs feature scenes shot from two or more angles check the disc box for details it should be marked with a icon if it contains multi angle scenes When a multi angle scene is playing the same icon appears on screen to let you know that other angles...

Страница 44: ...erprints and small scratches on a disc can affect playback and or recording performance Please take proper care of your discs Although this system can record PAL SECAM NTSC and PAL 60 you can t mix multiple TV line systems on one disc A disc can contain PAL and SECAM recordings or NTSC and PAL 60 See also Input Line System on page 102 Note Some DVD players such as some Pioneer models are compatibl...

Страница 45: ...use of the way that the video is recorded you may get slightly more or slightly less depending on what you re recording Restrictions on video recording You cannot record copy protected video using this system Copy protected video includes DVD Video discs and some satellite broadcasts If copy protected material is encountered during a recording recording will pause automatically and an error messag...

Страница 46: ...loaded the approximate remaining recording time for that disc is also shown Note that if the On Screen Display setting see On Screen Display on page 102 is Off then this information is not displayed Basic recording from the TV Follow the instructions below to record a TV program Recording starts immediately and continues until the disc is full or you stop the recording 1 Press HDD or DVD to record...

Страница 47: ... recording whichever is sooner You can only stop recording when the input function is set to DVD or HDD Tip During recording you can turn on off the SCART loop through function During recording press the front panel button to switch to SCART THRU loop through on or to switch to SCART NORM loop through off Note that you can t switch loop through on if recording from the AV2 LINE 1 DECODER or AV1 RG...

Страница 48: ...g catches the whole program even when the program is not running to schedule Up to eight timer programs can be set with VPS PDC on Important A timer recording can t be set if Auto Start Recording is in progress There are already 32 timer programs waiting to be recorded Timer recording will not start if The system is already recording A disc is being initialized finalized or unfinalized Timer recor...

Страница 49: ...e timer recording for up to a month in advance Each column is a 15 minute interval The darker area represents time that has already passed and can t therefore be selected The lighter area is time that s available 5 Press ENTER to set the start time The start date and time is displayed in the middle of the screen You can go back and reset the start time if you need to by pressing RETURN 6 Use the c...

Страница 50: ...he cursor left right buttons to select a field use the cursor up down buttons to change the value Date Choose a date up to one month in advance or select a daily or weekly program Start Set the recording start time Stop Set the recording end time maximum length of a timer recording is 24 hours for HDD recording or six hours for DVD CH Choose a channel 1 99 excluding skip channels or one of the ext...

Страница 51: ...lly If the HDD is being used for playback or high speed copying when an Auto Replace Recording is due to start the new timer recording will not replace the old one However the next time the timer recording starts both of the older two programs will be erased If you set the timer recording to use VPS PDC you must switch the system into standby before the timer recording is due to start for it to wo...

Страница 52: ...e channel number that the TV program is showing on VIDEO Plus programming with the power off You can enter a PlusCode programming number when the system is in standby Note that the recording is always made to the HDD If you want to record to a DVD disc you ll need to switch on the power and use the full VIDEO Plus program screen Important You can t use this feature until you have set up the guide ...

Страница 53: ...ote that it is only possible to program a new end time for a timer recording when VPS PDC is off 1 With the function set to HDD DVD press HOME MENU and select Timer Recording then Timer Recording View 2 Use the cursor up button to highlight the current timer recording Recording is shown in the VPS PDC column then press ENTER A screen showing details of the timer recording appears From this screen ...

Страница 54: ...rlier program is finished If two programs have the same times but different channels for example the program set most recently takes priority If VPS PDC is active for two timer programs that are programmed to start at the same time then the program that actually starts first takes priority Simultaneous recording and playback A feature called Chase Play makes it possible to watch a recording in pro...

Страница 55: ...automatically stop Recording from an external component You can record from an external component such as a camcorder or VCR connected to one of the system s external inputs 1 Make sure that the component you want to record from is connected properly to this system See Other connections on page 115 for connection options 2 Press HDD to record to the hard disk drive or DVD to record to a DVD 3 Pres...

Страница 56: ...ecording is due to start After the timer recording has finished Auto Start Recording will resume 1 Set the timer for the satellite receiver or other component then switch it into standby if necessary Check the manual that came with the receiver if you re not sure how to do this 2 Check that the Audio In settings for External Audio and Bilingual Recording are as you want them See Audio In settings ...

Страница 57: ...e sure a recordable disc is loaded if you want to record to DVD 3 From the Initial Settings menu check that the DV audio input is setup as you require See DV Input on page 108 for more on this Check also that the Audio In settings for External Audio and Bilingual Recording are as you want them see Audio In settings on page 107 4 Press HOME MENU and select DV Record from the menu DV recording only ...

Страница 58: ... recording on the camcorder 5 Play the source material Playing your recordings on other DVD players Most regular DVD players can play finalized discs recorded in Video mode A number of players including many Pioneer models can also play DVD RW discs recorded in VR mode finalized or not Check the manual that came with the player to check what kinds of discs it will play When you finalize a Video mo...

Страница 59: ...tting You can t change the input function to FM AM for example during finalization Initializing a DVD RW disc When you first load a blank disc the system will initialize it automatically for recording You can also manually initialize DVD RW discs You can initialize a disc for either Video mode recording or VR mode recording Important Initializing a disc will erase everything recorded on it Make su...

Страница 60: ... audio or video Copying can be carried out at the maximum speed possible When copying from HDD to DVD the speed of copying depends on the recording mode and the kind of DVD disc you re using The table at the bottom of the page shows the minimum copying time for one hour of material Note Not all discs are compatible with high speed copying Check with the disc manufacturer for compatibility There ma...

Страница 61: ...n screen If the current title is copy once protected an exclamation mark is shown see Play display 2 on page 29 Copyright Recording equipment should be used only for lawful copying and you are advised to check carefully what is lawful copying in the country in which you are making a copy Copying of copyright material such as films or music is unlawful unless permitted by a legal exception or conse...

Страница 62: ...e available for recording does not return to the pre copy figure Copying from HDD to DVD From the HDD to DVD Copy screen you can build up a Copy List of titles to copy to DVD From this screen you can also edit chapters so that the titles appear as you want them on your finished DVD See also Copyright on page 61 Important The system can only store one Copy List at a time The Copy List is erased if ...

Страница 63: ...ed Press RETURN to get back to the menu options on the left from the thumbnail area of the Copy List screen When selecting HDD titles you can display titles from a particular HDD group by pressing cursor up then using the cursor left right buttons and ENTER to select a group Press cursor down to get back to the HDD title thumbnail area Recording the Copy List After putting together your Copy List ...

Страница 64: ...in the Copy List see page 66 Move Change the order of titles in the Copy List see page 66 Erase All Erase the Copy List see page 67 Chapter Edit Chpt Edit Edit chapters within a Copy List title see page 67 Erase Erase a chapter Divide Divide a chapter into two Combine Combine two chapters into one Move Change the chapter order Preview Check the chapter content Erase Section Erase Sec Erase a secti...

Страница 65: ...te characters directly press and hold for two seconds to delete the whole name Press RETURN to go back to the Copy List screen without changing the name 4 To confirm the name and return to the main Copy List screen highlight OK and press ENTER 5 Repeat steps 2 to 4 to name other titles in the Copy List or press RETURN to go back to the Copy List menu options Divide Use this command to make two tit...

Страница 66: ...ing modes EP MN1 6 LP MN7 18 SP MN19 31 FINE MN32 can t be combined Preview Use this command to check the content of a title in the Copy List 1 Select Preview from the Copy List menu options 2 Use the cursor left right buttons to select a title from the Copy List to preview then press ENTER The selected title starts playing You can return to the Copy List screen by pressing STOP otherwise playback...

Страница 67: ...fter confirming Divide Divide a chapter into two or more new chapters See Chapter Edit Divide below Combine Combine two chapters into one See Chapter Edit Combine below Move Change the order of the chapters See Chapter Edit Move below Preview Check the content of a chapter Use the cursor buttons to select a chapter then press ENTER Once the preview has started press STOP to return to the chapter e...

Страница 68: ...ns to select the space between the chapters to combine 2 Press ENTER to combine Chapter Edit Move This command lets you rearrange the chapters within a Copy List title 1 Use the cursor buttons to select the chapter you want to move then press ENTER 2 Use the cursor buttons to select a new position for the chapter then press ENTER The thumbnails in the chapter list reflect the new order 1 3 0 00 52...

Страница 69: ...r appears under the bar to show the start of the section 4 In the same way find the end of the section to erase then with To highlighted press ENTER After pressing ENTER another marker appears under the bar to show the end of the section with the section itself marked in red 5 Select Yes to confirm or No to cancel then press ENTER In the thumbnail viewer you can see a few seconds of video either s...

Страница 70: ... is opened playback is switched between Original and Play List the DVD disc is reinitialized or finalized the system is reset to its factory settings see Resetting the system on page 124 It may not be possible to copy from a DVD disc that was recorded on a different DVD recorder or PC Original Conf List DVD DVD to HDD Copy Add Erase Move Preview Erase All DVD DVD HDD HDD 1 1 3 1 2 Copy List Total ...

Страница 71: ...ady to record it 1 Select Conf List to display the Copy List settings screen 2 Use the cursor left right buttons to select the Recording Mode High Speed Copy Only available when copying Original content from a VR mode disc The Copy List is copied at the same recording quality as the original See page 60 for more information on high speed copying FINE SP LP EP MN The Copy List is copied at the spec...

Страница 72: ...milarly a copy once protected title recorded from the TV for example can be added to the Copy List but it will not be copied if High Speed Copy is selected You may not be able to copy titles when copying a disc that was created using a PC or another recorder Erase Use this command to erase individual titles from the Copy List 1 Select Erase from the Copy List menu options 2 Use the cursor left rig...

Страница 73: ...or No to cancel then press ENTER Using disc back up This feature offers a simple way to make a back up copy of a finalized Video mode disc The data is copied first to the hard disk drive then on to another recordable DVD disc See also Copyright on page 61 1 With the input function set to HDD DVD press HOME MENU 2 Select Copy 3 Select Disc Back up 4 Select a back up option There are three back up o...

Страница 74: ... disc you can re initialize it in order to make it usable again see Initializing a DVD RW disc on page 59 9 After the system has finished recording the back up disc you can select whether to make another back up of the same data or exit Select Start to make another back up copy or Cancel to finish If you want to make another back up copy return to step 6 above 10 If you don t need to keep the back...

Страница 75: ...sc or you can create and edit a Play List The Play List doesn t actually change any of the content on the disc but just controls how the content is played back rather like the program play feature found on CD players Editing material recorded on the HDD is similar to editing the Original content of a VR mode DVD RW with similar commands for erasing naming and locking titles as well as fine control...

Страница 76: ... system During recording these titles cannot be played HDD All 1 1 12 30 Wed 4 11 Pr 5 LP Recording Time 0h30m40s 1 2 3 4 5 6 Disc Navigator Play Erase Ttl Name Chpt Edit Erase Sec HDD Remain 6h12m FINE All Group1 Group2 Group3 Group4 NEW Auto Replace Recording indicator Disc Navigator menu options Selected Group Number of title pages Locked title indicator Information for selected title Recording...

Страница 77: ...ontent a row of group names appears above the title thumbnails see Editing HDD groups on page 82 for more details You can access these by pressing cursor up repeatedly until the All group is highlighted then using the cursor left right buttons to select a group Press ENTER to open the highlighted group Titles on the HDD marked with a icon are timer recordings set to Auto Replace Recording see Stan...

Страница 78: ...ine Combine two Play List titles into one page 86 Erase All Erase all titles in the Play List page 87 Undo Undo the last change page 87 Editing VR mode Original Video mode and HDD content These commands affect the actual content stored on the DVD R RW or HDD Remember If you are editing a VR mode disc use the PLAYLIST button to switch to the Disc Navigator Original screen Play Use this function to ...

Страница 79: ...d character set 4 Highlight OK then press ENTER to enter the name and return to the main Disc Navigator screen To return to the main Disc Navigator screen without saving changes to the title name press RETURN 5 Press RETURN to go back to the Disc Navigator menu options or select another title to name Chapter Edit Chpt Edit When editing VR mode DVDs or video on the HDD you can edit individual chapt...

Страница 80: ...his command you can delete a part of an Original title ideal for cutting out the commercial breaks in a recording made from the TV 1 Select Erase Sec from the Disc Navigator menu options 2 Use the cursor buttons to select a title After selecting a title the Erase Sec screen appears from which you can mark the start and end points of the section to erase 3 Use the playback controls etc to find the ...

Страница 81: ...l from the Disc Navigator menu options 2 Select Yes to confirm or No to cancel then press ENTER Undo If you make a mistake while editing you can generally undo it There are three levels of undo in other words you can undo the last three edits you made Select Undo from the Disc Navigator menu options You can t undo the following operations initializing recording or finalizing a disc locking and unl...

Страница 82: ...me a group 1 Select Grp Name from the Disc Navigator menu 2 Use the cursor left right buttons to select the group that you want to name or rename then press ENTER 3 Input a name for the group The name can be up to six characters long Use the cursor buttons and ENTER to select characters A name generated automatically by the system will already be in the name input section of the screen Use the but...

Страница 83: ...isc Navigator menu options or select another title to erase Note The remaining recording time doesn t change when you erase something from the Play List Title Name Ttl Name You can give titles new names of up to 64 characters long 1 Select Ttl Name from the Disc Navigator Play List menu options 2 Select the title you want to name then press ENTER 3 Input a name for the selected title Use the curso...

Страница 84: ... Divide Divide a chapter into two or more parts Select the chapter you want to divide From the following screen use the playback controls etc to find the point at which you want to divide the chapter With Divide highlighted press ENTER You can keep dividing the chapter as many times as you want up to 999 chapters per disc Highlight Back and press ENTER to return to the Chapter Edit screen Combine ...

Страница 85: ... same title or press RETURN to get back to the main Disc Navigator screen Create Use this function to add an Original title to the Play List When you do this the whole title is put into the Play List you can erase bits you don t need later see Chapter Edit Chpt Edit on page 84 The title appears in the Play List complete with the chapter markers that appear in the Original However if you add more c...

Страница 86: ...sual playback controls including PLAY PAUSE scan and slow motion 4 With Divide highlighted press ENTER to divide the title at the current playback position 5 To return to the Disc Navigator menu options select Back and press ENTER Combine Use this function to combine two adjacent Play List titles into one 1 Select Combine from the Disc Navigator Play List menu options 2 Highlight the bar divider b...

Страница 87: ...re three levels of undo in other words you can undo the last three edits you made Select Undo from the Disc Navigator Play List menu options You can t undo anything after opening the disc tray or switching the system into standby You can t undo the following operations initializing recording or finalizing a disc locking and unlocking titles Play List 1 1 Undo DVD Disc Navigator 1 2 3 Create Move D...

Страница 88: ...r the first time the system automatically names the disc DISC where is a number from 1 to 99 You can rename the disc if you want to see Input Disc Name on page 96 When you change the display for the available recording time using the REC MODE button only the display is changed the actual recording mode is not affected The following discs appear in the Disc History list in gray Discs with no availa...

Страница 89: ...iles folders than this on the disc it is still possible to view them all using the Reload function see below The time it takes for the system to load a file increases with large file sizes Pictures with an aspect ratio different to your TV screen will appear with black bars top and bottom or either side depending on the picture If you encounter a disc that will not play check that the disc and fil...

Страница 90: ... off 2x zoom and 4x zoom The zoom factor is displayed on screen 2 Use the cursor buttons to move the zoomed area within the picture Rotating the screen You can rotate the displayed picture during a slideshow so you can always view pictures the right way up whichever way they were taken During a slideshow press ANGLE to rotate the displayed picture clockwise by 90º Press ANGLE repeatedly to continu...

Страница 91: ...n FM station in stereo but the reception is weak you can improve the sound quality by switching to mono 1 While listening to an FM radio station press SHIFT and SYSTEM SETUP 2 Use the cursor left right buttons to choose FM Mode then press ENTER 3 Use the cursor up down buttons to select FM Mono then press ENTER The mono indicator MONO lights when the tuner is in mono reception mode Select FM Auto ...

Страница 92: ... like listening to jazz you could search for a station that s broadcasting a show with the program type Jazz There are around 30 such program types including various genres of music news sport talk shows financial information and so on The receiver lets you display three different kinds of RDS information Radio Text Program Service Name and Program Type Radio Text RT is messages sent by the radio ...

Страница 93: ...on The display will then automatically switch to the PS data display if no PS data is transmitted from the station the frequency will be displayed after briefly showing NO DATA In the PTY display there are cases where NO DATA or None is shown If this happens the PS display is shown after a few seconds Searching for RDS programs One of the most useful features of RDS is the ability to search for a ...

Страница 94: ... position to the front speakers Front 0 3 m Front 9 m Distance can be set in increments of 0 3 m The default is 3 m Center speaker distance setting Specifies the distance from your listening position to the center speaker Center 0 3 m Center 9 m Distance can be set in increments of 0 3 m The default is 3 m Surround speakers distance setting Specifies the distance from your listening position to th...

Страница 95: ... appropriate level Turn down the volume to 40 or less to ensure you have adequate headroom 4 Use the cursor up down buttons to adjust the speaker levels in turn You should hear the test tone at the same volume from each speaker when seated in the main listening position The channel level range is 10 dB 5 When you re done press ENTER to exit test tone setup Tip Channel levels can be adjusted while ...

Страница 96: ...to change to upper or lower case or use the buttons You can also use the CLEAR button to delete characters directly press and hold for two seconds to delete the whole name For discs formatted on a different DVD recorder you will see only a limited character set Note You cannot input a name for a disc if the TV line system of the disc is different to the current setting of the system See Input Line...

Страница 97: ...n it Select Initialize HDD from the disc Setup menu Select Start to initialize Finalize settings Finalize Finalizing fixes the recordings in place so that the disc can be played on a regular DVD player or computer equipped with a suitable DVD ROM drive See Playing your recordings on other DVD players on page 58 for detailed instructions Undo Finalize You can undo the finalization on DVD RW discs r...

Страница 98: ...ssettes LDP suitable for Laserdiscs Memory1 user preset 1 Memory2 user preset 2 Memory3 user preset 3 You can press DISPLAY to see the individual settings for the current preset Tuner VCR or LDP 3 Press ENTER to select the preset Creating your own set There are three user presets in which you can save your own set of picture quality settings 1 Follow Choosing a preset above and select one of the u...

Страница 99: ...e setting There are six presets available TV CRT suitable for standard cathode ray tube TVs PDP suitable for plasma display screens Professional suitable for professional monitors Memory1 user preset 1 Memory2 user preset 2 Memory3 user preset 3 You can press DISPLAY to see the individual settings for the current preset TV CRT PDP or Professional 3 Press ENTER to select the preset Creating your ow...

Страница 100: ...r 4 Use the cursor left right buttons to adjust the currently selected picture quality setting 5 When you have all the settings as you want them press HOME MENU to exit Tip To see more of the picture as you adjust different settings press ENTER after selecting the setting you want to adjust Note The Black Setup setting applies only when playing NTSC discs PT RW_UK book 100 ページ 2004年7月26日 月曜日 午後3時4...

Страница 101: ...ual clock setting If no stations in your area are broadcasting time signals you can set the clock manually Set your time zone You can set this by selecting a city or a time relative to GMT Move the cursor down and select On for summer time if you are currently on summer time then press ENTER Disc Setup Initial Setup Video Adjust Play Mode DV Record Timer Recording Disc Navigator Copy Disc History ...

Страница 102: ...he time is shown in the front panel display when the system is in standby Switch to Off to have the front panel display switch off completely when in standby Note When set to Off the display still lights dimly in standby when setting a timer recording or during Auto Start Recording Power Save Default setting Off When set to Off signals arriving at the ANTENNA IN terminal and at the AV2 LINE 1 DECO...

Страница 103: ...els have been assigned to which program numbers Use the PREV NEXT buttons to display the previous next page 3 Press HOME MENU to exit this screen Auto Channel Setting Download from TV If you connected this system to your TV using the AV1 RGB TV AV connector and if your TV supports this function you can download all the channels that your TV is tuned to Check your TV s instruction manual for more d...

Страница 104: ...to Off adjust the Level to find the best sound and picture quality Sound System Set the sound system used for the current channel Name Move the cursor right then input a name for the current station up to five characters then press ENTER Decoder If the current channel is scrambled requiring a decoder connected to the AV2 LINE 1 DECODER connector set this to On See also AV2 L1 In on page 106 Channe...

Страница 105: ... Use the cursor left right buttons to change the channel number Use the PREV NEXT button to display the previous next 10 guide channels 3 To return to the Initial Setup menu press ENTER 1 1 Pr System CH Name 1 I CC40 2 I 2 3 I 3 4 I 4 5 I 5 6 I 6 Pr System CH Name 1 I CC40 2 I 2 3 I 3 4 I 4 5 I 5 6 I 6 1 1 17 2 1 17 Swap Preset Initial Setup 5 1 Pr System CH Name 1 I CC40 2 I 2 3 I 3 4 I 4 5 I 5 6...

Страница 106: ...esults if you are using a long SCART cable RGB If your TV is compatible this setting gives the best picture quality Note You may have to set up your TV for a specific video input type Check the operating instructions for your TV for more information AV2 L1 In Default setting Video You only need to make this setting if you connected this system to another component using the AV2 LINE 1 DECODER AV c...

Страница 107: ...t to NICAM When set to NICAM you can still select Regular Audio using the AUDIO button See Changing audio channels on page 22 Tuner Level Default setting Normal Set to Compression if the audio level from the built in TV tuner is excessively high causing distortion External Audio Default setting Stereo If the external source is standard stereo leave set to Stereo If each channel carries a separate ...

Страница 108: ...ttings will also affect the sound you hear through the speakers of this system Dolby Digital Out Default setting Dolby Digital If the connected component is Dolby Digital compatible set to Dolby Digital otherwise set to Dolby Digital PCM Check the manual that came with the connected component if you re unsure whether it is Dolby Digital compatible 96kHz PCM Out Default setting 96kHz If the connect...

Страница 109: ...our preferred subtitle language only if that is set to something different In other words movies in your native language won t have any subtitles while foreign language movies will be shown with subtitles Set to Off to have the system play discs strictly according to your Audio Language and Subtitle Language settings For Auto Language to work the Audio Language and Subtitle Language settings must ...

Страница 110: ...e of the 32 manual settings When recording you can select your Manual Recording setting using the REC MODE button 1 Select On go to setup to display the manual recording setting screen 2 Use the cursor left right buttons to change the manual recording level You can also use the and buttons to cycle between levels MN1 MN9 MN21 and MN32 To preview the recording quality press cursor down and select P...

Страница 111: ...eparation setting Frame Accurate Default setting Off When Frame Accurate setting is Off exact frame accuracy is traded for high speed copying when recording a Copy List Switch Frame Accurate On to preserve the accuracy of the Copy List However copying some edited Video mode titles will be done in real time Important When you change this setting the Copy List is erased Make sure it is set how you w...

Страница 112: ... the edit points are a few frames earlier or later than you set Parental Lock Default level Off Default password none Default Country code us 2119 Some DVD Video discs feature a Parental Lock level If the system is set to a lower level than the disc it will require you to enter a password before the disc will play This gives you some control about what your children watch on this system Some discs...

Страница 113: ...ng Playback Set Password 1 2 3 4 Initial Setup Basic Tuner Video In Out Audio In Audio Out Language Recording Playback TV Screen Size Still Picture Seamless Playback Parental Lock Angle Indicator Change Password Change Level Country Code Initial Setup TV Screen Size Still Picture Seamless Playback Parental Lock Angle Indicator Parental Lock Basic Tuner Video In Out Audio In Audio Out Language Reco...

Страница 114: ... Audio In Audio Out Language Recording Playback TV Screen Size Still Picture Seamless Playback Parental Lock Angle Indicator Change Password Change Level Country Code Initial Setup TV Screen Size Still Picture Seamless Playback Parental Lock Angle Indicator Parental Lock Basic Tuner Video In Out Audio In Audio Out Language Recording Playback Parental Lock Country Code Password Code Number us 1 2 3...

Страница 115: ... equipment with a SCART connector The video output is switchable between video S video and RGB See AV1 Out on page 106 for how to set this up 5 AC IN Power inlet 6 OPTICAL DIGITAL IN jack Digital audio input for connecting to an MD recorder etc 7 OPTICAL DIGITAL OUT jack Digital audio output for connecting to an MD recorder etc 8 System connections for use with the supplied subwoofer 9 CONTROL IN ...

Страница 116: ...ets and preset names already in your TV See Switching on and setting up on page 18 and Auto Channel Setting Download from TV on page 103 for more on this feature EPG download EPG download allows you to program a timer recording directly from the electronic program guide displayed on your TV See the manual that came with your TV for more information on how to use this feature Note that the SP and L...

Страница 117: ... scrambled TV channels 4 Use an optical digital audio cable to connect the OPTICAL DIGITAL AUDIO IN jack to an optical digital audio output on your satellite receiver cable box Use a SCART cable to connect your satellite receiver cable box directly to your TV This enables you to listen to digital broadcasts watch satellite cable channels directly on your TV while recording something else Tip This ...

Страница 118: ...er or cable box to your TV 1 Connect the cable from the antenna cable TV outlet to the antenna input on your VCR satellite receiver cable box 2 Use a SCART cable to connect your decoder box to your VCR satellite receiver cable box See the manual for your decoder box for more detailed instructions 3 Use a SCART cable to connect your VCR satellite receiver cable box to the AV2 LINE 1 DECODER AV conn...

Страница 119: ...RT cable to connect the AV2 LINE 1 DECODER AV connector to a SCART AV connector on your decoder box This enables you to record scrambled TV channels Note In order to use this setup you will need to make the following settings from the Initial Setup menu Set the AV2 L1 In setting to Decoder from the Initial Setup menu see AV2 L1 In on page 106 From the Manual CH Setting screen set the Decoder setti...

Страница 120: ...o player to the front panel inputs on this system You can use ordinary video or S video cables for the video connection Connecting a DV camcorder Using the front panel DV IN OUT jack it is possible to connect a DV camcorder or video deck or DVD R RW recorder and digitally transfer DV tapes or DVD R RW discs to DVD R RW Important This jack is for connection to DV equipment only It is not compatible...

Страница 121: ... the optical digital input you can use the AUDIO button to change the playback channel left right or both Analog out mode The analog out mode allows you to make surround compatible recordings from the ANALOG AUDIO OUT jacks Dolby multichannel sources will be downmixed to stereo for improved playback with systems that can provide matrix decoding like Dolby Pro Logic 1 Press SHIFT and SOUND 2 Use th...

Страница 122: ...ettings in the unit Switching SR control on off 1 Press SHIFT and SR 2 Use the cursor left right buttons to choose SR On or SR Off SR On Switches SR on this unit sends control signals to the plasma display SR Off Switches SR off this unit and the plasma display work independently 3 Press ENTER The SR indicator lights in the display when SR control is on Control mode settings 1 Press SHIFT and SR 2...

Страница 123: ... plasma display For example DIG PDP3 matches the digital input with video input 3 on the plasma display Function setting for analog input ANA None PDP1 5 PDPTV Matches the TV function of this unit with a numbered video input on the plasma display For example ANA PDP1 matches the analog input with video input 1 on the plasma display Note The 3 ringed SR cable from Pioneer is commercially available ...

Страница 124: ...dB ATT 10dB Reduces the signal level by 10dB ATT Off No attenuation Resetting the system Use this procedure to reset all system settings to the factory default 1 Make sure that the system is on 2 Press and hold the front panel STOP REC button and press the front panel STANDBY ON The system turns off with all settings reset Setting up the remote to control your TV You can use the supplied remote to...

Страница 125: ...ORPEL 607 KOYODA 644 LEYCO 607 640 646 648 LIESENK TTER 607 LOEWE 607 LUXOR 632 642 643 M ELECTRONIC 631 644 645 654 655 656 607 636 651 MAGNADYNE 632 649 MAGNAFON 649 MAGNAVOX 607 610 603 612 629 MANESTH 639 646 MARANTZ 607 MARK 607 MATSUI 607 639 640 642 644 647 648 MEDIATOR 607 MEMOREX 644 METZ 631 MINERVA 631 653 MITSUBISHI 609 610 602 621 631 MULTITECH 644 649 NEC 659 NECKERMANN 631 607 NEI 6...

Страница 126: ...orrectly When you re not using a disc return it to its case and store upright Avoid leaving discs in excessively cold humid or hot environments including under direct sunlight Don t glue paper or put stickers onto the disc or use a pencil ball point pen or other sharp tipped writing instrument These could all damage the disc For more detailed care information see the instructions that come with di...

Страница 127: ...oling of the system Place on an unstable surface or one that is not large enough to support all four of the unit s feet Cleaning the pickup lens The DVD recorder s lens should not become dirty in normal use but if for some reason it should malfunction due to dust or dirt consult your nearest Pioneer authorized service center Although lens cleaners are commercially available we do not recommend usi...

Страница 128: ...ped so that the picture fills the whole screen 4 3 16 9 The program appears squashed Set to either 4 3 Letter Box or 4 3 Pan Scan 4 3 Letter Box 4 3 Pan Scan The program is presented correctly on either setting When viewing on a widescreen TV or monitor Screen format of disc Setting Appearance 16 9 16 9 The program is presented in widescreen 4 3 16 9 Your TV will determine how the picture is prese...

Страница 129: ...e speakers are connected correctly Make sure the voltage of the mains power source is correct for the model Make sure there are no loose strands of speaker wire touching the rear panel of the subwoofer unit If the problem persists take it to your nearest Pioneer authorized service center or your dealer for servicing The disc is automatically ejected after closing the disc tray Check that the disc ...

Страница 130: ...ected correctly see Other connections on page 115 Press MUTE on the remote control to turn muting off Adjust the VOLUME There is no sound when the picture is paused or during scanning or slow motion play Press PLAY to resume regular playback No sound from surround or center speakers Refer to Setting the channel levels on page 95 to check the speaker levels Check that you haven t selected the STERE...

Страница 131: ... DVD Make sure that there is a recordable DVD loaded with some free space for recording and fewer than 99 titles already on the disc Also make sure that for a Video mode disc the disc isn t finalized If the title currently playing contains material that is copy once protected One Touch Copy will not work One Touch Copy doesn t work if the system is already recording to DVD Can t use One Touch Copy...

Страница 132: ...error persists use a new disc If the error appears even with a new disc please consult a Pioneer Service Center Incompatible or unreadable disc The disc loaded is a DVD RAM DVD R RW or some other incompatible disc type This display may also appear if the disc is dirty or damaged Cannot record to a disc that is not CPRM com patible Cannot record this content using Video mode recording The video sou...

Страница 133: ... lock setting on page 124 for more on switching on off the child lock A Out Fix Blinks rapidly for 2 seconds when an operation is prohibited because the analog out mode is set to A Out Fix see Analog out mode on page 121 Phones In Blinks rapidly for 2 seconds when an operation is prohibited because headphones are connected 96k Stereo Blinks rapidly for 2 seconds when an operation is prohibited bec...

Страница 134: ...ack No Only the audio channel set in the Bilingual Recording setting in the Initial Settings menu will be recorded If you need to record both channels of audio please record using a VR mode DVD RW disc See also Bilingual Recording on page 108 Can I record continuously on the HDD for more than six hours Yes timer recordings made to the HDD can by set for up to 24 hours However because the maximum l...

Страница 135: ...corded section of tape or if the power fails in the source component or the DV cable becomes disconnected DV related messages You may see the following messages appear on your TV screen when using the DV IN OUT jack No DV camcorder connected The camcorder is not connected properly or the camcorder is switched off The DV camcorder is recording The camcorder is recording so you cannot start recordin...

Страница 136: ...e code list next page for a complete list of languages and codes VR mode Video mode HDD Level Rec time Level Rec time MN 1 360 mins EP MN 1 360 mins MN 2 345 mins MN 2 345 mins MN 3 330 mins MN 3 330 mins MN 4 315 mins MN 4 315 mins MN 5 300 mins MN 5 300 mins MN 6 285 mins MN 6 285 mins MN 7 270 mins MN 7 270 mins MN 8 255 mins MN 8 255 mins MN 9 240 mins LP MN 9 240 mins MN 10 230 mins MN 10 230...

Страница 137: ...cedonian mk 1311 Malayalam ml 1312 Mongolian mn 1314 Moldavian mo 1315 Marathi mr 1318 Malay ms 1319 Maltese mt 1320 Burmese my 1325 Nauru na 1401 Nepali ne 1405 Norwegian no 1415 Occitan oc 1503 Oromo om 1513 Oriya or 1518 Panjabi pa 1601 Polish pl 1612 Pashto Pushto ps 1619 Quechua qu 1721 Rhaeto Romance rm 1813 Kirundi rn 1814 Romanian ro 1815 Kinyarwanda rw 1823 Sanskrit sa 1901 Sindhi sd 1904...

Страница 138: ... Image File A file format developed by Fuji Photo Film for digital still cameras Digital cameras from various manufacturers use this compressed file format which carries date time and thumbnail information as well as the picture data File extension A tag added to the end of a filename to indicate the type of file For example mp3 indicates an MP3 file ISO 9660 format International standard for the ...

Страница 139: ...Approx 1 hour Standard Play SP Approx 2 hours Long Play LP Approx 4 hours Extended Play EP Approx 6 hours Manual Mode MN Approx 1 6 hours TV tuner section Receivable channels Amplifier section Continuous Power Output RMS Front Center Surround 100 W per channel 1 kHz 10 T H D 6 Ω Subwoofer 100 W 100 Hz 10 T H D 6 Ω FM tuner section Frequency range 87 5 108 MHz Antenna 75 Ω unbalanced AM tuner secti...

Страница 140: ...trol input Mini jack DV input output 4pin i LINK IEEE 1394 standard AV Connectors 21 pin connector assignment This connector sends receives video and audio signals to from a compatible colour TV monitor VCR etc AV1 RGB TV connector output for TV monitor PIN no 1 Audio 2 R out 2 11 G out 3 Audio 1 L out 6 15 R or C out 4 GND 17 GND 7 B out 19 Video out or Y out 20 8 Status 21 GND AV2 LINE 1 connect...

Страница 141: ...um Input Power 100 W Dimensions 105 W x 139 H x 83 D mm Weight 0 55 kg Powered subwoofer S DVR9SW Enclosure Bass reflex floor type magnetically shielded System 18 cm 1 way system Speaker 18 cm cone type Nominal impedance 6 Ω Frequency range 25 Hz to 2300 Hz Maximum Input Power 100 W Dimensions 192 W x 395 H x 436 D mm Weight 12 5 kg Accessories Speaker system Speaker cables 5 Speaker setup guide 1...

Страница 142: ...arkham Ontario L3R OP2 Canada TEL 1 877 283 5901 PIONEER EUROPE NV Haven 1087 Keetberglaan 1 B 9120 Melsele Belgium TEL 03 570 05 11 PIONEER ELECTRONICS ASIACENTRE PTE LTD 253 Alexandra Road 04 01 Singapore 159936 TEL 65 6472 7555 PIONEER ELECTRONICS AUSTRALIA PTY LTD 178 184 Boundary Road Braeside Victoria 3195 Australia TEL 03 9586 6300 PIONEER ELECTRONICS DE MEXICO S A DE C V Blvd Manuel Avila ...

Отзывы: