background image

61

Checking the alarm logs and operation/status change logs

Operation/Status

Checking the operation/status change log in a list

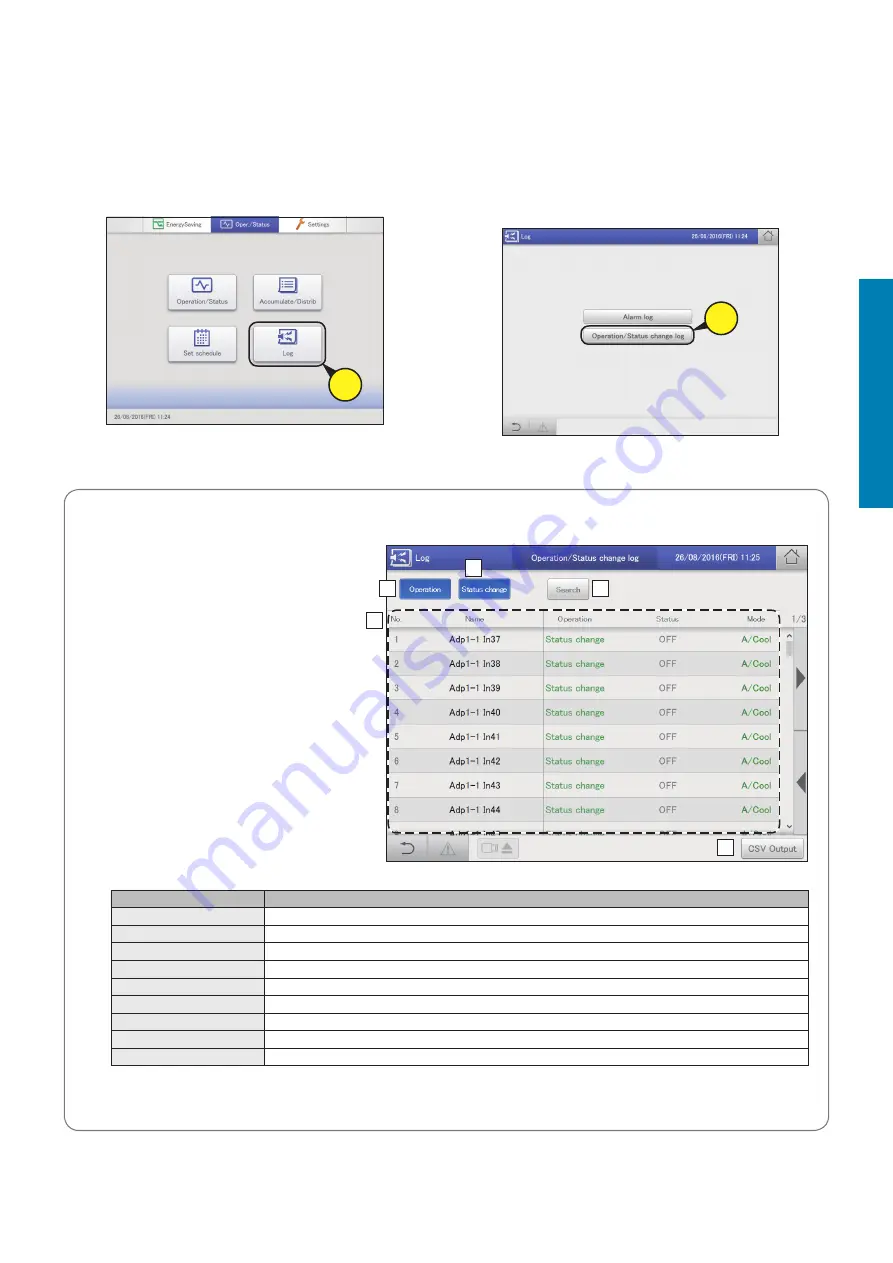
You can display a list showing operations for indoor units that logs when and how changes were made.

2

Touch [Operation/Status change log].


z

The “Operation/Status change log” screen is displayed.

2

1

Touch [Log] in “Oper./Status”.

1

The “Operation/Status change log” screen

A:   The operation log is displayed. This is 

usually displayed. Touch to hide.

B:   The status change log is displayed. This is 

usually displayed. Touch to hide.

C:   The “Search” dialogue is displayed when 

you touch this.

You can find the log information you need 

from amongst the operation/status change 

logs.

You can search by either the device name or 

the display period. (→ “Searching operation/

status change logs” (P.62))

D:   The operation/status change logs are 

displayed in a list.

Item

Explanation

Name

The names of the units are displayed.

Operation

This shows whether the operation occurred as schedule or if the operation was changed.

Status

This indicates the operating status (ON or OFF).

Mode

The operating mode (Heat, Dry, Cool, Fan, A/Heat, A/Cool) is displayed.

Set T.

The temperature setting is displayed.

Fan

The fan speed (High, Mid., Low, Auto) is displayed.

Flap

The airflow direction is displayed.

Prhbt

This indicates the remote controller operation “Accept”, or “Prhbt1” to “Prhbt4”.

Date

The date and time of the change to operational status is displayed.

E:   You can output (save) the displayed list of operation/status change logs in CSV format.

(→ “Outputting (saving) logs as a CSV file” (P.63))

A

C

E

B

D

Содержание CZ-256ESMC3

Страница 1: ...odel No CZ 256ESMC3 ENGLISH Before operating the unit read these operating instructions thoroughly and keep them for future reference Installation Instructions Separately Attached Panasonic Corporation 1006 Kadoma Kadoma City Osaka Japan F1118 10419 ...

Страница 2: ...etc of all indoor units and outdoor units in real time You can also select indoor units to change their settings Distributing air conditioner energy P 71 You can view cumulative operating times for indoor units engine operating times for outdoor units and operation cycles in a list Cumulative values Using these data you can calculate the distribution ratio of electricity or gas consumed for air co...

Страница 3: ...ngs as a CSV file 134 Inputting settings as a CSV file 136 Saving automatically generated files 138 Configuring the system 140 Basic settings on the indoor unit 141 Basic settings on the outdoor unit 145 Basic settings for distribution calculation 148 Changing the name of the schedule group 151 Changing the name of the area group 153 Changing the name of the distribution group 155 Basic settings f...

Страница 4: ...Checking the alarm logs 59 To check the current or past cumulative times Checking the list of accumulated values on the indoor unit 65 To check the current or past distribution ratios Checking distribution data in a list 72 Settings What you want to do Title Page To change the name of an indoor unit Basic settings on the indoor unit 141 To change the name of the area group Changing the name of the...

Страница 5: ...repair In case of emergency remove the power plug from the socket or switch off the circuit breaker or the means by which the system is isolated from the mains power CAUTION This appliance is intended to be used by expert or trained users in shops in light industry and on farms or for commercial use by lay persons This appliance can be used by children aged from 8 years and above and persons with ...

Страница 6: ...ts mean that used electrical and electronic products and batteries should not be mixed with general household waste For proper treatment recovery and recycling of old products and used batteries please take them to applicable collection points in accordance with your national legislation and the Directives 2002 96 EC and 2006 66 EC By disposing of these products and batteries correctly you will he...

Страница 7: ...larity Area group P 8 Distribution group P 8 Inter unit control wiring no polarity Linked systems 1 Linked systems 2 Linked systems 3 Linked systems 4 Communication adaptor control wiring RS 485 polarity present Communication adaptor control wiring RS 485 polarity present Signal input x 3 Signal output x 2 Signal input x 3 Signal output x 2 Indoor units 256 units 64 units x 16 systems Outdoor unit...

Страница 8: ...sed controllers system controllers etc In group control all indoor units belonging to a group have the same address In this document and on the unit this is described as the CNTR addr Setting No 1 to 64 Set on this unit and other central controllers for each linked system Unit name In group control this will be the same name This is the minimum unit used for operation monitoring and scheduling Set...

Страница 9: ...to operate outside of a schedule but to monitor and stop automatically P 80 Time set for unattended auto shutoff ON OFF Detect Detect Detect 60 min 60 min Forget to turn off 60 min AUTO OFF AUTO OFF MANUAL ON MANUAL ON 9 00 23 00 22 08 21 00 Demand peak shaving settings Peak cut settings 2 Specify time slots when you want operation capacity of the outdoor units reduced P 95 1 The Efficient operati...

Страница 10: ... the performance of the air conditioning units can be controlled so that energy usage is reduced This unit suppress the maximum demand for electricity through automated control of air conditioning units by demand control output demand output signals emitted by external equipments Demand control with indoor unit demand settings Pulse signal generated Intelligent Controller Setting level Setting exa...

Страница 11: ...nits the energy reduction effect may be reduced depending on the conditions in the room Multi function wired remote controller CZ RTC5 or later When there is a lot of human activity z z In cooling or drying mode Operates at the set temperature z z In heating mode The air conditioners run at a temperature lower than the set temperature When there is not a lot of human activity z z In cooling or dry...

Страница 12: ...12 Preparations before changing settings Preparation Preparations before changing settings This chapter describes the part names of the unit and their functions and also explains some basic operations ...

Страница 13: ...r is on 3 USB terminal Connect a USB memory device here to backup data from this unit settings accumulation distribution 4 Storage door Open this cover to connect a USB memory device to the USB terminal To open gently push on the storage door and then allow to drop down To close lift the storage door and gently press closed 5 LAN terminal Connect to a network with wiring The illustration shows the...

Страница 14: ...panel Swipe This is an operation where the finger is slid in a direction up or down on the touch panel This is used to scroll slowly Flick This is an operation where the finger on the touch panel is flicked in a direction up or down This is used to scroll quickly Picker This is an up and down movement of the finger touching the screen used to pick settings in elements such as spin boxes Basic oper...

Страница 15: ...tes that the selection is currently unavailable due to other conditions Check boxes These are mainly used to switch on or off item selection and functions Display example Status Explanation Unselected In this state the item is not selected Selected In this state the item is selected In this example the automatic stop feature will operate A check mark appears when you touch it The check mark disapp...

Страница 16: ...are elements that appear on the screen and are mainly used for settings They close automatically once you have registered the settings Touch to close the dialogue without changing the setting There may also be cases where you touch at the top right of the screen to register the setting Notations in this document Menu names screen names etc are shown as follows in this document Type Notation Exampl...

Страница 17: ...u P 18 E Scroll buttons Touch on the right side of the screen to scroll to the right Touch to scroll to the left The display changes according to the direction you can scroll F Back icon Touch this to go back to the previous menu G Warning icon The Alarm list screen is displayed when you touch this Checking on current alarms P 36 z z In this document and on the unit indoor units are described as t...

Страница 18: ...nergy saving settings Submenu Screen menu Overview Page Set temp auto return Even if the temperature initially set is changed the temperature automatically returns to the set one after a certain amount of time 77 Unattended auto shutoff If the indoor unit automatically stops at the set time but then is started again this setting automatically stops the unit again repeatedly at set intervals 80 Set...

Страница 19: ...ttings Make settings for Hybrid GHP EHP control 172 Backup Save data settings accumulation distribution logs to USB memory devices 130 Restore Restore data that has been stored in the unit or saved to a USB memory device 132 CSV Output Export output the settings for this unit in CSV format 134 CSV Input Import input the settings for this unit in CSV format 136 Auto save CSV file Saves the CSV file...

Страница 20: ...settings 153 2 Name of the distribution group Distribution group settings 155 Name of the schedule group Schedule group name settings 151 5 Pulse meter related Association with the distribution group Pulse meter settings 158 Type of pulse meter electricity gas multiplying factor number of pulse units Pulse meter settings 158 Name of the pulse meter Pulse meter settings 158 6 Distribution related D...

Страница 21: ...ng Operating hours Select when consideration is to be paid to the electricity for the indoor units The electricity for outdoor units and indoor units are both loaded into this unit and distributed Thermostat on times Select when no consideration is to be paid to the electricity for the indoor units The electricity for outdoor units only is loaded into this unit and distributed 4 If the air conditi...

Страница 22: ... access depending on the menu See above for information on how to enter the identification number Releasing the lock on screen operations The Screen is locked screen is displayed if you touch the screen when the screen illumination is off 1 Touch Unlock Screen 2 Enter the identification number y y When you enter a Level 1 or Level 2 identification number the screen returns to the one that was disp...

Страница 23: ...indoor units and outdoor units You can also check alarms that have occurred in the system in a list Screen menu Overview Page I D unit list Check the operational status of the indoor units in a list 24 I D unit information Check the details about the indoor units number of operation cycles etc in a list 28 O D unit information Check the details about the outdoor units outdoor temperatures etc in a...

Страница 24: ... Basic settings on the indoor unit P 141 to 144 and then proceed with these settings 1 Touch Operation Status in Oper Status 1 2 Touch I D unit list z z The I D unit list screen is displayed 2 3 Checking the status of settings P 25 Note y y You can select indoor units to change their settings Operating the indoor unit P 26 Select the area to display 1 Touch Area z z The Select Area dialogue is dis...

Страница 25: ...es the current operating status ON OFF P 26 Mode The current operating mode Heat Dry Cool Fan Auto is displayed P 26 Set T The current temperature setting is displayed P 27 Room T The current room temperature is displayed Fan SPD The current fan speed High Mid Low Auto is displayed P 27 Flap The airflow direction is displayed P 27 Prhbt This indicates the remote controller operation Accept or Prhb...

Страница 26: ... multiple units setting items in common are displayed in the Settings dialogue 5 Change the settings of the items Common display area Operation display area Select an item from the common display area and set the operation in the operation display area Item Explanation ON OFF Set whether to start or stop operation 1 Touch ON OFF 2 Select ON or OFF Mode Set the operating mode 1 Touch Mode 2 Select ...

Страница 27: ...bt3 or Prhbt4 Accept Allows operations with the remote controller Prhbt1 to Prhbt4 Operations on the remote controller are restricted You can change the restricted operations P 211 Eco Enable or disable energy saving operation 1 Touch Eco 2 Select Valid or Invl Enable or disable ECONAVI setting 1 Touch 2 Select Valid or Invl 2 The air flow indicated on the Intelligent Controller is different from ...

Страница 28: ...entilation system and demand control settings ON or OFF only 1 Touch Operation Status in Oper Status 1 2 Touch I D unit information z z The I D unit information screen is displayed 2 3 Check the setting details P 29 Note y y You can select indoor units to change their ventilation output settings Changing the settings for ventilation output P 30 y y You can select indoor units to change their deman...

Страница 29: ...number of operation cycles for the day is displayed Demand Demand control setting status is displayed ON is displayed when demand control is set Demand settings on the indoor unit P 90 T S This displays the operational status of the thermostat ON is displayed when the thermostat is working Fan The actual fan strength High Mid Low Auto OFF is displayed SuctnTmp The current inlet temperature is disp...

Страница 30: ...stered and the Vent dialogue closes 3 1 Put a check mark in the Select column z z Select the indoor units whose settings you want to change z z You can select multiple indoor units 1 2 Touch Vent z z The Vent dialogue is displayed 2 Changing the settings for ventilation output Checking the operational status of indoor units ...

Страница 31: ...he setting is registered 4 1 Put a check mark in the Select column z z Select the indoor units whose settings you want to change z z You can select multiple indoor units 1 2 Touch Demand z z The Demand setting dialogue is displayed 2 Checking the operational status of indoor units Changing the demand control settings Switch between setting and cancelling demand control Refer to Demand settings on ...

Страница 32: ... Open the storage door and connect a USB memory device to the USB terminal 2 Touch CSV Output z z A confirmation screen is displayed 2 3 Touch OK z z The contents currently displayed is saved to the USB memory device in CSV format z z When saving is complete a message confirming that saving is complete is displayed Outputting saving the displayed contents as a CSV file The following screen is the ...

Страница 33: ...d 2 3 Check the setting details P 34 Note y y You can select outdoor units to change their demand control settings Changing the demand control settings P 35 Check the details about the outdoor units outdoor temperatures demand setting status etc in a list You can also select outdoor units to change their demand control settings ON or OFF only Checking the operational status of the outdoor unit ...

Страница 34: ...7 y y This is supported only by some outdoor units Current oil change time The number of operating hours after the last oil change is displayed Available only when using a gas heat pump Engine oil check sign This displays the check sign for engine oil Available only when using a gas heat pump y y If this sign is displayed contact the place of purchase or your servicing agent to have the oil replac...

Страница 35: ...y y If multiple outdoor units are selected the demand values common between them are displayed 4 Touch Transmit z z The settings are changed and the Demand dialogue is closed z z To cancel the settings touch Cancel 1 Put a check mark in the Select column z z Select the outdoor units whose settings you want to change z z You can select multiple outdoor units 1 2 Touch DmndStng z z The Demand dialog...

Страница 36: ...odes and dates and times of occurrence and recovery for alarms that have occurred in the air conditioning system in a list You can also do things such as output the alarm list in CSV format and check the alarm log 1 Touch Operation Status in Oper Status 1 2 Touch Alarm list z z The Alarm list screen is displayed 2 3 Checking on current alarms P 37 ...

Страница 37: ... or flicking the screen Item Explanation Name The names of units where alarms are currently occurring are displayed Alarm code The alarm detail of current alarms is displayed Alarm date This displays the date and time the alarm occurred D You can output save the displayed list of alarms in CSV format Outputting saving the list of alarms in CSV format P 39 E The Alarm log screen is displayed when y...

Страница 38: ...start of the period and the time at the bottom is the end 1 Touch Settings y y The Date setting dialogue is displayed 2 Set the date and time y y Use to set the Day Month Year Hours Minutes and Seconds 3 Touch OK y y The settings are registered and the Date setting dialogue closes y y To cancel the settings touch Cancel Latest info Touch to clear the period you have set and show the most recent 10...

Страница 39: ... file z z When saving is complete a message confirming that saving is complete is displayed z z The CSV file is saved to the icxi csv almlist folder Example file name for the output file al_18052016 csv 4 Touch when you want to disconnect the USB memory device z z The message USB memory can now be safely removed is displayed Touch OK and then remove the USB memory device z z Close the storage door...

Страница 40: ...roups or individually Screen menu Overview Page Schedule results You can see the schedules set up for the future and how they performed in the past in a list 54 Calendar You can allocate a single day s schedule to a calendar 50 Schedule setting You can register the schedule for a single day 44 Update schedule You can modify a schedule that you have registered only from the day of the change up to ...

Страница 41: ...egistering the schedule You can register up to 50 types of daily running mode What is the daily running mode Scheduling patterns for indoor units individually or as part of a schedule group are called daily running mode Daily operating modes are registered as different patterns for schedules to match different days of the week holidays and seasons Example of daily running mode settings y y Daily r...

Страница 42: ...indoor unit Setting cell this example shows Time displayed 1 block equates to a setting cell so here there are 7 settings Example In the 09 00 setting cell y y Time 09 00 y y ON OFF ON y y OpertnMode Cool y y Temperatre 28 C y y Fan SPD Low y y Flap Swing Example In the 09 15 setting cell y y Time 09 15 y y ON OFF ON no change to the setting y y OpertnMode Dry y y Temperatre 28 C no change to the ...

Страница 43: ...us Allocating a schedule to a date on the calendar z z Allocating a schedule to a calendar P 50 This day is a Sunday so allocate Mode3 This day is a work day so allocate Mode1 This day is a Saturday so allocate Mode2 Schedule setting flow ...

Страница 44: ... mode 4 Put a check mark in the Select column z z Select the indoor unit or schedule group you want to set 4 5 Touch Edit z z The Detail setting screen is displayed 5 Continued on next page 1 Touch Set schedule in Oper Status 1 2 Touch Schedule setting z z The Schedule setting screen is displayed 2 3 Press to select the daily running mode 3 ...

Страница 45: ...strength of the fan 1 Touch Fan SPD 2 Select the fan speed high mid low automatic Flap Set the direction of the airflow 1 Touch Flap 2 Set the flap to the desired position F1 F2 F3 F4 F5 Swing y y Heating fan and automatic heating can be adjusted in 5 steps and cooling and dry can be adjusted in 3 steps y y You can set either or if the model does not support airflow direction settings Prhbt Set wh...

Страница 46: ...are all blank will not run at all 3 Touch Register z z The settings are registered and the Sttg dialogue closes z z To cancel the settings touch Cancel 6 3 7 Touch Register z z The Detail setting dialogue closes z z To cancel the settings touch Cancel 7 8 Repeat steps 4 to 7 to register other indoor units z z Repeat steps 3 to 7 if you want to register in other daily running modes z z The confirma...

Страница 47: ...right is blank y y When at least one check mark has been put in the Valid column in the Set schedule group name screen refer to Changing the name of the schedule group P 151 the schedule group name is displayed first then the indoor unit names that do not belong to schedule groups are displayed F The Detail setting dialogue is displayed when you touch this and you can make advanced settings for th...

Страница 48: ... deleted z z The schedule is restored if you touch Cancel Copy a schedule for setting This is convenient when setting the same kind of schedule 1 Select the schedule to copy z z The highlighted indoor unit or schedule group is the one to be copied 1 2 Touch Copy 2 3 Select the indoor unit or schedule group you want to paste z z You cannot simultaneously paste multiple indoor units or schedule grou...

Страница 49: ... is displayed 1 1 1 2 2 Change the settings z z Refer to step 6 on P 45 for the settings 3 Touch Register z z The settings are registered and the Sttg dialogue closes z z To cancel the settings touch Cancel 3 Setting a schedule Deleting the settings in setting cells 1 Select the setting cell to be deleted in the Detail setting dialogue 1 2 Touch Delete z z The selected setting cell is deleted 2 ...

Страница 50: ...h the date z z The daily running mode is allocated to the selected date z z While a daily running mode is selected you can allocate it to other dates z z Repeat steps 4 and 5 to allocated daily running modes to other dates 5 6 Touch Register z z The setting is registered z z To cancel the settings touch Cancel 6 1 Touch Set schedule in Oper Status 1 2 Touch Calendar z z The Calendar screen is disp...

Страница 51: ...splay dark grey section 3 Touch Register to register the setting content y y Automatic updates are applied starting from 2 years later D Delete the daily running mode allocated to a calendar Deleting allocated daily running modes P 52 E A list of daily running modes allocated to the calendar is displayed You can put comments in the text boxes on the right Adding comments to daily running modes P 5...

Страница 52: ...helpful to add a comment to the daily running mode to describe how it is used for example The comment can be up to 16 characters long using letters and numbers 1 Touch the text box on the right of the daily running mode z z The touchscreen keyboard is displayed 1 2 Enter the text 3 Touch Register z z The setting is registered z z To cancel the settings touch Cancel 3 Allocating a schedule to a cal...

Страница 53: ...y of the week y y If daily running modes have already been registered in the calendar then when you set at the day of the week level the daily running modes are overwritten 1 Touch By day of the week z z The By day of the week screen is displayed 1 2 Set the period 1 Touch 2 1 z z The Calendar dialogue is displayed z z The period at the left is the start and the period at the right is the end 2 1 ...

Страница 54: ...3 2 then select the date 3 3 z z The settings are registered and the Calendar dialogue closes 3 3 3 2 4 Touch the Select column 4 1 then touch DetaildScd 4 2 z z The Detailed schedule dialogue P 55 is displayed 4 1 4 2 1 Touch Set schedule in Oper Status 1 2 Touch Schedule results z z The Schedule results screen for that day is displayed 2 3 Set the day you want to check 1 Touch 3 1 z z The Calend...

Страница 55: ...erformance The colour key is as follows Blue Cooling Light blue Dry Red Warming Grey Fan Green Automatic Note Past performance is not displayed in the following cases y y When a date after the next day is specified in setting A y y When the power of the indoor unit has been turned off so that the schedule could not be executed y y When past performance display exceeds 50 000 items items are delete...

Страница 56: ...oor unit or schedule group whose settings you want to change 4 5 Touch Edit z z The Detail setting dialogue is displayed 5 6 Change and add settings z z Refer to Changing the settings in setting cells P 49 to change the settings z z Refer to step 6 in Setting a schedule P 45 to add settings z z Refer to step 6 in Setting a schedule P 45 for the setting items Continued on next page 1 Touch Set sche...

Страница 57: ...ule screen A Select the year month and day to change y y Only the current date and the next 4 days are shown in this area B You can delete the selected schedule either by indoor unit or by schedule group Deleting a schedule P 48 C You can copy the selected schedule either by indoor unit or by schedule group Copy a schedule for setting P 48 D Paste the schedule specified at C to an indoor unit or s...

Страница 58: ...hange logs You can check the logs for alarms that have occurred in the system and the logs of operation status changes in lists on this unit You can also output the log lists in a CSV format file Screen menu Overview Page Alarm log Check the log of alarms that have occurred in the system in a list 59 Operation Status change log Check the log of operation status changes of the indoor units in a lis...

Страница 59: ... Searching alarm logs P 60 B A check mark appears in all of the Check columns when you touch this C The alarm log is displayed in a list You can scroll up or down by swiping or flicking the screen Item Explanation Name The names of units where alarms are occurring are displayed Alarm code The type of alarm is displayed Date time of Alarm ON OFF This displays the date and time the alarm occurred Wh...

Страница 60: ...Day Month Year Hours Minutes and Seconds 3 Touch OK y y The settings are registered and the Date setting dialogue closes y y To cancel the settings touch Cancel Latest info Touch to clear the period you have set and show the most recent 100 alarms 3 Touch OK z z Alarms matching the conditions are displayed in a list z z If you specify name the latest 200 alarms are displayed If you do not specify ...

Страница 61: ...ange logs You can search by either the device name or the display period Searching operation status change logs P 62 D The operation status change logs are displayed in a list Item Explanation Name The names of the units are displayed Operation This shows whether the operation occurred as schedule or if the operation was changed Status This indicates the operating status ON or OFF Mode The operati...

Страница 62: ... The Search dialogue is displayed 1 2 Set the search conditions Item Explanation Name Select the name of the unit for which you want to find the information from the list Term setting Set the start and finish for the period you want to search The time at the top is the start of the period and the time at the bottom is the end 1 Touch Settings y y The Date setting dialogue is displayed 2 Set the da...

Страница 63: ...e the storage door after removing the USB memory device 4 1 Open the storage door and connect a USB memory device to the USB terminal 2 Touch CSV Output z z A confirmation screen is displayed 2 3 Touch OK z z The log currently displayed is saved to the USB memory device in CSV format z z When saving is complete a message confirming that saving is complete is displayed Checking the operation status...

Страница 64: ...n this unit The display for indoor units can be viewed by area or individual unit and outdoor units and pulse meters can be viewed by different values adaptor value or total value for a period Screen menu Overview Page I D unit acc Check the accumulated data for the indoor units in a list 65 O D unit acc Check the accumulated data for the outdoor units in a list 67 Pulse acc Check the accumulated ...

Страница 65: ...eft is the start of the period and the time at the right is the end z z If you set Data to Adaptor value you cannot select the period to be displayed 1 Touch 3 1 z z The Calendar dialogue is displayed showing the current date 3 1 2 Touch the date 3 2 z z Use to select the month you want to check The current month is displayed if you touch ThsMth z z The settings are registered and the Calendar dia...

Страница 66: ...lated operating hours when the thermostat is ON and when ON High ON Mid and ON Low OFF High Displays the accumulated hours when the thermostat is OFF and the fan is set to High When T S OFF details is touched OFF Mid Displays the accumulated hours when the thermostat is OFF and the fan is set to Mid When T S OFF details is touched OFF Low Displays the accumulated hours when the thermostat is OFF a...

Страница 67: ...e settings are registered and the Calendar dialogue closes 3 2 4 Set the time slots to display 1 Touch Time 4 1 z z The Specify time dialogue is displayed z z If you set the Adaptor value you cannot select the time slots to be displayed 4 1 Continued on next page 1 Touch Accumulate Distrib in Oper Status 1 2 Touch O D unit acc z z The O D unit acc screen is displayed 2 3 Set the period to be displ...

Страница 68: ...me The names of the outdoor units are displayed OperTime The number of operation hours for the outdoor units are displayed OprCount The number of operation cycles for the outdoor units are displayed Inverter accumul kWh The accumulated values if inverter generation is being used are displayed Solar accumul kWh The accumulated values if solar generation is being used are displayed E You can output ...

Страница 69: ...period to be displayed z z The time at the left is the start of the period and the time at the right is the end z z If you set the Adaptor value you cannot select the period to be displayed 1 Touch 3 1 z z The Calendar dialogue is displayed showing the current date 3 1 2 Touch the date 3 2 z z Use to select the month you want to check The current month is displayed if you touch ThsMth z z The sett...

Страница 70: ...e meters are displayed in a list You can scroll up or down by swiping or flicking the screen Item Explanation Name The names of all units indoor units and outdoor units are displayed Dstr The distribution group number is displayed Type The type of meter is displayed Adaptor value when Adaptor value is selected The accumulated value of the communication adaptor is displayed Meter value when Adaptor...

Страница 71: ... how to check distribution data You can check distribution data in a list by unit and by area on this unit You can check the distribution ratio usage and charges for both electricity and gas Screen menu Overview Page Distribution data Check the details about distribution calculations in a list 72 ...

Страница 72: ...n ratio You need to make the following settings before you can check distribution data y y Distribution mode settings P 160 y y Area group name settings P 153 y y Distribution group settings P 155 y y Pulse meter settings P 158 y y Calendar settings for distribution calculation P 148 y y Distribution ratio settings P 161 3 Set the period to be displayed z z Set the start and end of the period to b...

Страница 73: ...s the RglrHourRnge stngs P 150 time slot is changed over If the schedule stops operation prior to the change over of a time slot avoid setting it inside 10 minutes this may change depending on the state of communications of the change over of the time slot y y When there is a problem with the communications between the main unit and the indoor units or the communication adaptor it may not be possi...

Страница 74: ...g distribution data Operation Status Changing the units of display 1 Make sure that Area is off 2 Select the unit of display z z Switch the display between Area and I D unit 2 Checking distribution data in a list ...

Страница 75: ...plied from outdoor units Elec cost This is the charges calculated based on the electricity usage O D Gas ratio This is the distribution ratio of gas supplied from GHP O D Gas usage m3 This is the quantity of gas supplied from GHP O D Gas cost This is the charges calculated based on the gas usage PwrGnGas ratio This is the distribution ratio of gas used to generate power PwrGnGas usage m3 This is t...

Страница 76: ...ng timer Efficient operation setting You can specify time slots when you want operation capacity reduced 85 Out unit silent setting Set a time for the outdoor unit to operate at a lower level at night compared to the day 87 Screen menu Overview Page Register demand point Register the demand point input 89 I D unit demand settings You can automatically control indoor units by setting particular lev...

Страница 77: ...he identification number password level 1 or 2 and the Set temp auto return screen is displayed 2 When you want to keep the set temperature at 28 C during the summer months Make the return temperature 28 C in the temperature auto return setting and the return time 30 minutes later and it will not matter how many times the temperature is changed the set temperature will return to 28 C every 30 minu...

Страница 78: ...ntervals Auto return The auto return function is enabled for the selected indoor unit if you put a check mark here The following items are settings common to all indoor units y y Eco dirc only y y Always return Select the conditions for return When you select Eco dirc only the return to the set temperature only occurs automatically if it saves energy y y Allow auto C H y y Fan switching When you s...

Страница 79: ...ollows the outdoor unit display order set in O D unit settings P 145 Address The display follows the address order set in I D unit settings P 141 C The indoor units with a check mark next to them will be the subject of the changes to the settings D The temperature auto return setting is enabled for the selected indoor unit if you put a check mark here This is linked with the Auto return Setting di...

Страница 80: ...Set 3 2 z z The Setting dialogue is displayed 3 1 3 2 4 Change the settings Item Explanation Timer settings Start time End time Set the time slots to automatically stop Use to set the time Note y y You can make the settings extend over different dates For example 22 00 to 08 00 Continued on next page When the settings are for closed between 21 00 and 09 00 and the stop monitoring during closed hou...

Страница 81: ...ing at the Start time the unit continues to automatically stop repeatedly at the Auto stop time interval y y Stop by elapsed time After automatically stopping at Start time automatic stopping only happens after the Auto stop time has elapsed if the indoor unit is running y y All day y y Specify time Select the time conditions y y All day Automatic stopping at Auto stop time continues repeatedly th...

Страница 82: ...isplay follows the outdoor unit display order set in O D unit settings P 145 Address The display follows the address order set in I D unit settings P 141 C The indoor units with a check mark next to them will be the subject of the changes to the settings D The unattended auto shutoff is enabled for the selected indoor unit if you put a check mark here This is linked with the Auto shutoff Setting d...

Страница 83: ... 1 The upper limit temperature for some models is 26 C y y In cooling drying mode 18 to 30 C 1 C intervals y y In automatic mode 17 to 27 C 1 C intervals Note y y The temperature range you can set depends on the model Temp range limit The temperature range limit function is enabled for the selected indoor unit if you put a check mark here Continued on next page 1 Touch Energy saving in EnergySavin...

Страница 84: ...t Display The display follows the order set in I D unit settings P 141 O D unit The display follows the outdoor unit display order set in O D unit settings P 145 Address The display follows the address order set in I D unit settings P 141 C The indoor units with a check mark next to them will be the subject of the changes to the settings D The temperature range limit setting is enabled for the sel...

Страница 85: ...r the identification number password level 1 or 2 and the Energy saving timer screen is displayed 2 3 Put a check mark in the Select column 3 1 and touch Set 3 2 z z The Setting dialogue is displayed 3 1 3 2 4 Change the settings Item Explanation Start time End time Set the start and end times for Timer 1 and Timer 2 Use to set the time The setting ranges are as follows y y Hours 00 to 23 1 hour i...

Страница 86: ...display follows the order set in I D unit settings P 141 O D unit The display follows the outdoor unit display order set in O D unit settings P 145 Address The display follows the address order set in I D unit settings P 141 C The indoor units with a check mark next to them will be the subject of the changes to the settings D The energy saving timer setting is enabled for the selected indoor unit ...

Страница 87: ... The Setting dialogue is displayed 3 1 3 2 Note y y This is displayed only for outdoor units for which the out unit silent setting can be set 4 Change the settings Item Explanation Start time End time Set the start and end times Use to set the time The setting ranges are as follows y y Hours 00 to 23 1 hour intervals y y Minutes 00 to 59 1 minute intervals Note y y You can make the settings extend...

Страница 88: ...switches between Display and Address each time you touch it C The outdoor units with a check mark next to them will be the subject of the changes to the settings D The out unit silent setting is enabled for the selected out unit silentt if you put a check mark here This is linked with the Out unit silent Setting dialogue P 87 setting E The Setting dialogue is displayed when you touch this A B D E ...

Страница 89: ...r from the list at right 3 1 and touch Settings 3 2 z z Set the demand points Demand 1 Demand 2 and Demand 3 z z You can change the name of the adaptor displayed for the demand points Touch the text box and change with the touchscreen keyboard Enter a name up to 16 alphanumeric characters 3 1 3 2 4 Touch Register z z To cancel the settings touch Cancel 4 1 Touch Demand setting in EnergySaving 1 2 ...

Страница 90: ...s displayed 3 1 3 2 4 Change the settings z z Set the Settings for Demand 1 Demand 2 and Demand 3 in Level Item Explanation Level Select a setting level Settings Select an operation No operation is caused if you select I D unit demand Valid The demand setting is enabled for the selected indoor unit if you put a check mark here Continued on next page 1 Touch Demand setting in EnergySaving 1 2 Touch...

Страница 91: ... Setting dialogue closes z z To cancel the settings touch Cancel 5 6 Set other indoor units z z Repeat steps 3 to 5 7 Select Yes for I D unit demand 7 8 Touch Register z z To cancel the settings touch Cancel 8 Demand settings on the indoor unit I D unit demand settings ...

Страница 92: ...y The display follows the order set in I D unit settings P 141 O D unit The display follows the outdoor unit display order set in O D unit settings P 145 Address The display follows the address order set in I D unit settings P 141 D The indoor units with a check mark next to them will be the subject of the changes to the settings E The I D unit demand setting is enabled for the selected indoor uni...

Страница 93: ...emand 2 and Demand 3 in Level Item Explanation Level Select a setting level Demand Select an operation No operation is caused if you select When you have selected Ope in Demand set the control rate with The values shown are those values that can be set for the outdoor unit selected O D unit demand Valid The demand setting is enabled for the selected outdoor unit if you put a check mark here Contin...

Страница 94: ... units B Set whether to enable outdoor unit demand control or not Note y y If you select Yes make sure that you set No for indoor unit demand settings C This switches between Display and Address each time you touch it D The outdoor units with a check mark next to them will be the subject of the changes to the settings E The O D unit demand setting is enabled for the selected outdoor unit if you pu...

Страница 95: ... 3 2 z z The Setting dialogue is displayed 3 1 3 2 4 Change the settings Item Explanation Timer 1 Timer 2 First select either Timer 1 or Timer 2 then set the Start time End time and Demand for each of them Continued on next page 1 Touch Demand setting in EnergySaving 1 2 Touch Demand peak shaving settings z z Enter the identification number password level 1 or 2 and the Demand peak shaving setting...

Страница 96: ... Select an operation No operation is caused if you select When you have selected Ope in Demand set the control rate with The values shown are those values that can be set for the outdoor unit selected Demand peak shaving Valid The outdoor unit time slot demand control setting is enabled for the selected outdoor unit if you put a check mark here 5 Touch Register z z The Setting dialogue closes z z ...

Страница 97: ...touch it C The outdoor units with a check mark next to them will be the subject of the changes to the settings D The outdoor time slot demand setting is enabled for the selected outdoor unit if you put a check mark here This is linked with the Demand peak shaving Valid Setting dialogue P 96 setting E The Setting dialogue is displayed when you touch this A B D E C Suppressing the consumption of ele...

Страница 98: ...at the indoor unit is to be allocated to Up to 10 groups Set from Gr 1 to Gr 10 Ope Operation of the indoor units is stopped Set either OFF or T S The thermostat is set to off forcibly Select between T S OFF and Continued on next page 1 Touch Demand setting in EnergySaving 1 2 Touch I D unit cyclic z z Enter the identification number password level 1 or 2 and the I D unit cyclic screen is displaye...

Страница 99: ...ter z z The Setting dialogue closes z z To cancel the settings touch Cancel 5 6 Set other indoor units z z Repeat steps 3 to 5 7 Touch Timer set z z The Term setting dialogue is displayed 7 8 Touch the number z z You can set 4 different time slots 8 9 Set the times z z The time on the left is the control start time The time on the right is the control end time z z Use to set the time Hours can be ...

Страница 100: ...Cancel 11 12Put a check mark in the Valid column 12 13Select Yes for I D unit cyclic 13 14Touch Register z z To cancel the settings touch Cancel 14 Note y y Up to 10 control groups can be created y y Control groups that have not been set will not be the object of cyclic control Control operation at regular intervals I D unit cyclic ...

Страница 101: ...e order set in I D unit settings P 141 O D unit The display follows the outdoor unit display order set in O D unit settings P 145 Address The display follows the address order set in I D unit settings P 141 D The indoor units with a check mark next to them will be the subject of the changes to the settings E The I D unit cyclic is enabled for the selected indoor unit if you put a check mark here T...

Страница 102: ...used if you select When you have selected Ope set the control rate with The values shown are those values that can be set for the outdoor unit selected Continued on next page 1 Touch Demand setting in EnergySaving 1 2 Touch O D unit cyclic z z Enter the identification number password level 1 or 2 and the O D unit cyclic screen is displayed 2 When using cycling control at 10 minute intervals on the...

Страница 103: ... touch Cancel 10 11Put a check mark in the Valid column 11 Continued on next page Item Explanation O D unit cyclic Valid The O D unit cyclic function is enabled for the selected outdoor unit if you put a check mark here 5 Touch Register z z The Setting dialogue closes z z To cancel the settings touch Cancel 5 6 Set other outdoor units z z Repeat steps 3 to 5 7 Touch Timer set z z The Term setting ...

Страница 104: ...g control across the whole system or not Note y y If you select Yes make sure that you set No for indoor unit cycling control settings C This switches between Display and Address each time you touch it D The outdoor units with a check mark next to them will be the subject of the changes to the settings E The O D unit cyclic is enabled for the selected outdoor unit if you put a check mark here This...

Страница 105: ...e functionality to collect the data accumulated in the devices and to turn this into graphs Making the data visible makes it possible to objectively manage energy saving Screen menu Overview Page Bar chart Quantities of energy usage electricity gas etc are shown in bar charts 109 Line graph Temperature changes etc are shown in line graphs 113 ...

Страница 106: ...ys The transition of daily data is displayed in hourly units 1 hour Mths The transition of monthly data is displayed in daily units 1 day Yrs The transition of yearly data is displayed in monthly units 1 month z z Display method Display method Bar Line Explanation Ranking Display the 10 top best or worst units based on collected values for the item By unit Data by item is displayed for units items...

Страница 107: ...the display period z z Item The items you can set depend on the unit selected z z Bar charts Unit days Mths Yrs I D Ttl opr time minutes T S ON ope time minutes Ttl opr time minutes T S ON ope time minutes Elec usage kWh A C gas usage m3 PowerGenratn gas usage m3 ElectricCost A C gas cost PwrGnGasCost O D O D Unit opertn count times Engine operating time minutes Invertr cuml power genrtn kWh PV cu...

Страница 108: ...you can easily display them without having to select the items every time You still need to set the display period and other items Up to 5 graph groups can be registered Example The monthly transitions of total operating hours thermostat ON operating times and electricity usage for one indoor unit is registered in graph group 1 Example The daily transition of operation cycles and engine operating ...

Страница 109: ...information about display periods DspDay DspMth Year Set the dates to be displayed y y When days is selected 1 Touch 2 Select the date to display in the Calendar dialogue The current date is displayed if you touch Tday y y When Mths or Yrs is selected 1 Select the month or year to display with The current month or year is displayed if you touch CuMo or CuYr X axis Use to set the first and last tim...

Страница 110: ...nformation about units 7 8 Select the type of graph z z Refer to P 107 for information about types of graphs z z If you have selected Rankng as the display method select either Worst or Best 8 9 Set the display units for the Y axis 1 Touch Ax1 z z The Unit setting dialogue is displayed z z Select the display units for the Y axis 9 1 2 Touch the unit to display z z The settings are registered and t...

Страница 111: ...select depends on the settings for display method and graph type Display method Graph type Plel Cumultve UntCmpar Up to 4 Up to 4 ChngPrDy 1 only 1 only 12Set the target values for the axis z z Touch Ax1TgtVal and enter the numbers with the touchscreen numeric keypad z z A blue line is inserted to indicate the target values for the graph z z You can set any goal z z This cannot be set if you have ...

Страница 112: ...umultve 2 2 3 SepUnt 2 3 2 3 1 Touch Worst or Best to switch between rankings 2 Touch Plel Cumultve or SepUnt to switch between the type of graph 3 You can touch to change the units displayed 10 units before or after Note y y Touch GrphDspSetgs to change the display range and displayed items Graphing operating times and energy usage ...

Страница 113: ...selected 1 Touch 2 Select the date to display in the Calendar dialogue The current date is displayed if you touch Tday y y When Mths is selected 1 Select the month to display with The current month is displayed if you touch CuMo X axis Use to set the first and last time or period y y When days 00 00 to 24 00 in 1 hour steps y y When Mths 1st to 31st in 1 day steps Data units Indicates the units fo...

Страница 114: ...Refer to P 107 for information about types of data z z If you have selected days for the display period this is not set 8 9 Select the item z z Refer to P 107 for the items you can set z z You can select one item only z z If you have selected By unit as the display method the items are fixed so there is no need for you to set them 9 10Select the device name z z You can set the device name for only...

Страница 115: ...t values for the graph z z You can set any goal 11 12Touch GraphDsp z z The graph is displayed in the main screen z z To cancel the settings touch Cancel 12 Line graph example Display method By unit ItemUnts ChngPrDy ChngPrYr 1 1 1 1 You can touch to change the units displayed 10 units before or after Note y y Touch Graph Disp Set to change the display range and displayed items Graphing temperatur...

Страница 116: ...s of set temperatures and indoor temperatures for indoor units 03 and 06 are displayed in a line graph 1 Touch Energy saving mgmt in EnergySaving 1 2 Select the type of graph z z The main screen is displayed 2 3 Touch GrphDspSetgs z z The display settings screen is displayed 3 4 Set the display range z z For details refer to step 4 in Graphing operating times and energy usage P 109 for bar charts ...

Страница 117: ...of display z z The settings are registered and the Unit setting dialogue closes 9 2 10 Touch AxsSet to select the axis to display z z Select the axis to display the data item z z The axis switches between Ax1 and Ax2 each time you touch it 10 11Select the item z z Refer to P 107 for the items you can set z z You can select one item only z z If you have selected Unit as the display method the items...

Страница 118: ...tem and touch 15Set the target values for the axis z z Touch Ax1TgtVal or Ax2TgtVal and enter the numbers with the touchscreen numeric keypad z z A blue line is inserted to indicate the axis 1 target values and a pink line is inserted to indicate the axis 2 target values for the graph z z You can set any goal 15 16Touch GraphDsp z z The graph is displayed in the main screen z z To cancel the setti...

Страница 119: ... screen is displayed 3 2 3 1 4 Make the graph display settings z z Follow steps 4 to 14 in Making the settings P 116 to 118 to make the graph display settings 5 Touch Reg Graph Grp z z The message OK to overwrite GraphGroupXX XX is the setting number of the selected graph group is displayed 5 6 Touch Register z z The setting is registered z z To cancel registration touch Cancel 6 Setting items fre...

Страница 120: ...ph group numbers displayed in the graphs you can display other registered graphs Modifying a registered graph 1 Touch the number of the Graph group to be displayed 1 2 Touch GrphDspSetgs z z The display settings screen is displayed 2 3 Change the settings z z For advanced settings for changing the range of display refer to step 4 in Graphing operating times and energy usage P 109 for bar charts or...

Страница 121: ... OK to overwrite GraphGroupXX XX is the setting number of the selected graph group is displayed 4 5 Touch Register z z The setting is registered z z To cancel registration touch Cancel 5 Note y y Touch CallGraphGroup and you can also modify the display item settings for other graph groups Setting items freely ...

Страница 122: ...motely control this unit from external devices over a network Remote control is performed using a browser from a PC smart phone or tablet Only users registered in this unit can operate You can also limit the operations that can be performed on the unit using privileges Screen menu Overview Page Network settings Make settings to enable remote control over a network 123 Web user settings Register us...

Страница 123: ...the text box and enter with the touchscreen keyboard y y You cannot set 0 0 0 0 Default gateway Set the default gateway of this unit if necessary Touch the text box and enter with the touchscreen keyboard y y You cannot set 0 0 0 0 AutoDNS If you want the IP address of the DNS server acquired automatically put a check mark here The DNS primary server and DNS secondary server will not be able to be...

Страница 124: ...124 Perform remote operation of the unit over a network Setting 4 Touch Register z z To cancel the settings touch Cancel 4 Setting the network ...

Страница 125: ...sword z z The touchscreen keyboard appears when you touch the text box Refer to Character input P 215 for instructions on how to enter text z z Enter a password of at least 8 numbers Ensure alphanumerics are included 5 Continued on next page 1 Touch System Settings in Settings z z The System settings screen is displayed 1 2 Touch Web user settings z z Enter the identification number password level...

Страница 126: ... GenralUser z z Only one person can have the 0 Administr setting 6 7 Select what is to be operated z z The Select part dialogues are displayed when you touch this z z Select what is to be operated I D unit Control Gr Area z z When the privileges are set to 0 Administr all operations are available so it is not possible to select what to operate 7 8 Select the devices to be operated 8 1 and touch 8 ...

Страница 127: ...rform operations over the network Priv This shows the privileges of the user 0 Administr 1 Operator 2 GenralUser I D unit Users can use the categories with a Control Gr Area C The Edit user sttngs dialogue is displayed when you touch this A B C 12 Put a check mark in the Register column z z Select the users that can operate over the network 12 13Touch Register z z The setting is registered z z To ...

Страница 128: ... intelligent controller z z The address is https intelicon index php is the IP address set in Network settings For example https 192 168 1 101 intelicon index php z z The login screen is displayed 3 Enter the User ID and Password z z Enter the personal user ID and password set in Web user settings P 125 z z The operation screen is displayed z z The operations are the same as the operations on this...

Страница 129: ...data to USB memory devices you can restore the data in the main unit if it is ever corrupted by power outages caused by lightning strikes etc Screen menu Overview Page Backup Save data settings logs to USB memory devices 130 Restore Restore data that has been stored in the unit or saved to a USB memory device 132 CSV Output Export output the settings for this unit as a CSV file 134 CSV Input Impor...

Страница 130: ...cedure 4 5 Touch when you want to disconnect the USB memory device z z Remove your USB memory device after the message USB memory can now be safely removed is displayed z z Close the storage door after removing the USB memory device 5 1 Open the storage door and connect a USB memory device to the USB terminal z z This step is not necessary if you are backing up over a network 2 Touch Backup CSV Ou...

Страница 131: ... as follows Main unit Set Save schedule settings and group settings Log Save alarm logs and operation status change logs y y The time required for backup depends on the volume of data y y The 6 types of backup file are icxsysset zip icxsyslog zip icxappset zip icxapplog zip icxapplog_now zip icxsyslog_now zip y y When backing up over a network this operation is not possible if backing up from anot...

Страница 132: ...s or Sys Settngs Restore location Restore setting 5 Touch Restore z z Restoring starts When restoring is complete the message Restart is displayed 5 6 Touch OK z z Restart the unit The restored data may restart Continued on next page 1 Open the storage door and connect a USB memory device to the USB terminal 2 Touch Backup CSV Output in Settings z z The Backup CSV Output screen is displayed 2 3 To...

Страница 133: ...mory can now be safely removed is displayed z z Close the storage door after removing the USB memory device Note y y The items you can restore are as follows Restore main unit Set Restore schedule settings and group settings y y The time required for restoring depends on the volume of data y y The data restored is that which was backed up Restoring data ...

Страница 134: ... y y Schedule y y Events 4 Touch Trgt z z The Output target dialogue is displayed 4 5 Touch setting name to be exported z z The settings are registered and the Output target dialogue closes 5 Continued on next page 1 Open the storage door and connect a USB memory device to the USB terminal z z This step is not necessary if you are backing up over a network 2 Touch Backup CSV Output in Settings z z...

Страница 135: ...ings repeat steps 4 to 6 z z To cancel the export touch Cancel 6 7 Touch when you want to disconnect the USB memory device z z Remove your USB memory device after the message USB memory can now be safely removed is displayed z z Close the storage door after removing the USB memory device Note y y The time required for export depends on the volume of data Outputting settings as a CSV file ...

Страница 136: ... y y Area settings 4 Touch Trgt z z The InputTgt dialogue is displayed 4 5 Touch setting name to be imported z z The settings are registered and the InputTgt dialogue closes 5 Continued on next page 1 Open the storage door and connect a USB memory device to the USB terminal z z This step is not necessary if you are importing over a network 2 Touch Backup CSV Output in Settings z z The Backup CSV O...

Страница 137: ...e import touch Cancel 8 9 Touch when you want to disconnect the USB memory device z z Remove your USB memory device after the message USB memory can now be safely removed is displayed z z Close the storage door after removing the USB memory device Note y y The time required for import depends on the volume of data y y The CSV file is imported input from the location it was exported output on the U...

Страница 138: ...5 6 Select the Month to save z z You can select multiple Month 6 Continued on next page 1 Open the storage door and connect a USB memory device to the USB terminal z z This step is not necessary if you are downloading over a network 2 Touch Backup CSV Output in Settings z z The Backup CSV Output screen is displayed 2 3 Touch Auto save CSV file z z Enter the identification number password level 1 o...

Страница 139: ...sconnect the USB memory device z z Remove your USB memory device after the message USB memory can now be safely removed is displayed z z Close the storage door after removing the USB memory device Note y y Distribution data and log data is automatically saved in the unit as CSV files once per day CSV files are automatically generated every month y y This procedure saves the CSV files specified by ...

Страница 140: ...p name settings Edit the name of the schedule group 151 Area group name settings Edit the name of the area group 153 Pulse meter settings Make allocations between pulse meters and distribution groups 158 Distribution mode settings Set the mode used for distributing when calculating charges 160 Distribution Ratio settings Set the units for calculating electricity and gas usage charges 161 Event con...

Страница 141: ...u want to manage z z This procedure is not necessary if central addresses have been automatically set Automatically setting central addresses P 144 4 5 Touch Register z z To cancel the settings touch Cancel 5 1 Touch System Settings in Settings z z The System settings screen is displayed 1 2 Touch I D unit settings z z Enter the identification number password level 2 and the I D unit settings scre...

Страница 142: ...if it is subject to batch operations Not managed is displayed if the device is not subject to management and is displayed if it is subject to management Display This indicates the display order Central address This shows the central address Control Gr This shows the control group name it belongs to SchedleGroup This shows the schedule group name it belongs to Area This shows the area group name it...

Страница 143: ...ater when calculating load distribution Touch the text box and enter with the touchscreen numeric keypad Group registration y y Control Gr y y SchedleGroup y y Area y y Distrib Grp Register the group the unit belongs to The group names are displayed when you touch the text boxes Note y y By putting a check mark in the Select column of the indoor units belonging to the same group you can edit the s...

Страница 144: ...on groups when using time distribution Automatically setting central addresses 1 Put a check mark in the Register column z z Select the indoor units you want to manage 1 2 Touch CNTR adr AutSet 2 Note y y The central address is shared with other centralised controllers system controllers etc Do not change unless necessary y y After setting the central address in the Edit unit settings dialogue and...

Страница 145: ...a check mark in the Register column z z Select the outdoor units you want to manage 4 5 Touch Register z z To cancel the settings touch Cancel 5 1 Touch System Settings in Settings z z The System settings screen is displayed 1 2 Touch O D unit settings z z Enter the identification number password level 2 and the O D unit settings screen is displayed 2 3 Check the setting details P 146 ...

Страница 146: ... Explanation Select Select the outdoor units whose settings you want to change No The serial number is displayed Name The names of the outdoor units are displayed Address The addresses of the outdoor units are displayed ClHt Free is displayed if the outdoor unit is the type that can both cool and heat is displayed if it is the specialised type Register If you want it to be managed by this unit put...

Страница 147: ...u can enter up to 16 letters or numbers O D unit sys addr Use to select the desired outdoor unit system address 1 to 30 Item Explanation Outdoor unit No Sub unit number Use to select the desired individual number 0 to 3 within the system Display Use to set the order when displayed in a list 4 Touch Register z z To cancel the settings touch Cancel 4 5 Touch Register z z To cancel the settings touch...

Страница 148: ...ring specified days P 149 CtffDay Set the monthly cut off days 1 to 28 End Registering cut off days P 149 RglrHourRnge Set the distribution time slots for each day of the week Regular hour range settings possible if you put a check mark in Valid The Regular hour range settings dialogue is displayed when you touch RglrHourRnge stngs Set the target time slots for distribution calculation P 150 4 Tou...

Страница 149: ... The colour of the date column changes when you touch this Touch again to return to the original You cannot set a date in the past however z z Touch the day of the week column to set the specified day by day of the week 1 Day of the week column Registering cut off days 1 Touch z z Touch to move the days forward touch to move the days back 1 Basic settings for distribution calculation ...

Страница 150: ...tes 3 4 Touch Set z z The set time is displayed in the cell z z To delete the set time slot select the time slot to delete and touch Clear z z To copy the set time slot select the time slot to copy and touch Copy Next select the place you want to paste to and touch Paste 4 5 Touch Register z z The Regular hour range settings dialogue closes z z To cancel the settings touch Cancel 5 6 Put a check m...

Страница 151: ...the schedule group You can enter up to 16 letters or numbers Display Use to set the order when displayed in a list Continued on next page 1 Touch System Settings in Settings z z The System settings screen is displayed 1 2 Touch Schedule group name settings z z Enter the identification number password level 1 or 2 and the Set schedule group name screen is displayed 2 3 Put a check mark in the Selec...

Страница 152: ...e Valid column z z Put a check mark in the schedule group to be used for the operating schedule 7 The Set schedule group name screen A Put a check mark in the group to be edited B Put a check mark here if schedule group is to be used C The indoor units belonging to the selected schedule group are displayed D The Edit schedule group settings dialogue is displayed when you touch this A B C D Changin...

Страница 153: ...rea group You can enter up to 16 letters or numbers Display Use to set the order when displayed in a list Continued on next page 1 Touch System Settings in Settings z z The System settings screen is displayed 1 2 Touch Area group name settings z z Enter the identification number password level 1 or 2 and the Area group name settings screen is displayed 2 3 Put a check mark in the Select column z z...

Страница 154: ...ea group to use 7 8 Touch Register z z To cancel the settings touch Cancel 8 The Area group name settings screen A Put a check mark in the group to be edited B Put a check mark in the group name use the area group C The names of the indoor units belonging to the selected area group are displayed D The Edit area group settgs dialogue is displayed when you touch this A B C D Changing the name of the...

Страница 155: ...distribution group You can enter up to 16 letters or numbers Display Use to set the order when displayed in a list Continued on next page 1 Touch System Settings in Settings z z The System settings screen is displayed 1 2 Touch Distribution group settings z z Enter the identification number password level 1 or 2 and the Distribution group settings screen is displayed 2 3 Put a check mark in the Se...

Страница 156: ... Put a check mark in the Valid column z z Put a check mark in the distribution group to use in distribution calculations 7 8 Touch Register z z To cancel the settings touch Cancel 8 Note y y Do not put both PAC and GHP in a single distribution group with time distribution Put each of them in separate groups Changing the name of the distribution group ...

Страница 157: ...in the group to be edited B Put a check mark here if distribution group is to be used C The indoor units belonging to the selected distribution group are displayed D The Edit distribution group sttngs dialogue is displayed when you touch this A B C D Changing the name of the distribution group ...

Страница 158: ...ultiplying factor to be displayed for the pulse meter After decimal pt Use to set the number of decimal places to be displayed for the pulse meter 0 to 3 Display Use to set the order when displayed in a list Type Use to set the pulse meter type Select from Elec Gas PwGn TpWt and Ice Continued on next page 1 Touch System Settings in Settings z z The System settings screen is displayed 1 2 Touch Pul...

Страница 159: ...h Cancel 6 7 Put a check mark in the Register column z z Put a check mark next to the pulse meters you want to enable 7 8 Touch Register z z To cancel the settings touch Cancel 8 The Pulse meter settings screen A A list of pulse meters with a check mark in the Register column is displayed B Put a check mark next to the pulse meters you want to edit C Put a check mark next to the pulse meters you w...

Страница 160: ...wer generation y y When set to No you cannot set billing method Billing method Set the billing method for gas power generation Energy savng dist Set the range of energy savings effects for multi function air conditioners or ice thermal storage models in calculations for distribution when load distribution only y y With O D system only the air conditioning distribution of the area of the outdoor sy...

Страница 161: ...ur range is the one set in Regular hour range settings in Calendr sttgs for distr calc P 150 OutOfHrs Set the out of hours price SpcfdDay Set the specified days price y y The specified day is the one set in SpecifiedDayCalendar in Calendr sttgs for distr calc P 149 AllHours Set prices for times that are not covered by regular hour ranges out of hours or specified days CCY code Enter the currency u...

Страница 162: ...4 1 and touch Set 4 2 z z The Input point settings dialogue is displayed 4 1 4 2 5 Select the input target from the list z z Input targets include air conditioner alarms digital input output devices indoor units individual and control groups 5 Continued on next page 1 Touch System Settings in Settings z z The System settings screen is displayed 1 2 Touch Event control z z Enter the identification ...

Страница 163: ...peration of the indoor units is stopped Alarm Select either ON or OFF y y ON indicates that an error alarm has been transmitted y y OFF indicates that a unit has recovered from an error Room T Set the room temperature The touchscreen numeric keypad appears when you touch the text box Select either min or max y y min indicates when the temperature is above the set temperature y y max indicates when...

Страница 164: ...t signal is on y y OFF indicates that the digital output signal is off z z When an indoor unit has been selected I DUnt Ope Select either ON or OFF y y ON indicates that the indoor unit starts operation y y OFF indicates that indoor unit stops operation Mode Select the operation mode to switch to Setting the operation mode P 167 Set T Set the temperature Eco Select either Valid or Invlid Set one o...

Страница 165: ...put delay time 1 Touch OutptDlayTme z z The OutptDlayTme settings dialogue is displayed 13 1 2 Select the output delay time z z Set the initiating time for the output point when the input point conditions have been met 13 2 14Put a check mark next to Valid z z The set event control works if you put a check mark here 14 15Touch Register z z To cancel the settings touch Cancel 15 Linked control of a...

Страница 166: ...30Sec 1Min 3Min 5Min and 10Min E The list of input points that are set is displayed Input point This displays the input targets for which conditions are set Type The input target type is displayed Status The input target status is displayed Symbol A symbol is displayed when temperature is set as a condition for indoor units The symbols displayed are as follows When the temperature is set to min Wh...

Страница 167: ... the mode to switch z z The settings are registered and the OpertnMode dialogue closes 2 Deleting the settings for input output points 1 Select the input output point to delete 1 1 and touch Set 1 2 z z The settings dialogue is displayed 1 1 1 2 2 Touch the highlighted input output target z z The setting is deleted 2 3 Touch Register z z The setting dialogue closes and the selected input output po...

Страница 168: ...entication OP25B The SMTP server port setting is automatically set to 587 if you put a check mark here Password Set the password to use for SMTP authentication Authentictn Select either LOGIN or CRAM MD5 as the authentication method SSL TLS set SMTPs 2 Select either SSL TLS or STARTTLS as the encryption method Recp stgs The Email Alarm recipient settings dialogue is displayed when you touch this S...

Страница 169: ... address Valid Users with a check mark in this column will be sent alarm mails Adapter CommuErr Users with a check mark in this column will be sent alarm mails when there is a communications error with the communication adaptor I D unit Disc Users with a check mark in this column will be sent alarm mails when there is a disconnected alarm with an indoor unit Send test mail A test mail is sent to t...

Страница 170: ...ber password level 2 and the Communication adapter setting screen is displayed 2 3 Put a check mark in the Select column z z Select the communication adaptor to be edited 3 4 Touch Sttng z z The Edit CommAdptrStgs dialogue is displayed 4 5 Change the settings Item Explanation Name Change the name of the communication adaptor You can enter up to 16 letters or numbers 6 Touch Register z z The Edit C...

Страница 171: ... adaptors with a check mark in the Register column is displayed when you touch this Touch again to return to the previous display B Put a check mark next to the communication adaptor you want to edit C Put a check mark next to the communication adaptors you want to enable D The Edit CommAdptrStgs dialogue is displayed when you touch this Note y y In the Address column Link1 and Link2 are in this u...

Страница 172: ...ew the current control status 180 Cost settings Set cost priority control 182 Gas demand settings Set gas demand values 184 Check upper limit map Check the upper limit map which is used for cost priority control 186 Delay time settings Set delay times 188 Register power demand point Register the power demand point inputs 192 Register gas demand point Register the gas demand point inputs 193 Regist...

Страница 173: ... gas costs for each of the 5 time slots set in the Cost settings screen upper limit maps are automatically generated according to the cooling or heating mode and the outdoor temperature with the upper limit map suited to the current conditions being automatically referenced Refer to the following page for information about upper limit maps z z Energy priority control Control so that the energy con...

Страница 174: ...rrent settings in the Check upper limit map screen z z Energy priority map Referenced with energy priority control Values are fixed in the following map Load level EHP GHP 10 30 0 20 60 0 30 90 0 40 20 50 50 50 50 60 80 50 70 100 55 80 100 70 90 100 85 100 100 100 100 100 100 z z GHP priority map Referenced with GHP priority control Values are fixed in the following map Load level EHP GHP 10 0 15 ...

Страница 175: ...insufficient GHP priority control The system operates so that the GHP side is prioritised with EHP operating only when capacity is insufficient 5 Select the demand setting 5 Item Explanation Not set Demand control is not performed EHP demand GHP takes some of the load from EHP according to the demand level GHP demand GHP demand control instructions are issued according to the demand level The inst...

Страница 176: ...176 Configuring the Hybrid GHP EHP control Setting Setting the mode used for operation Basic settings 6 Touch Register z z To cancel the settings touch Cancel 6 ...

Страница 177: ...the Select column z z Select the outdoor units you want to register 4 5 Touch Set z z The operation dialogue is displayed 5 Continued on next page 1 Touch System Settings in Settings z z The System settings screen is displayed 1 2 Touch Hybrid GHP EHP settings z z Enter the identification number password level 1 or 2 and the Hybrid GHP EHP settings screen is displayed 2 3 Touch Outdoor unit settin...

Страница 178: ...ual map settings Group settings Set the group for referencing the value sent when gas demand is input 7 Touch Register z z The settings are registered and the operation dialogue closes z z To cancel the settings touch Cancel 7 8 Put a check mark in the Register column z z Select the outdoor units for which you want to implement Hybrid GHP EHP control Hybrid GHP EHP control instructions are impleme...

Страница 179: ...n only affects main units A Shows the circuit Intelligent controller that the outdoor unit is connected to Currently this is fixed to IntelliCon B Select the linked system that the outdoor unit is connected to C The outdoor units with a check mark next to them will be the subject of the changes to the settings D Hybrid GHP EHP control is enabled for the selected outdoor unit if you put a check mar...

Страница 180: ...rrent instruction values for Hybrid GHP EHP control for each outdoor unit 4 Check the details P 181 1 Touch System Settings in Settings z z The System settings screen is displayed 1 2 Touch Hybrid GHP EHP settings z z Enter the identification number password level 1 or 2 and the Hybrid GHP EHP settings screen is displayed 2 3 Touch Hybrid GHP EHP O D unit info z z The Hybrid GHP EHP O D unit info ...

Страница 181: ...d GHP EHP compatible No is displayed if the unit is not compatible GHP EHP Shows whether the unit is GHP or EHP Power dmnd level Shows the current power demand level 0 to 3 Gas dmnd level Shows the current gas demand level 0 to 3 EHP upLmt Shows the EHP upper limit value that is currently being sent to the outdoor unit GHP upLmt Shows the GHP upper limit value that is currently being sent to the o...

Страница 182: ...rk in the Valid column z z Select the time slot to use 4 5 Set the power costs gas costs z z The touchscreen numeric keypad appears when you touch the text box 5 Item Explanation Pow costs cost kWh Set the unit price 0 to 999 99 for each unit of energy This is used to calculate the power charges when using cost priority control Gas costs cost kWh Set the unit price 0 to 999 99 for each unit of ene...

Страница 183: ...can make the settings extend over different dates For example 22 00 to 08 00 y y The start time is valid only for those time slots where a check mark has been put in the Valid column For example When set as follows y y Put a check mark in the Valid column for Timeslots 1 and set the start time to 03 00 y y Put a check mark in the Valid column for Timeslots 2 and set the start time to 22 00 Timeslo...

Страница 184: ... selected in the demand settings in the Basic settings screen P 175 4 Put a check mark in the Select column z z Select the group you want to edit 4 5 Touch Set z z The operation dialogue is displayed 5 Continued on next page 1 Touch System Settings in Settings z z The System settings screen is displayed 1 2 Touch Hybrid GHP EHP settings z z Enter the identification number password level 1 or 2 and...

Страница 185: ... z Set a value for each between level 0 and 3 The settings can be in the range 0 to 130 and Unlmtd unlimited 6 7 Touch Register z z The settings are registered and the operation dialogue closes z z To cancel the settings touch Cancel 7 Setting gas demand values Gas demand settings ...

Страница 186: ... maps are generated according to combinations of Timeslot group Mode and OutAirTmpSlt and you can view the content of each upper limit map by selecting each of these 4 Check the details P 187 1 Touch System Settings in Settings z z The System settings screen is displayed 1 2 Touch Hybrid GHP EHP settings z z Enter the identification number password level 1 or 2 and the Hybrid GHP EHP settings scre...

Страница 187: ... 3 C 5 C 7 C 9 C 11 C 13 C y y When cooling if the outdoor temperature is less than 27 C the 25 C map is referenced If the outdoor temperature is more than 27 C and less than 29 C the 27 C map is referenced If the outdoor temperature is more than 39 C the 39 C map is referenced This concept is the same when heating B This shows the upper limit value that is referenced when the set conditions are m...

Страница 188: ...d Group 3 Green Group 4 Light blue Group 5 Yellow 4 Put a check mark in the Select column z z Select the outdoor units you want to edit 4 5 Touch Set z z The operation dialogue is displayed 5 Continued on next page 1 Touch System Settings in Settings z z The System settings screen is displayed 1 2 Touch Hybrid GHP EHP settings z z Enter the identification number password level 1 or 2 and the Hybri...

Страница 189: ...k mark in the Select column z z Select the demand delay group you want to edit 9 Demand delay Ie to Ve These correspond to groups 1 to 5 and are referenced when there is a change in the power demand level Ig to Vg These correspond to groups 1 to 5 and are referenced when there is a change in the gas demand level Ctrl delay time min Shows the time 0 to 60 minutes to delay when the demand level incr...

Страница 190: ...me min Set the time 0 to 60 minutes to delay when the demand level increases Release delay time min Set the time 0 to 60 minutes to delay when the demand level decreases 12Touch Register z z The settings are registered and the operation dialogue closes z z To cancel the settings touch Cancel 12 Setting delay times Delay time settings ...

Страница 191: ...telligent controller that the outdoor unit is connected to Currently this is fixed to IntelliCon B Select the linked system that the outdoor unit is connected to C The delay group setting content for each time slot corresponding to outdoor units is shown in graphs D The Delay group settings screen is displayed when you touch this E When you touch this you can make settings for the delay groups for...

Страница 192: ...ec Demand Lv1 Elec Demand Lv2 and Elec Demand Lv3 z z You can change the names displayed for each of the demand points Touch the text box and change with the touchscreen keyboard Enter a name up to 16 alphanumeric characters 4 1 4 2 5 Touch Register z z To cancel the settings touch Cancel 5 1 Touch System Settings in Settings z z The System settings screen is displayed 1 2 Touch Hybrid GHP EHP set...

Страница 193: ...as Demand Lv1 Gas Demand Lv2 and Gas Demand Lv3 z z You can change the names displayed for each of the demand points Touch the text box and change with the touchscreen keyboard Enter a name up to 16 alphanumeric characters 4 1 4 2 5 Touch Register z z To cancel the settings touch Cancel 5 1 Touch System Settings in Settings z z The System settings screen is displayed 1 2 Touch Hybrid GHP EHP setti...

Страница 194: ... 2 z z Set the demand point HW Demand z z You can change the names displayed for demand points Touch the text box and change with the touchscreen keyboard Enter a name up to 16 alphanumeric characters 4 1 4 2 5 Touch Register z z To cancel the settings touch Cancel 5 1 Touch System Settings in Settings z z The System settings screen is displayed 1 2 Touch Hybrid GHP EHP settings z z Enter the iden...

Страница 195: ...e upper limit map made with these settings is prioritised 4 Put a check mark in Use indiv map 4 5 Touch Register z z To cancel the settings touch Cancel 5 6 Put a check mark in the Select column z z Select the load level to edit 6 Continued on next page 1 Touch System Settings in Settings z z The System settings screen is displayed 1 2 Touch Hybrid GHP EHP settings z z Enter the identification num...

Страница 196: ...or both EHP upper limit value and GHP upper limit value z z The settings can be in the range 0 to 130 and Unlmtd unlimited 8 9 Touch Register z z The settings are registered and the operation dialogue closes z z To cancel the settings touch Cancel 9 10Touch Register z z To cancel the settings touch Cancel 10 Using individually set upper limit maps Individual map settings ...

Страница 197: ... value that is referenced when the set conditions are met for each load level EHP upLmt Shows the EHP upper limit value corresponding to the current load level GHP upLmt Shows the GHP upper limit value corresponding to the current load level C When you touch this the operation dialogue is displayed for load levels with a check mark in the Select column B C A Using individually set upper limit maps...

Страница 198: ...ware update Update the software for this unit 201 Initialize Initialise the settings for this unit The user not initialise under any circumstances 202 Language TimeZone sttngs Set the language to be used when setting and operating this unit 205 Date settings Manually set the date and time 204 Screen menu Overview Page Test run Perform a test operation of the indoor unit after installing this unit ...

Страница 199: ... to enter the identification number password y y The back light does not turn off if you touch Invalid The actual time can differ by about a minute CleanngMde All operations are disabled on the liquid crystal display when you touch this Start so that you can clean it This is cancelled when you touch END Auto logout time Log out automatically after the specified time 30 m 1hour or 12 hrs Buzzr vol ...

Страница 200: ...ne number 5 Touch Register z z To cancel the settings touch Cancel 5 1 Touch IntelContrlr maint in Settings z z The IntelContrlr maint screen is displayed 1 2 Touch Intelligent Controller info z z Enter the identification number password level 1 or 2 and the Show service contact info screen is displayed 2 3 Touch the text box z z The touchscreen keyboard is displayed 3 ...

Страница 201: ...ouch OK z z A confirmation message appears again z z To cancel the update touch Cancel 5 6 Touch Update z z The update starts The progress of the update is shown as a percentage z z The unit automatically restarts when updating is complete 1 Open the storage door and connect a USB memory device to the USB terminal 2 Touch IntelContrlr maint in Settings 2 3 Touch Software update z z Enter the ident...

Страница 202: ...st operation of the air conditioning units for example 2 Touch Initialize z z Several confirmation messages will be displayed so touch Yes each time z z Initialisation starts z z When initialising is complete the message Settings were reset IntelligntCtrlr is restarting is displayed 2 1 Touch IntelContrlr maint in Settings z z The IntelContrlr maint screen is displayed 1 2 Touch Initialize z z Ent...

Страница 203: ...r password to perform settings and operations If you wish to operate after the screen turns off entering the identification number password can disable the operation by the third party There are identification numbers password for Level 1 Level 2 and screen lock release 1 Enter an identification number z z The touchscreen keyboard appears when you touch the text box z z Use an identification numbe...

Страница 204: ... set Hours Minutes and Seconds The time system for Hours is 24 hours 4 Touch Register z z To cancel the settings touch Cancel 4 1 Touch IntelContrlr maint in Settings z z The IntelContrlr maint screen is displayed 1 2 Touch Date settings z z Enter the identification number password level 1 or 2 and the Date setting screen is displayed 2 Note y y Do not turn back the time manually by 30 minutes or ...

Страница 205: ...can set English US English UK German Italian French Spanish and Portuguese z z The settings are registered and the SlctLang dialogue closes 4 5 Touch Select time zone z z The Select time zone dialogue is displayed 5 Continued on next page 1 Touch IntelContrlr maint in Settings z z The IntelContrlr maint screen is displayed 1 2 Touch Language TimeZone sttngs z z Enter the identification number pass...

Страница 206: ...ne to display z z You can select UTC 12 to UTC 1 UTC and UTC 1 to UTC 14 Find the difference between the time in the installation location of the intelligent controller and Coordinated Universal Time UTC If the former is 1 hour ahead of the latter for example select UTC 1 z z The settings are registered and the Select time zone dialogue closes 6 Setting the language and time zone ...

Страница 207: ... 2 Select the linked system you want to run the test operation for z z The settings are registered and the Link dialogue closes z z The outdoor units in the selected linked system are displayed in a list 4 2 Continued on next page 1 Touch A C maintenance in Settings z z The A C maintenance screen is displayed 1 2 Touch Test run z z Enter the identification number password level 2 and the Test run ...

Страница 208: ...ogue is displayed 6 7 Select the operation mode Cool or Heat 7 1 and touch ON 7 2 z z The settings are registered and the operation dialogue closes z z The test operation starts 7 1 7 2 8 Check the Stus column z z During the test operation the operation mode is shown in the Stus column for cooling and for heating 9 To stop the test operation touch Oprn then touch OFF in the operation dialogue Runn...

Страница 209: ...ayed when you touch this C Outdoor units are displayed in a list Item Explanation Slct Select the outdoor units you want to run a test operation for O D unit The outdoor units in the linked system selected at B are displayed Stus The operation mode while testing operation is displayed D The indoor units that are connected to outdoor units with a check mark in C are displayed E Test operation is pe...

Страница 210: ...Change the settings Item Explanation Communic error w A C DetrTime Set the judgement time 10 to 99 when an error occurs between this unit and the air conditioning units Use to set the value RS485 line comm spd bps Set the communications speed between this unit and the air conditioning units 9600 or 19200 y y Set 19200 under normal circumstances No comm mode There is no communication with the air c...

Страница 211: ... check Remote controller display check y y ComError C17 alarm communication error between the unit and the air conditioning unit C06 alarm communication error between the unit and the communication adaptor Local R C Prhbt settings Set Prbt1 to Prbt4 for each item ON OFF Temp setngs Mode Fan SPD Flap or Energy saving to set whether to permit or prohibit operations and settings with the local remote...

Страница 212: ...mitted by the units 3 Put a check mark in the Register column of the target unit 3 4 Touch Register z z To cancel the settings touch Cancel 4 1 Touch A C maintenance in Settings z z The A C maintenance screen is displayed 1 2 Touch Maintenance information z z Enter the identification number password level 1 or 2 and the Register maintenance information screen is displayed 2 ...

Страница 213: ...213 Appendix Appendix Appendix This chapter provides information you will require to use the unit input of numbers and letters terminology etc and maintenance information ...

Страница 214: ...creen numeric keypad such as the following appears on the screen when you touch the text box 1 2 3 4 5 Name Explanation 1 Input field The number you touch appears 2 DEL key This deletes all of the numbers displayed in the input field 3 Numbered keys 0 to 9 dot key key Touch the number The number you touch is displayed in the input field and are added to the right Each time you touch the key a minu...

Страница 215: ...you touch it the characters displayed are deleted one at a time from the right of the cursor 5 keys Touch to move the cursor to the beginning of the text Touch to move the cursor to the end of the text 6 move cursor keys Each time you touch one of these the cursor in the input field moves one character left or right 7 Space key Each time to touch this key 1 space is added to the input field 8 Uppe...

Страница 216: ...h startup input You can automatically startup all units with an external signal Excluding those indoor units set to be excluded from the operation Operation example When the input signal switches from OFF to ON the startup signal is sent to all indoor units Batch alarm output When an alarm or error occurs on any of the connected units this unit sends a signal externally This signal can be used by ...

Страница 217: ...umulative operating time of indoor unit No i high RHi The cumulative operating time of indoor unit No i mid RLi The cumulative operating time of indoor unit No i low SHHi The cumulative thermostat ON time of indoor unit No i high SHi The cumulative thermostat ON time of indoor unit No i mid SLi The cumulative thermostat ON time of indoor unit No i low Pi The performance of indoor unit No i a value...

Страница 218: ...hole is the total electricity gas consumption index for all indoor units included in the relevant distribution group TOTALe is the electricity consumption index for the distribution group as a whole TOTALg is the gas consumption index for the distribution group as a whole m is the number of indoor units included in the relevant group Electricity consumption index TOTALe TE1 TE2 TEm Gas consumption...

Страница 219: ...m3 Methodology for calculating electricity gas consumption usage for each indoor unit The formula for calculating the electricity usage or gas usage for an individual indoor unit is as follows Quantity of electricity used Electricity usage of the distribution group x the distribution ratio of electricity consumed by indoor units Quantity of gas used Gas usage of the distribution group x the distri...

Страница 220: ...tion Electricity distribution rate RPI f PIA Gas distribution ratio RGI f PGA Setting Heater capacity H Value added for fan current B Calculation Elements related to ice thermal storage ICE f TCnight RPI Pice f Pc e Calculation Amount of electricity used PI f RPI Pc e ICE Pice Amount of gas used GI f RGI Gc g Work performance capacity Electricity PINp f D FI PS PINg f 0 Gas GIN f D FI PS Setting V...

Страница 221: ...e counts apportioned to each time slot in hours out hours particular days may not be completely accurate Display refresh times The maximum period between refreshing of filter signs and engine oil signs is 7 minutes The maximum period between refreshing of accumulated operating time and distribution data distribution ratios used amounts is 18 minutes Electric heater ON time is refreshed every hour ...

Страница 222: ...e The methodology adopted on this unit for calculating air conditioning distribution ratios and air conditioning usage is only a simplified one There will be differences from the usage volumes billed by the electricity and gas providers Depending on operating conditions there will be differences from the actual air conditioning volumes and the distribution ratios Due to the rounding of fractions w...

Страница 223: ...e calculation of the distributions leading to a large difference Contact the place of purchase or your servicing agent for details Remote control less systems In a system without remote controllers where only one centralised device has been installed if that device breaks down then you may be faced with the problem of not being able to run the air conditioning units It is our recommendation to ins...

Страница 224: ...mes of only one of these the main unit shall be the object of distribution calculations If the sub units operate with the thermostat off or stop due to warnings these will not be recognized ON hours for electric heater The cumulative ON time for electric heaters is not displayed Indoor unit performance fixed values As these are not identified automatically set the performance fixed capacity values...

Страница 225: ...he interface adaptor Air conditioning distributing Indoor unit fan speed data The cumulative operating hours by fan speed will be fixed to Mid Even when the thermostat ON signal input is connected to the interface adaptor the cumulative operating hours will be counted as fixed to Mid ON hours for electric heater The cumulative ON time for electric heaters is not displayed Indoor unit performance f...

Страница 226: ...indicative of a malfunction Furthermore it is characteristic for colour liquid crystal displays to show some discolouration due to changes in temperature etc but this is not indicative of a malfunction No operation even after touching buttons y y After long term use there may be a shift in the positioning of the operating positions on the touch panel compared to the screen s position Contact the p...

Страница 227: ...hinners or wipe with chemical cloths This can cause discolouration or malfunction When the unit is very dirty dampen a cloth in water or warm water wring thoroughly and wipe Do not let water get on the unit directly Take care not to get water directly on the unit Electric insulation may worsen leading to possible malfunction and electric shock Do not disassemble Do not disassemble this unit This m...

Страница 228: ...ns included with this unit or to lend out the software without the permission of the rights holder y y This company accepts no responsibility for damages losses or requests for payment incurred as a result of using this unit or the software included with this unit If any problems with calculations etc of proportions and usage volumes occur due to issue with the device or software we will not be re...

Страница 229: ...oogle Chrome Screen resolution 1280 1024 recommended USB memory devices that can be used Standard type USB2 0 Capacity 4 GB or more Cautions before use y y Proper operation is not guaranteed even if you use a computer that meets the above specifications y y Encryption with security software etc cannot be used y y Panasonic accepts no responsibility for any loss of data 1 The maximum number of conn...

Страница 230: ...Panasonic Corporation http www panasonic com Panasonic Corporation 2016 2019 ...

Отзывы: