47
Setting a schedule
Operation/Status
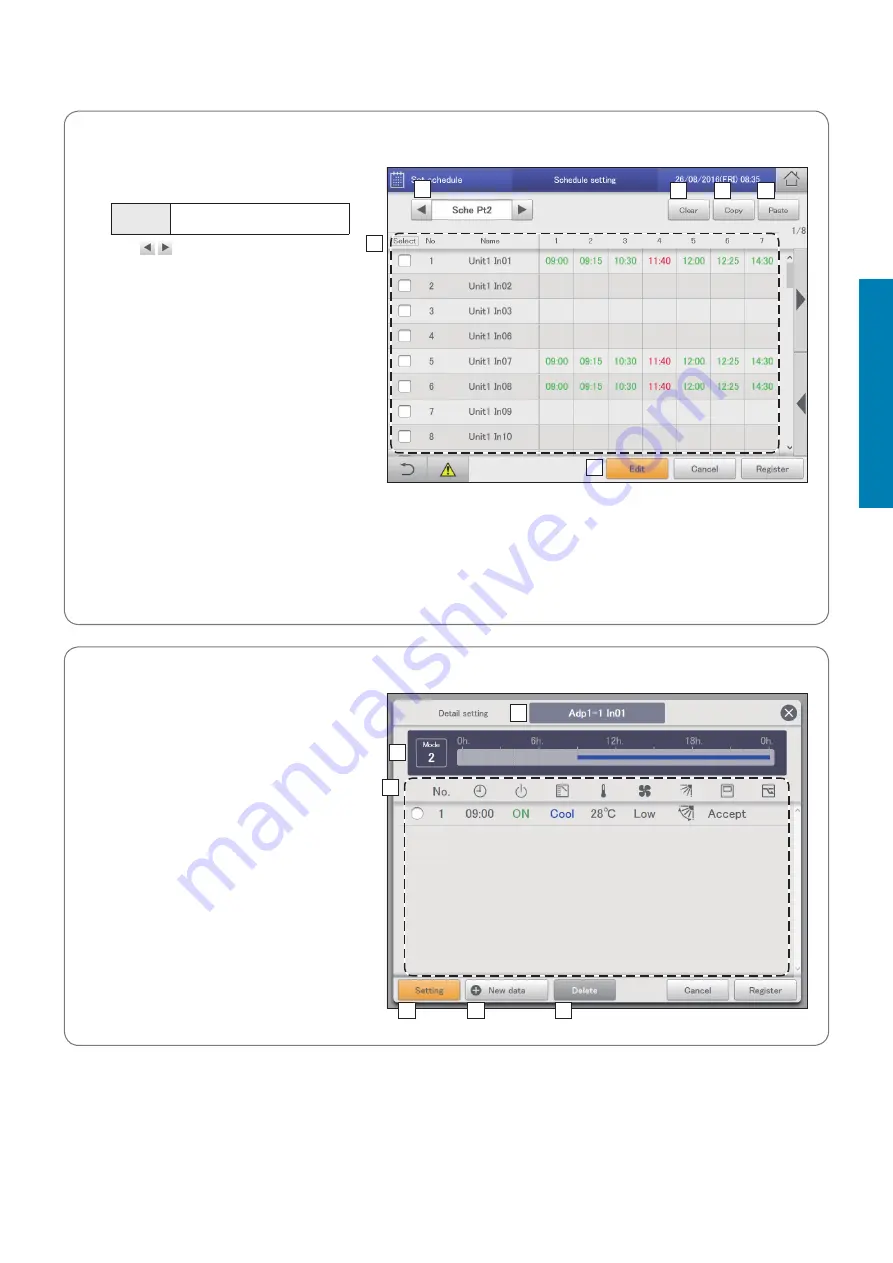
The “Schedule setting” screen
A: Select the daily running mode to register.
You can select daily running modes from the
following types.
Mode
Register as a normal pattern.
(Mode1 to 50)
y
Use to select the daily running mode.
y
The display order is as follows.
“Mode1”
“Mode2”
…
“Mode50”
B: You can delete the selected schedule either
by indoor unit or by schedule group.
(→ “Deleting a schedule” (P.48))
C: You can copy the selected schedule either
by indoor unit or by schedule group. (→
“Copy a schedule for setting” (P.48))
D: You can paste the schedule specified at C to
an indoor unit or schedule group.
(→ “Copy a schedule for setting” (P.48))
E: You can view the schedule for a single day
in a list.
You can scroll up or down by swiping or
flicking the screen.
Note
y
Before setting an operating schedule, the setting cell on the right is blank.
y
When at least one check mark has been put in the “Valid” column in the “Set schedule group name” screen (refer to “Changing
the name of the schedule group” (P.151)), the schedule group name is displayed first, then the indoor unit names that do not
belong to schedule groups are displayed.
F: The “Detail setting” dialogue is displayed when you touch this, and you can make advanced settings for the schedule.
A
C
D
B
E
F
The “Detail setting” dialogue
A: The name of the selected indoor unit or
schedule group is displayed.
B: The daily running mode is displayed.
Set schedules are displayed in a timetable.
C: View a list of registered setting cells.
Each line is one setting cell.
You can scroll up or down by swiping or flicking
the screen.
D: Modify the registered content of setting cells.
(→ “Changing the settings in setting cells”
(P.49))
E: The “Sttg” dialogue is displayed when you
touch this and you can add setting cells.
F: Delete the registered content of setting cells.
(→ “Deleting the settings in setting cells” (P.49))
A
C
D
B
E
F
Setting a schedule


