


- 96 -
3. Scan
2
Click [Start], and then select [All Programs] > [Okidata] > [ActKey] > [Tool] >
[Network Configuration].
3
Right-click [Show Network Configuration] in the task tray.
4
Select the scanner driver to be used, and then select [Properties] from the
[Scanner] menu.
5
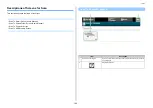
Click the [Register] tab.
As the computer information, the computer name, IP address and port number are
displayed.
You do not need to set the computer name, because the computer's host name is
automatically acquired.
Computer name (host name) is used as default address, but you can clear the "use
computer name (host name)" check box and select IP address of the computer.
If multiple network cards are installed in the computer, multiple IP addresses are
displayed.
Select the IP address of the network card that is currently used.
Change the current setting for the port number that is displayed if necessary.
6
Click [Register] to register your computer to Network Scan Destination of Scan
To Computer of the machine.
Deleting Computer Using Network Configuration
You can delete unnecessary computers from Network Scan Destination of Scan To
Computer of the machine.
1
Click [Start], and then select [All Programs] > [Okidata] > [ActKey] > [Tools] >
[Network Configuration].
2
Right-click [Show Network Configuration] in the task tray.
3
Select [Properties] from the [Scanner] menu.
4
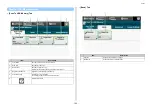
Click the [Unregister] tab.
5
Select the computer name to unregister, and then click [Unregister].
You can set WSD Scan from Scan To Computer or Remote Scan via a network.
To use WSD Scan, the machine must be connected to a computer with the following installed
via a network: Windows 10/Windows 8.1/Windows 8/Windows Vista/Windows 7/Windows
Server 2012/Windows Server 2012 R2/Windows Server 2008/Windows Server 2008 R2
To use the WSD Scan function, follow the steps to install the machine to the computer as a
WSD device.
Check the network connection before starting the procedure below.
Enabling WSD Scan
To use the Scan To Computer (WSD Scan) function and the Remote Scan (WSD Scan)
function via the WSD Scan connection, follow the procedure below.
1
Press [Device Settings] on the touch panel.
2
Press
or
several times to select [Admin Setup].
3
Enter the administrator name and password and press [OK].
The factory default administrator name and password are "admin" and "999999"
respectively.
4
Press [Scanner Setup].
5
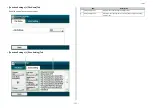
Press [WSD Scan Setup].
6
Check that [WSD Scan] is set to [Enable].
Pressing [WSD Scan] switches between [Enable] and [Disable].
7
Press [Back] until the home screen is displayed.
Installing This Machine as a WSD Device to a Computer
Install this machine as a WSD Scan device with a Windows computer that supports WSD
Scan so that you can use the WSD Scan function.
Using WSD Scan
Содержание MC573
Страница 1: ...MC573 ES5473 MFP Advanced Manual...
Страница 18: ...18 1 Basic Operations 7 Select a volume level...
Страница 31: ...2 Copy Useful Functions For a Better Finish Color Settings Advanced Copy Settings...
Страница 141: ...141 4 Print 5 Press Color Menu 6 Press Adjust Registration 7 Press Yes...
Страница 144: ...144 4 Print Color Correct Utility Color Swatch Utility PS Gamma Adjuster Utility Adjusting Color with Software...
Страница 489: ...489 11 Utility Software Storage Manager plug in Create or edit a file to download to a device...
Страница 507: ...46532802EE Rev2...


