


- 81 -
3. Scan
5
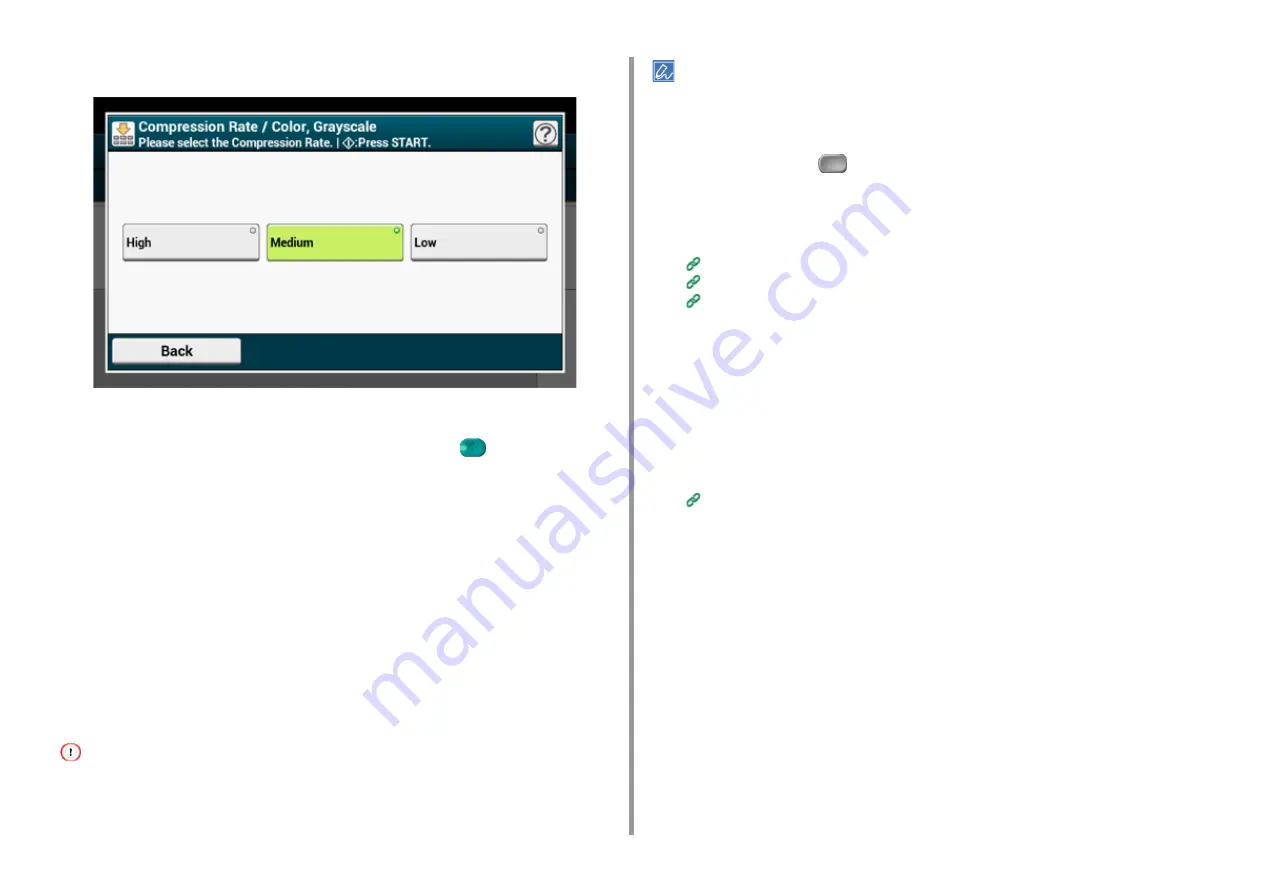
Select a compression rate.
6
Select a color type.
7
Change other settings if necessary, and then press the
(START) button.
Encrypting a PDF File
When converting a scanned document to a PDF file, you can encrypt the file. You can set an
encryption level, a document open password, a permission password, and use permissions
for the created PDF file. The higher the encryption level is, the higher the security level is.
A document open password is intended to open an encrypted PDF file. A document open
password cannot be the same as a permission password. You can enter up to 32 characters.
A permission password is intended to control printing, extracting, editing, or other operations
for encrypted PDF files. A permission password cannot be the same as a document open
password. You can enter up to 32 characters.
• [Encrypted PDF] can be selected only if [File Format] is set to [PDF] or [HC-PDF]. [PDF/A] cannot be selected.
• To encrypt a PDF file, you must set a document open password or permission password.
• The permission setting items for printing and editing a PDF file vary depending on the encryption level.
• A permission to print a document, a permission to extract text and graphic, and a permission to change a document
are displayed only if you select [Enable] or [Apply Default Password] for [Permissions Password].
1
Press [Scan] or the
(SCAN) button.
2
Set a document in the ADF or on the document glass.
3
Select a scan function.
Sending Scanned Data as an E-mail Attachment
Saving Scanned Data in USB Memory
Saving Scanned Data in a Shared Folder
4
Press [Encrypted PDF] on the [Image Settings] tab.
5
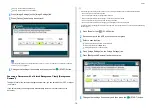
Press [Encrypt], select encryption level, and then press [Next].
6
To set a document open password, press [Enable] or [Apply Default
Password].
To select [Apply Default Password], you must register the default password from
[Device Settings] > [Admin Setup] > [Scanner Setup] > [Default Settings] >[Encrypted
PDF Setting] on the touch panel in advance.
7
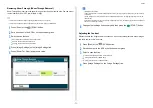
Enter a password, and then press [OK].
You can enter up to 32 characters.
8
Enter the password again, and then press [OK].
9
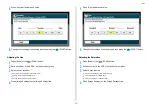
To set a permission password, press [Enable] or [Apply Default Password].
10
Enter a password, and then press [OK].
A permission password cannot be the same as a document open password. You can
enter up to 32 characters.
11
Enter the password again, and then press [OK].
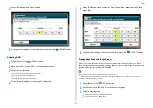
12
Select a permission to print, and then press [Next].
13
Select a permission to extract, and then press [Next].
Содержание MC573
Страница 1: ...MC573 ES5473 MFP Advanced Manual...
Страница 18: ...18 1 Basic Operations 7 Select a volume level...
Страница 31: ...2 Copy Useful Functions For a Better Finish Color Settings Advanced Copy Settings...
Страница 141: ...141 4 Print 5 Press Color Menu 6 Press Adjust Registration 7 Press Yes...
Страница 144: ...144 4 Print Color Correct Utility Color Swatch Utility PS Gamma Adjuster Utility Adjusting Color with Software...
Страница 489: ...489 11 Utility Software Storage Manager plug in Create or edit a file to download to a device...
Страница 507: ...46532802EE Rev2...


