Press scroll key until the display shows
. Send a 60mV signal
to terminals 19 and 20 in correct polarity . Press scroll key for at
least 3 seconds . The display will blink a moment and a new value is
obtained . Otherwise , if the display didn't blink or if the obtained value
is equal to -199.9 or 199.9, then the calibration fails.
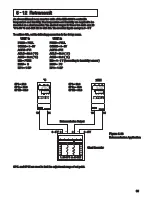
Perform step 4 to calibrate
function ( if required ) for input 1.
voltage
Change the DIP switch for the Voltage input. Press scroll key until
the display shows
. Send a 10 V signal to terminals 19 and
20 in correct polarity. Press scroll key for at least 3 seconds . The
display will blink a moment and a new value is obtained . Otherwise,
if the display didn't blink or if the obtained value is equal to -199.9 or
199.9 , then the calibration fails.
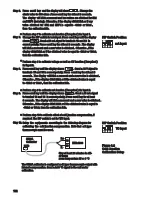
Change the DIP switch for the RTD input . Press scroll key until the
display shows
. Send a 100 ohms signal to terminals 18, 19
and 20 according to the connection shown below:
Change the DIP switch for the RTD input . Press scroll key until the
display shows
. Send a 100 ohms signal to terminals 18, 19
and 20 according to the connection shown below:
Perform both steps 5 and 6 to calibrate
function ( if required )
for input 1.
RTD
Perform both steps 5 and 6 to calibrate
function ( if required )
for input 1.
RTD
Step 1.
Step 1.
Step 3.
Step 3.
Step 4.
Step 4.
Short terminals19 and 20 , then press scroll key for at least 3 seconds.
The display will blink a moment and a new value is obtained.
Otherwise, if the display didn't blink or if the obtained value is equal to
-360 or 360, then the calibration fails.
Short terminals19 and 20 , then press scroll key for at least 3 seconds.
The display will blink a moment and a new value is obtained.
Otherwise, if the display didn't blink or if the obtained value is equal to
-360 or 360, then the calibration fails.
Step 2.
Step 2.
Step 5.
Step 5.
Press both scroll and down keys and release them quickly. The
operation mode menu will appear on the display. Repeat the operation
several times until
appear on the display.
Press scroll key for at least 3 seconds , the display will show
and the unit enters calibration mode . The output 1 and output 2 use
their failure transfer values to control.
Perform step 2 to calibrate
of A to D converter and step 3 to
calibrate
of A to D converter. The DIP switch is set for T/C input.
Zero
gain
18
19
20
ETR-8300
100 ohms
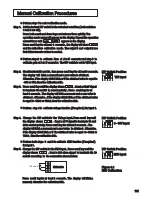
Manual Calibration Procedures
Manual Calibration Procedures
Set the lockout DIP switch to the unlocked condition ( both switches
3 and 4 are off ).
Set the lockout DIP switch to the unlocked condition ( both switches
3 and 4 are off ).
Perform step 1 to enter calibration mode.
Perform step 1 to enter calibration mode.
*
*
*
*
Press scroll key for at least 3 seconds . The display will blink a
moment, otherwise the calibration fails.
Press scroll key for at least 3 seconds . The display will blink a
moment, otherwise the calibration fails.
101
1
2
3
4
ON
DIP Switch Position
DIP Switch Position
T/C input
T/C input
1
2
3
4
ON
1
2
3
4
ON
DIP Switch Position
DIP Switch Position
DIP Switch Position
DIP Switch Position
0 10V input
0 10V input
RTD input
RTD input
Figure 6.1
RTD Calibration
Figure 6.1
RTD Calibration


