background image

212

7.LAN

(continued)

1.Wir ed

(continued)

1.TCP/IP

(continued)

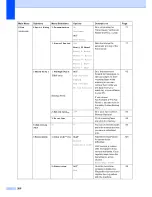
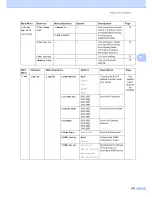
8.DNS Ser ver

(

Primary

)

000.000.000.000

(

Secondary

)

000.000.000.000

Specifies the IP address 
of the primary or 
secondary DNS server.

See 

Network 

User’s 

Guide on 

the 

CD-ROM.

9.APIPA

On

*

Off

Automatically allocates 
the IP address from the 
link-local address range.

0.IPv6

On

Off

*

Enable or Disable the 
IPv6 protocol.

2.Ether net

Auto

*

100B-FD

100B-HD

10B-FD

10B-HD

Chooses the Ethernet 
link mode.

3.Set to 
Default

1.Reset

Restore the wired 
network setting to 
factory default.

2.Exit

4.Wir ed Enable

On

*

Off

Enable or Disable the 
Wired LAN manually.

2.WLAN

1.TCP/IP

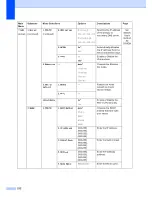
1.BOOT Method

Auto

*

Static

RARP

BOOTP

DHCP

Chooses the BOOT 
method that best suits 
your needs.

2.IP Addr ess

[000-255]. 
[000-255]. 
[000-255]. 
[000-255]

Enter the IP address.

3.Subnet Mask

[000-255]. 
[000-255]. 
[000-255]. 
[000-255]

Enter the Subnet mask.

4.Gateway

[000-255]. 
[000-255]. 
[000-255]. 
[000-255]

Enter the Gateway 
address.

5.Node Nam e

BRWXXXXXX

Enter the Node name.

Main 
Menu

Submenu

Menu Selections

Options

Descriptions

Page

Содержание cx2100

Страница 1: ...Printing for Professionals Oc cx2100 User s Guide...

Страница 2: ...tion To order supplies call the Oc Supply Line 1 800 462 6797 US 1 866 462 4478 CAN 01277 846 146 UK Should your system develop a problem that cannot be remedied by using the maintenance or troublesho...

Страница 3: ...an even set you up to receive a monthly e mail reminder Go to www oceusa com and click on Meter Reads 3 Enter your readings by phone by calling 800 945 9708 Checking the page counters You can see the...

Страница 4: ...nical help you must call the country where you bought the machine Calls must be made from within that country Oc Technical Support Internet address Oc USA web site http www oceusa com In USA 1 800 243...

Страница 5: ...Unprintable area 14 Unprintable area for copies 14 Unprintable area when printing from a computer 15 Loading paper and envelopes 15 Loading documents 18 Using the ADF automatic document feeder 18 Usi...

Страница 6: ...t 37 Changing fax resolution 37 Dual access black white only 38 Real time transmission 38 Overseas mode 39 Delayed fax black white only 39 Delayed batch transmission black white only 39 Checking and c...

Страница 7: ...rs 55 How to dial 55 Manual dialing 55 One touch dialing 55 Speed dialing 55 Search 56 LDAP Search 56 Fax redial 56 Storing numbers 57 Storing a pause 57 Storing one touch dial numbers 57 Storing spee...

Страница 8: ...ng 74 Copy options temporary settings 75 Improving copy quality 75 Enlarging or reducing the image copied 75 Making N in 1 copies page layout 76 Duplex 2 sided copying 77 Sorting copies using the ADF...

Страница 9: ...Appendixes A Safety and legal 94 Choosing a location 94 To use the machine safely 95 Important information 98 Standard telephone and FCC notices 98 Industry Canada Compliance Statement Canada only 10...

Страница 10: ...chine 148 Cleaning the scanner 149 Cleaning the laser scanner windows 150 Cleaning the corona wires 154 Cleaning the drum unit 157 Replacing the consumable items 164 Replacing a toner cartridge 167 Re...

Страница 11: ...223 Scan 224 Print 225 Interfaces 225 PictBridge 226 Direct print feature 226 Computer requirements 227 Consumable items 228 Ethernet wired network 229 Ethernet wireless network 230 Authentication and...

Страница 12: ...Section I General I General information 2 Loading paper and documents 9 General setup 20 Security features 26...

Страница 13: ...ons below a Turn on your PC Insert the Oc CD ROM into your CD ROM drive b If the language selection screen appears click your language c The CD ROM main menu will appear If this window does not appear...

Страница 14: ...ion in the ScanSoft PaperPort 11SE with OCR application Viewing documentation Macintosh 1 a Turn on your Macintosh Insert the Oc CD ROM into your CD ROM drive b The following window will appear c Doub...

Страница 15: ...rrent setting OK Lets you store your settings in the machine Volume keys or Press to scroll backwards or forwards through menu selections Press to change the volume when in fax or standby mode a or b...

Страница 16: ...the machine in Copy mode 11 Fax and telephone keys Hook Press before dialing if you want to make sure a fax machine will answer and then press Black Start or Color Start Also press this key after you...

Страница 17: ...a Secure When using Secure Function Lock you can switch restricted users by holding down Shift as you press the Secure key See Secure Function Lock on page 27 You can print data saved in memory when y...

Страница 18: ...machine is in Sleep mode Green Warming Up The machine is warming up for printing Green Ready The machine is ready to print Yellow Receiving Data The machine is either receiving data from the computer...

Страница 19: ...The front cover or fuser cover is open Close the cover Toner Life End Replace the toner cartridge with a new one Paper error Put paper in the tray or clear the paper jam Check the LCD message Scan lo...

Страница 20: ...r tray multi purpose tray or optional lower tray Standard paper tray 2 Since the standard paper tray is a universal type you can use any of the paper sizes one paper type and size at a time listed in...

Страница 21: ...cled paper up to 250 20 lb 80 g m2 Multi purpose tray MP tray Width 2 75 to 8 5 in 69 9 to 215 9 mm Length 4 57 to 16 0 in 116 0 to 406 4 mm Plain paper Thin paper Thick paper Recycled paper Bond pape...

Страница 22: ...200 degrees centigrade for a period of 0 1 seconds If you have selected a cotton bond paper paper having a rough surface such as cockle or laid finished paper or paper that is wrinkled or puckered the...

Страница 23: ...aling flap The sealing flaps should be folded crisply and correctly irregularly cut or folded envelopes may cause paper jams Envelopes should consist of two layers of paper in the area circled in figu...

Страница 24: ...e of paper that weighs more than the paper weight specifications for the machine with edges that are not straight or consistently square with windows holes cut outs or perforations with glue on surfac...

Страница 25: ...a temperature of 392 degrees Fahrenheit 200 degrees centigrade for a period of 0 1 seconds Label sheets should not exceed the paper weight specifications described in this User s Guide Labels exceedin...

Страница 26: ...ard paper tray optional lower tray or multi purpose tray When printing on plain paper 16 to 28 lb 60 to 105 g m2 use the paper tray For printing on other types of media use the MP tray multi purpose t...

Страница 27: ...r 1 slide the paper guides to fit the paper size Make sure that the guides are firmly in the slots d Fan the stack of paper well to avoid paper feeding problems e Put the paper into the paper tray wit...

Страница 28: ...bels and thick paper Before loading press the corners and sides of the envelopes to make them as flat as possible a Unfold the output paper tray support flap 1 b Open the MP tray and lower it gently c...

Страница 29: ...ocuments to be faxed must be from 5 8 to 8 5 inches 147 3 to 215 9 mm wide and from 5 8 to 14 inches 147 3 to 356 mm long and of a standard weight 20 lb 80 g m2 2 sided document 2 When you load a 2 si...

Страница 30: ...an be up to 8 5 inches wide and up to 14 inches long 215 9 mm wide to 355 6 mm long To use the scanner glass the ADF must be empty a Lift the document cover b Using the document guidelines on the left...

Страница 31: ...r OK b Press a or b to choose 0 Sec 30 Secs 1 Min 2 Mins 5 Mins or Off Press OK c Press Stop Exit Paper settings 3 Paper type 3 Set up the machine for the type of paper you are using This will give yo...

Страница 32: ...e MP tray when making N in 1 copies You must choose one of the other available Paper Size selections for the MP tray A6 size is not available for the optional Tray 2 Tray use in copy mode 3 You can ch...

Страница 33: ...f the tray is out of paper and received faxes are in the machine s memory No Paper will appear on the LCD Insert paper in the empty tray a Press Menu 1 7 2 17 Tray Use 2 Fax a MP T1 b T1 MP Select ab...

Страница 34: ...the beeper is on the machine will beep when you press a key make a mistake or after you send or receive a fax You can choose a range of volume levels from High to Off a Press Menu 1 4 2 14 Volume 2 B...

Страница 35: ...the machine is idle You can choose how long the machine must be idle from 000 to 240 minutes before it goes into sleep mode When the machine receives a fax computer data or makes a copy the timer wil...

Страница 36: ...ystem requires a 9 to dial an outside number use this setting to automatically dial 9 for every fax you send a Press Menu 0 6 b Press a or b to choose On or Off Press OK If you chose On go to c If you...

Страница 37: ...rd Date Time Station ID Quick Dial settings Mode Timer Paper Type Paper Size Volume Auto Daylight Ecology Tray Use LCD Contrast Setting Lock Secure Function Lock Setting up the password 4 a Press Menu...

Страница 38: ...g access to the Menu settings Disabling at least one function is required to turn on Secure Function Lock for the Public user Access to restricted operations can be enabled by creating a restricted us...

Страница 39: ...up the Public user Public users do not need to enter a password Note You must disable at least one function to turn on Secure Function Lock for Public user a Press Menu 1 9 2 19 Security 2 Function L...

Страница 40: ...p for Fax Rx Copy Color Copy B W and Scan Press OK h Repeat d to g for entering each additional user and password i Press Stop Exit Note You cannot use the same password as another user s password Tur...

Страница 41: ...Menu 1 1 See Mode timer on page 20 Also you can exit from an individual user by pressing the lighted Mode key a Hold down Shift as you press Secure Function Lock Change User PIN XXXX Pls enter PIN b E...

Страница 42: ...Section II Fax II Sending a fax 32 Receiving a fax 41 Telephone services and external devices 47 Dialing and storing numbers 55 Remote fax options black white only 62 Polling 69 Printing reports 71...

Страница 43: ...send the scanned pages The machine will scan and send your document Sending a 2 sided fax from the ADF 5 You can send a 2 sided document from the ADF To cancel a fax in progress press Stop Exit a Make...

Страница 44: ...bed Fax Set Next Page Then Press OK g Your machine will automatically send the fax Note When faxing multiple pages from the scanner glass real time transmission should be set to Off Faxing legal size...

Страница 45: ...t you know the results Note The scan profile of the One Touch Speed Dial or Group number you chose first will be applied to the broadcast If the fax resolution of the fax number you choose first is S...

Страница 46: ...x Electronic cover page black white only 5 This feature will not work unless you have already programmed your Station ID See the Quick Setup Guide You can automatically send a cover page with every fa...

Страница 47: ...e a comment Press OK f Enter two digits to show the number of pages you are sending Press OK For example enter 0 2 for 2 pages or 0 0 to leave the number of pages blank If you make a mistake press d o...

Страница 48: ...x can be improved by changing the fax resolution Resolution can be changed for the next fax or for all faxes To change the fax resolution for the next fax 5 a Make sure you are in Fax mode b Load your...

Страница 49: ...canned so far or press Stop Exit to cancel the operation Real time transmission 5 When you are sending a fax the machine will scan the documents into the memory before sending Then as soon as the tele...

Страница 50: ...ress Menu 2 2 3 22 Setup Send 3 Delayed Fax Set Time 00 00 Enter OK Key d Enter the time you want the fax to be sent in 24 hour format For example enter 19 45 for 7 45 PM Press OK The number of pages...

Страница 51: ...e When you hear the fax tone press Black Start or Color Start If you are using the scanner glass press 1 to send a fax f If you picked up the handset of an external telephone replace it Sending a fax...

Страница 52: ...2100 Your external telephone answering device TAD will automatically answer every call Voice messages are stored on the external TAD and fax messages are printed Choose External TAD as your receive mo...

Страница 53: ...Ring delay on page 43 Manual 6 Manual mode turns off all automatic answering functions unless you are using the Distinctive Ring Receive feature To receive a fax in Manual mode lift the handset of an...

Страница 54: ...F T ring time 6 When somebody calls your machine you and your caller will hear the normal telephone ring sound The number of rings is set by the ring delay setting If the call is a fax then your machi...

Страница 55: ...elephone press the Fax Receive Code l51 See Operation from extension telephones on page 53 Note If you use a modem or send faxes from a computer on the same line and your machine intercepts them set e...

Страница 56: ...nu 2 1 5 21 Setup Receive 5 Auto Reduction a On b Off Select ab or OK c Press a or b to choose On or Off Press OK d Press Stop Exit Duplex 2 sided printing for Fax mode 6 If you set Duplex to On for f...

Страница 57: ...achine Receiving a fax at the end of a conversation 6 At the end of a conversation you can ask the other party to send you a fax before you both hang up a Ask the other person to place the document in...

Страница 58: ...elephone numbers on that one line Oc uses the term Distinctive Ring but telephone companies market the service under a variety of names such as Custom Ringing Personalized Ring Smart Ring RingMaster I...

Страница 59: ...elephone company s Distinctive Ring service The new telephone number on your line can just receive faxes Note You must pay for your telephone company s Distinctive Ring service before you program the...

Страница 60: ...nd then answer with a fax tone When the voice number is called the machine will not answer Registering the distinctive ring pattern Very important 7 After you have set the Distinctive Ring feature to...

Страница 61: ...l listen for the CNG fax calling tones sent by a sending fax machine If it hears them it will take over the call and receive the fax If it does not hear them it will let your TAD take a voice message...

Страница 62: ...ine time to listen for fax tones b Limit your speaking to 20 seconds c End your 20 second message by giving your Fax Receive Code for people sending manual faxes For example After the beep leave a mes...

Страница 63: ...your machine is on Line 2 plug it into L2 of the triple adapter Installing machine external two line TAD and two line telephone 7 When you are installing an external two line telephone answering devic...

Страница 64: ...ternal and extension telephones 7 Operation from extension telephones 7 If you answer a fax call on an extension telephone or an external telephone connected to the EXT jack of the machine you can mak...

Страница 65: ...elephone you can tell your machine to receive it by pressing the fax receive code l51 Wait for the chirping sounds then replace the handset See Easy receive on page 44 Telephone Answer Code 7 If you r...

Страница 66: ...one touch dial numbers on page 57 To dial One Touch numbers 21 to 40 hold down Shift as you press the One Touch key Speed dialing 8 Hold down Shift as you press Search Speed Dial and then enter the th...

Страница 67: ...u are looking for If the LCD shows No Contact Found when you enter the first letter of the name it means that a name for the letter is not stored LDAP Search 8 If the machine is connected to your LDAP...

Страница 68: ...ause 8 Press Redial Pause to insert a 3 5 second pause between numbers You can press Redial Pause as many times as needed to increase the length of the pause Storing one touch dial numbers 8 Your mach...

Страница 69: ...top Exit Note When you do a broadcast and you have saved a scan profile along with the number or E mail address the scan profile of the One Touch Speed Dial or Group number you chose first will be app...

Страница 70: ...e options below To store another Speed Dial number go to b To finish storing Speed Dial numbers press Stop Exit Note When you do a broadcast and you have saved a scan profile along with the number or...

Страница 71: ...b to select Fax IFAX or E Mail Press OK e To add One Touch or Speed Dial numbers follow the instructions below For One Touch numbers press the One Touch keys one after the other For Speed Dial number...

Страница 72: ...m both to dial 555 7000 if you press the following keys Hold down Shift as you press Search Speed Dial 003 Hold down Shift as you press Search Speed Dial 002 and Black Start or Color Start Numbers can...

Страница 73: ...you press Search Speed Dial and the three digit location Note If you store a group on a One Touch key or a Speed Dial location the faxes will be forwarded to several fax numbers You can also enter an...

Страница 74: ...our fax number followed by Press OK For example press 1 2 3 4 5 Redial Pause 1 8 0 0 5 5 5 6 7 8 9 If you do not need a PIN press OK e Press Stop Exit Note You cannot change a Paging number or PIN rem...

Страница 75: ...eceiving in Chapter 6 in the Software User s Guide on the CD ROM If you choose Backup Print On the machine will also print the fax a Press Menu 2 5 1 25 Remote Fax Opt 1 Fwd Page Store a Off b Fax For...

Страница 76: ...ry will be sent to your PC before the setting changes Faxes in the memory will be sent to your PC when the PC Fax Receive icon is active on your PC See the Software User s Guide on the CD ROM If you p...

Страница 77: ...at any time If you want to make your code inactive press Clear Back and then OK in b to restore the inactive setting l Using your remote access code 9 a Dial your fax number from a telephone or anoth...

Страница 78: ...messages Note You can insert a pause in a fax number by using the key Changing the fax forwarding number 9 You can change the default setting of your fax forwarding number from another telephone or f...

Страница 79: ...registered You can register your fax forwarding number by entering 4 See Changing the fax forwarding number on page 67 Once you have registered the number fax forwarding will work 3 Paging 4 Fax forw...

Страница 80: ...Start or Color Start The LCD shows Dialing Sequential polling 10 Sequential polling lets you request documents from several fax machines in one operation Afterwards a Sequential Polling Report will b...

Страница 81: ...essage 22 Setup Send Other Settings a 1 Yes b 2 No Select ab or OK f Press Black Start g If you are using the scanner glass the LCD will prompt you to choose one of the options below Flatbed Fax Next...

Страница 82: ...n set the machine to print a fax journal activity report at specific intervals every 50 faxes 6 12 or 24 hours 2 or 7 days The default setting is Every 50 Faxes this means that your machine will print...

Страница 83: ...al or alphabetical order 4 Fax Journal Prints a list of information about your last 200 incoming and outgoing faxes TX transmit RX receive 5 User Settings Print a list of your current settings 6 Netwo...

Страница 84: ...Section III Copy III Making copies 74...

Страница 85: ...d to enter the number of copies up to 99 d Press Black Start or Color Start Note To sort your copies see Sorting copies using the ADF on page 79 If the LCD shows Please Wait and the machine stops copy...

Страница 86: ...ble for copying photographs To temporarily change the quality setting follow the steps below a Make sure you are in Copy mode b Load your document c Use the dial pad to enter the number of copies up t...

Страница 87: ...ou can reduce the amount of paper used when copying by using the N in 1 copy feature This allows you to copy two or four pages onto one page which lets you save paper Important 12 Please make sure the...

Страница 88: ...irection shown below 2 in 1 P 2 in 1 L 4 in 1 P 4 in 1 L Duplex 2 sided copying 12 You can reduce the amount of paper used when copying by using the duplex copy feature This allows you to copy on both...

Страница 89: ...ack Start or Color Start to scan the document Note Duplex copy using a 2 sided legal size document is not available Advanced Duplex Copy short edge 12 Advanced 2 sided i 1 sided Portrait Landscape Adv...

Страница 90: ...Press Black Start or Color Start Adjusting brightness contrast and color 12 Brightness 12 Adjust the copy brightness to make copies darker or lighter To temporarily change the copy brightness setting...

Страница 91: ...decrease the contrast Press OK f Press Black Start or Color Start To change the default setting follow the steps below a Press Menu 3 3 33 Contrast nnonn Select d c OK b Press d or c to increase or d...

Страница 92: ...hile you are making copies the LCD message will guide you through the next step If you get an Out of Memory message while scanning a subsequent page you will have the option to press Black Start or Co...

Страница 93: ...Chapter 12 82...

Страница 94: ...Section IV Walk up printing IV Printing photos from a digital camera 84 Printing data from a USB flash memory drive 87...

Страница 95: ...ctBridge 13 Setting your digital camera 13 Make sure your camera is in PictBridge mode The following PictBridge settings may be available from the LCD of your PictBridge compatible camera Depending on...

Страница 96: ...iled information on changing PictBridge settings Printing images 13 a Make sure that your camera is turned off Connect your camera to the USB direct interface 1 on the front of the machine using a sui...

Страница 97: ...your camera is not in PictBridge mode or does not support PictBridge you can connect your camera as a normal storage device This enables you to print photos from your camera Follow the steps in Printi...

Страница 98: ...e not supported Creating a PRN or PostScript 3 file for direct printing 14 Note The screens in this section may vary depending on your application and operating system a From the menu bar of an applic...

Страница 99: ...t the data File names containing more than 8 characters will appear on the LCD as the first 6 characters of the file name followed by a tilde mark and a number For example HOLIDAY2007 JPG would appear...

Страница 100: ...nu 1 7 3 to change the paper tray setting You can change the default settings for direct print by using the control panel when the machine is not in the direct print mode Press Menu 5 to enter the USB...

Страница 101: ...Chapter 14 90...

Страница 102: ...Section V Software V Software and network features 92...

Страница 103: ...Windows see Chapter 5 in the Software User s Guide on the CD ROM For Macintosh see Chapter 12 in the Software User s Guide on the CD ROM Oc PC FAX For Windows see Chapter 6 in the Software User s Guid...

Страница 104: ...Section VI Appendixes VI Safety and legal 94 Options 106 Troubleshooting and routine maintenance 110 Menu and features 199 Specifications 219 Glossary 233...

Страница 105: ...raffic area DO NOT place the machine near heaters air conditioners refrigerators water chemicals or devices that contain magnets or generate magnetic fields DO NOT expose the machine to direct sunligh...

Страница 106: ...lephone line cord first and then the power cord from the AC power outlet DO NOT handle the plug with wet hands Doing this might cause an electrical shock Always make sure the plug is fully inserted Af...

Страница 107: ...sp the side hand holds that are located at the bottom of the machine DO NOT carry the machine by holding scanner unit To prevent injuries when moving or lifting this machine make sure to use at least...

Страница 108: ...e or in a wet basement or near a swimming pool 2 Avoid using this product during an electrical storm There may be a remote risk of electric shock from lightning 3 DO NOT use this product to report a g...

Страница 109: ...but not all areas the sum of RENs should not exceed five 5 0 To be certain of the number of devices that may be connected to a line as determined by the total RENs contact the local telephone company...

Страница 110: ...om the wall outlet before servicing modifying or installing the equipment This equipment may not be used on coin service lines provided by the telephone company or connected to party lines Oc cannot a...

Страница 111: ...ations However there is no guarantee that interference will not occur in a particular installation If this equipment does cause harmful interference to radio or television reception which can be deter...

Страница 112: ...Standard according to the Radiation Control for Health and Safety Act of 1968 This means that the equipment does not produce hazardous laser radiation Since radiation emitted inside the equipment is c...

Страница 113: ...ver be placed near or over a radiator or heater This product should never be placed in a built in installation unless proper ventilation is provided 7 This product should be connected to an AC power s...

Страница 114: ...the product has been exposed to rain or water If the product does not operate normally when the operating instructions are followed Adjust only those controls that are covered by the operating instru...

Страница 115: ...ied Money Bonds or other certificates of indebtedness Certificates of Deposit Internal Revenue Stamps canceled or uncanceled Selective Service or draft papers Passports United States Canadian Postage...

Страница 116: ...ce logo PaperPort and ScanSoft are trademarks or registered trademarks of Nuance Communications Inc or its affiliates in the United States and or other countries Presto PageManager is a registered tra...

Страница 117: ...106 B Options B This machine has the following optional accessories You can increase the capabilities of the machine with these items Options B Lower tray DIMM memory 6429909...

Страница 118: ...f the power switch Unplug the telephone line cord and interface cable and then unplug the power cord from the AC outlet b Using two people lift the machine carefully and place it onto the optional low...

Страница 119: ...option you have installed click Add and then click Apply For Macintosh users The printer driver is already configured for use with the lower paper tray No additional steps are required Memory board B...

Страница 120: ...e board surface e Hold the DIMM by the edges and align the notches in the DIMM with the protrusions in the slot Insert the DIMM diagonally 1 then tilt it toward the interface board until it clicks int...

Страница 121: ...probably had a bad connection with static or interference on the telephone line Ask the other party to send the fax again Poor print quality See Improving the print quality on page 117 Vertical black...

Страница 122: ...in If you are sending a PC Fax message and get RESULT NG on the Transmission Verification Report your machine may be out of memory To free up extra memory you can turn off fax storage see Turning off...

Страница 123: ...ies Suggestions Vertical black line appears in copies Black vertical lines on copies are typically caused by dirt or correction fluid on the glass strip or one of the corona wires for printing is dirt...

Страница 124: ...his The machine does not print on both sides of the paper even though the printer driver setting is Duplex Check the paper size setting in the printer driver You need to select Letter Legal or Folio T...

Страница 125: ...s are curled Low quality thin or thick paper or not printing on the recommended side of the paper could cause this problem Try turning over the stack of paper in the paper tray Make sure that you choo...

Страница 126: ...t number for this service Enter 54925 4 In Internal Port number for this service Enter 54925 5 Make sure UDP is selected 6 Click OK e Click the Add button f To add port 54926 for network PC Fax enter...

Страница 127: ...mber Enter 54925 3 Make sure UDP is selected Then click OK g Click the Add port button h To add port 54926 for Network PC Fax enter the information below 1 In Name Enter any description for example Oc...

Страница 128: ...y Shake the toner cartridges gently Clean the laser scanner windows with a soft cloth See Cleaning the laser scanner windows on page 150 Turn off Toner Save See Toner save on page 24 White streaks or...

Страница 129: ...installed properly See Replacing a toner cartridge on page 167 One of the toner cartridges may be damaged Identify the missing color and put in a new toner cartridge for the color with the white line...

Страница 130: ...94 Install a new toner cartridge for the color causing the problem See Replacing a toner cartridge on page 167 Clean the corona wires of the drum unit for the color causing the problem See Cleaning th...

Страница 131: ...e 172 Make sure that the belt unit is installed properly See Replacing the belt unit on page 178 Perform the calibration Press Menu 4 6 See Software User s Guide on the CD ROM Adjust the color by usin...

Страница 132: ...f the drum unit and turn the drum unit over then make sure that four drum unit gears are in the home position The home position of each drum can be identified by matching the number on the drum unit g...

Страница 133: ...per on page 9 Check the paper type and quality See Acceptable paper and other media on page 9 Make sure that the back cover is closed properly Make sure that paper is loaded properly Make sure that yo...

Страница 134: ...ase lever of the fuser unit is in the closed position Call Oc Technical Support to replace the fuser unit Poor fixing when printed on thick paper Choose Thick paper mode in the printer driver or in th...

Страница 135: ...e paper to curl If you do not use the machine often the paper may have been in the paper tray too long Turn over the stack of paper in the paper tray Also fan the paper stack and then rotate the paper...

Страница 136: ...hand side and one on the right hand side to the envelope position as shown in the illustration below c Close the back cover and re send the print job Note When you have finished printing open the bac...

Страница 137: ...e back cover d Choose Plain Paper mode in the printer driver and re send the print job e If the problem is not solved after printing a few pages choose Thin Paper mode in the printer driver and re sen...

Страница 138: ...ace of the photosensitive drum Take all the toner cartridges out of the drum unit and turn the drum unit over Wipe the toner on the edge of drum unit with a dry lint free soft cloth as shown in the il...

Страница 139: ...2 0 1 20 Miscellaneous 1 Compatibility a High b Normal Select ab or OK b Press a or b to choose Basic for VoIP or Normal or High Basic for VoIP cuts the modem speed to 9600 bps and turns the error co...

Страница 140: ...ing the waste toner box on page 183 If the problem continues call Oc Technical Support Cartridge Error Put the Black K Toner Cartridge back in 1 1 The toner cartridge color with the problem is shown i...

Страница 141: ...ask them to check your telephone line Connection Fail You tried to poll a fax machine that is not in Polled Waiting mode Check the other fax machine s polling setup Cooling Down Wait for a while The...

Страница 142: ...nical problem Turn off the machine s power switch and then turn it on again If the error message continues leave the machine for several minutes and then try to print copy or scan again The machine ca...

Страница 143: ...ess Stop Exit and wait until the other operations in progress finish and then try again Clear the data from the memory See Out of memory message on page 40 or page 81 Print operation in process Do one...

Страница 144: ...then turn it on again If the error message continues leave the machine for several minutes before you try it again The machine can be turned off for up to 4 days without losing faxes stored in the me...

Страница 145: ...les stored on the USB flash memory drive Reduce the number of files stored on the USB flash memory drive Unusable Device An incompatible or broken device has been connected to the USB direct interface...

Страница 146: ...ode a Follow a and b in Checking if the machine has faxes in its memory on page 135 b Enter the fax number to which faxes will be sent c Press Black Start or Color Start Transferring faxes to your PCC...

Страница 147: ...the steps below Document is jammed in the top of the ADF unit C The document may get jammed if it is not inserted or fed properly or if it is too long Follow the steps below to clear a document jam a...

Страница 148: ...in this section HOT SURFACE After you have just used the machine some internal parts of the machine will be extremely hot When you open the front or back cover of the machine DO NOT touch the shaded p...

Страница 149: ...d Fan the paper stack and then put it back in the MP tray e When loading paper in the MP tray make sure that the paper stays under the maximum paper height guides on both sides of the tray Paper is j...

Страница 150: ...e paper size Make sure that the guides are firmly in the slots d Put the paper tray firmly back in the machine CAUTION DO NOT take out the standard paper tray while paper is feeding from a lower paper...

Страница 151: ...140 c Press the front cover release button and then open the front cover d Hold the green handle of the drum unit Lift the drum unit up and then pull it out until it stops...

Страница 152: ...ing the green handles on the drum unit CAUTION Hold the handles of drum unit when you carry it DO NOT hold the sides of the drum unit We recommend that you place the drum unit on a clean flat surface...

Страница 153: ...nit assembly or this may release the paper so you can pull it out of the paper tray opening g Put the drum unit back in the machine as follows 1 Make sure that the gray lock lever 1 is in the up posit...

Страница 154: ...the drum unit in the machine match the green guides 1 of the drum unit handle to the green arrows 2 on both sides of the machine 2 Push the drum unit in until it stops h Close the front cover of the...

Страница 155: ...achine C If the LCD shows Jam Rear follow these steps Jam Rear a Press the cover release lever to open the front cover b Hold the green handle of the drum unit Lift the drum unit up and then pull it o...

Страница 156: ...r 1 HOT SURFACE After you have just used the machine some internal parts of the machine will be extremely hot When you open the front or back cover of the machine DO NOT touch the shaded parts shown i...

Страница 157: ...jammed underneath Paper Tray 1 or in the fuser unit C If the LCD shows Jam Duplex follow these steps Jam Duplex a Pull the paper tray completely out of the machine and check inside the machine b If pa...

Страница 158: ...er you have just used the machine some internal parts of the machine will be extremely hot When you open the front or back cover of the machine DO NOT touch the shaded parts shown in the illustration...

Страница 159: ...from the control panel It may crack the panel DO NOT use flammable substances or any type of spray to clean the inside or outside of the machine Doing this may cause a fire or electrical shock For mo...

Страница 160: ...e 2 and scanner glass 3 underneath it with a soft lint free cloth moistened with a non flammable glass cleaner c In the ADF unit clean the white bar 1 and the scanner glass strip 2 underneath it with...

Страница 161: ...indows with your fingers a Turn off the machine s power switch Unplug the telephone line cord first disconnect all cables and then unplug the power cord from the AC power outlet b Press the front cove...

Страница 162: ...ts of the machine will be extremely hot When you open the front cover of the machine DO NOT touch the shaded parts shown in the illustration CAUTION Hold the handles of drum unit when you carry it DO...

Страница 163: ...windows 1 with a dry lint free cloth f Put the drum unit back in the machine as follows 1 Make sure that the gray lock lever 1 is in the up position and put the drum unit in the machine Push down the...

Страница 164: ...1 of the drum unit handle to the green arrows 2 on both sides of the machine 2 Push the drum unit in until it stops g Close the front cover of the machine h Plug the machine s power cord back into th...

Страница 165: ...d first disconnect all cables and then unplug the power cord from the AC power outlet b Press the front cover release button and then open the front cover c Hold the green handle of the drum unit Lift...

Страница 166: ...t off with cold water at once To avoid print quality problems DO NOT touch the shaded parts shown in the illustrations e Push to release the latches of the white corona wire cover 1 and then open the...

Страница 167: ...corona wire cover h Repeat e to g to clean each of the remaining corona wires i Hold the handle of the toner cartridge and slide the toner cartridge into the drum unit Make sure that you match the ton...

Страница 168: ...d reconnect all cables and telephone line cord Turn on the machine s power switch Cleaning the drum unit C If you have print quality problems clean the drum unit as follows a Turn off the machine s po...

Страница 169: ...ops d Release the gray lock lever 1 that is on the left side of the machine Lift the front of the drum unit and pull the drum unit completely out of the machine using the green handles on the drum uni...

Страница 170: ...of the drum unit Repeat this for all of the toner cartridges CAUTION We recommend that you place the toner cartridges on a clean flat surface with a piece of disposable paper underneath it in case you...

Страница 171: ...re that the drum unit gears 1 are on the left hand side g See the print sample to identify the color causing the problem The color of the spots or toner stain is the color of the drum you should clean...

Страница 172: ...DO NOT touch it with your fingers DO NOT clean the surface of the photosensitive drum with a sharp object DO NOT use a scrubbing or wiping motion because this might damage the drum j Turn the drum uni...

Страница 173: ...unit and make sure that you fold down the toner cartridge handle A once the toner cartridge is in place Repeat this for all the toner cartridges 1 C Cyan 2 M Magenta 3 Y Yellow 4 K Black l Put the dru...

Страница 174: ...1 of the drum unit handle to the green arrows 2 on both sides of the machine 2 Push the drum unit in until it stops m Close the front cover of the machine n Plug the machine s power cord back into th...

Страница 175: ...rinted pages will vary depending on the print jobs and paper you use 3 When printing on Letter size paper at 5 print coverage for CMYK each The actual number of printed pages will vary depending on th...

Страница 176: ...actual number of printed pages will vary depending on the print jobs and paper you use 3 When printing on Letter size paper at 5 print coverage for CMYK each The actual number of printed pages will v...

Страница 177: ...hine parts may be reduced The projected life for toner cartridges and a waste toner box is based on an average 5 coverage of the printable area using any color toner cartridge Frequency of replacement...

Страница 178: ...ge is running low the LCD shows Toner Low Note It is a good idea to keep new toner cartridges ready for use when you see the Toner Low warning Toner life end message C When the following message appea...

Страница 179: ...or back cover of the machine DO NOT touch the shaded parts shown in the illustration a Press the front cover release button and then open the front cover b Hold the green handle of the drum unit Lift...

Страница 180: ...oner cartridges Use or attempted use of potentially incompatible toner and or cartridges in the cx2100 may cause damage to the machine and or may result in unsatisfactory print quality Our warranty co...

Страница 181: ...en open the cover 2 Clean the corona wire inside the drum unit by gently sliding the green tab from left to right and right to left several times CAUTION Be sure to return the tab to the home position...

Страница 182: ...unit Make sure that you match the toner cartridge color to the same color label on the drum unit and make sure that you fold down the toner cartridge handle A once the toner cartridge is in place Rep...

Страница 183: ...othes wipe or wash it off with cold water at once Note The drum unit is a consumable item and it is necessary to replace it periodically There are many factors that determine the actual drum life such...

Страница 184: ...ne maintenance 173 C a Turn off the machine s power switch Press the front cover release button and then open the front cover b Hold the green handle of the drum unit Lift the drum unit up and then pu...

Страница 185: ...th it in case you accidentally spill or scatter toner Note Discard the used drum unit according to local regulations keeping it separate from domestic waste Be sure to seal up the drum unit tightly so...

Страница 186: ...it Repeat this for all the toner cartridges CAUTION We recommend that you place the toner cartridges on a clean flat surface with a piece of disposable paper underneath it in case you accidentally spi...

Страница 187: ...unit and make sure that you fold down the toner cartridge handle A once the toner cartridge is in place Repeat this for all the toner cartridges 1 C Cyan 2 M Magenta 3 Y Yellow 4 K Black g Put the dru...

Страница 188: ...of the drum unit handle to the green arrows 2 on both sides of the machine 2 Push the drum unit in until it stops h Close the front cover of the machine When you replace the drum unit with a new one y...

Страница 189: ...ts Belt Unit message C When the belt unit runs out the following message appears on the LCD When you see this message you must replace the belt unit Change Parts Belt Unit CAUTION DO NOT touch the sur...

Страница 190: ...the drum unit Lift the drum unit up and then pull it out until it stops c Release the gray lock lever 1 that is on the left side of the machine Lift the front of the drum unit and pull the drum unit...

Страница 191: ...e you accidentally spill or scatter toner To prevent damage to the machine from static electricity DO NOT touch the electrodes shown in the illustration d Hold the green parts of the belt unit with bo...

Страница 192: ...unit in the machine Match the h mark on the belt unit to the g mark on the machine Push down on the green area of the belt unit to lock it in place g Put the drum unit back in the machine as follows...

Страница 193: ...le to the green arrows 2 on both sides of the machine 2 Push the drum unit in until it stops h Close the front cover of the machine When you replace the belt unit with a new one you need to reset the...

Страница 194: ...tual number of printed pages will vary depending on the print jobs and paper you use Change Parts Waste Toner Box Waste Toner Box Full message C When the waste toner box is full the following message...

Страница 195: ...184 a Press the front cover release button and then open the front cover b Hold the green handle of the drum unit Lift the drum unit up and then pull it out until it stops...

Страница 196: ...N Hold the handles of drum unit when you carry it DO NOT hold the sides of the drum unit We recommend that you place the drum unit on a clean flat surface with a piece of disposable paper underneath i...

Страница 197: ...ble paper underneath it in case you accidentally spill or scatter toner e Remove the waste toner box from the machine using the green handle Note Discard the used waste toner box according to local re...

Страница 198: ...ark on the belt unit to the g mark on the machine Push down on the green area of the belt unit to lock it in place h Put the drum unit back in the machine as follows 1 Make sure that the gray lock lev...

Страница 199: ...put the drum unit in the machine match the green guides 1 of the drum unit handle to the green arrows 2 on both sides of the machine 2 Push the drum unit in until it stops i Close the front cover of t...

Страница 200: ...hine for transport WARNING Once your machine has been set up and used we do not recommend that it be moved or shipped unless absolutely necessary Color laser printers are complex printing devices Movi...

Страница 201: ...rum unit and the belt unit 4 pieces 5 A piece of paper Letter or A4 to protect the belt unit supplied by the user 6 Joints for attaching cartons 4 pieces Repacking the machine C a Turn off the machine...

Страница 202: ...it out until it stops e Release the gray lock lever 1 that is on the left side of the machine Lift the front of the drum unit and pull the drum unit completely out of the machine using the green hand...

Страница 203: ...clean flat surface with a piece of disposable paper underneath it in case you accidentally spill or scatter toner g Attach the original orange protective cover to each of the toner cartridges Place ea...

Страница 204: ...carton j Put the belt unit back in the machine Match the h mark on the belt unit to the g mark on the machine Push down on the green area of the belt unit to lock it in place k Insert the original or...

Страница 205: ...the gray lock lever 1 is in the up position and put the drum unit in the machine Push down the gray lock lever 1 Note When you put the drum unit in the machine match the green guides 1 of the drum uni...

Страница 206: ...t the arrow cutout 4 points toward it Put the styrofoam piece marked REAR into the lower carton so that the arrow cutout 4 points away from it p Using two people place the machine into the plastic bag...

Страница 207: ...arton to the joint holes 3 of the lower carton t Put the two styrofoam pieces for the toner cartridges on the top of the machine Match the right side of the machine to the RIGHT mark on one of the sty...

Страница 208: ...tenance 197 C v Put the four joints 1 into the holes of the carton using steps A and B as shown below w Close the carton and tape it shut x For USA Put the box in the larger carton y For USA Close the...

Страница 209: ...rum 2 Belt Unit 3 PF Kit MP Select ab or OK b Press a or b to choose 1 Drum 2 Belt Unit 3 PF Kit MP 4 PF Kit 1 5 PF Kit 2 1 6 Fuser or 7 Laser Press OK 83 Parts Life 1 Drum Remaining XX 1 PF Kit 2 app...

Страница 210: ...he menu numbers to program your machine For example to set Beeper volume to Low a Press Menu 1 4 2 b Press a or b to choose Low c Press OK Memory storage D Your menu settings are stored permanently an...

Страница 211: ...Press 9 for Service menu 1 Press 0 for Initial Setup 1 This will appear only when the LCD shows an error message You can also scroll through each menu level by pressing a or b for the direction you wa...

Страница 212: ...nge from individual user to public user when using Secure Function Lock 20 30 2 Pap er Typ e 1 MP Tr ay Thin Plain Thick Thicker Recycled Paper Sets the type of paper in the MP tray 20 2 Tr ay 1 Thin...

Страница 213: ...per in the optional paper tray 2 21 4 Volum e 1 Ring Off Low Med High Adjusts the ring volume 23 2 Beep er Off Low Med High Adjusts the volume level of the beeper 23 3 Sp eaker Off Low Med High Adjust...

Страница 214: ...MP Only MP T1 T2 T1 T2 MP Tray 2 or T2 appears only if you installed the optional paper tray Selects the tray that will be used for PC print 22 8 LCD Contr ast nnnno nnnon nnonn nonnn onnnn Adjusts t...

Страница 215: ...Codes On l51 51 Off Allows you to answer all calls at an extension or external telephone and use codes to turn the machine on or off You can personalize these codes 54 5 Auto Reduction On Off Cuts th...

Страница 216: ...th a document to be retrieved by another fax machine 70 7 Cover p g Setup B W only Next Fax On Next Fax Off On Off Print Sample Automatically sends a cover page you have programmed 35 8 Cover p age Ms...

Страница 217: ...or to send faxes to your PC If you choose Fax Forward or PC Fax Receive you can turn on the safety feature Backup Print 62 2 Rem ote Access l Sets your own code for Remote Retrieval 66 3 Pr int Fax Pr...

Страница 218: ...sts the red color for copies 79 2 Gr een nnnno nnnon nnonn nonnn onnnn Adjusts the green color for copies 3 Blue nnnno nnnon nnonn nonnn onnnn Adjusts the blue color for copies 4 Pr inter 1 Em ulation...

Страница 219: ...librate Reset Adjusts the color density or returns the color calibration to the factory setting 7 Auto Regist 1 Registr ation 1 Start Adjust the print position of each color automatically 2 Exit 2 Fr...

Страница 220: ...from the USB flash memory drive 88 4 Or ientation Por tr ait Landscape Sets the page orientation when printing directly from the USB flash memory drive 88 5 Collate On Off Enables or disables the page...

Страница 221: ...amera using PictBridge If you choose the paper size Letter A4 or B5 Portrait will be chosen If you choose A5 B6 or A6 Landscape will be chosen 84 3 Date Tim e On Off Prints the date and time the photo...

Страница 222: ...ns Page 7 LAN 1 Wir ed 1 TCP IP 1 BOOT Method Auto Static RARP BOOTP DHCP Chooses the BOOT method that best suits your needs See Network User s Guide on the CD ROM 2 IP Addr ess 000 255 000 255 000 25...

Страница 223: ...10B HD Chooses the Ethernet link mode 3 Set to Default 1 Reset Restore the wired network setting to factory default 2 Exit 4 Wir ed Enable On Off Enable or Disable the Wired LAN manually 2 WLAN 1 TCP...

Страница 224: ...ge 0 IPv6 On Off Enable or Disable the IPv6 protocol 2 Setup Wizar d You can configure your print server 3 Secur Easy Setup You can configure the wireless network easily 4 WLAN Status 1 Status Active...

Страница 225: ...nter the POP3 port number 7 Mailbox Nam e Enter the mail box name Up to 32 characters 8 Mailbox Pwd Enter the password to login to the POP3 server Up to 32 characters 9 APOP On Off Enables or disables...

Страница 226: ...dpi B W 200x100 dpi Ifyouchose color option PDF JPEG Chooses the file format to send the scanned data via e mail If you chose B W option PDF TIFF 5 Scan to FTP Color 150 dp i Color 300 dpi Color 600 d...

Страница 227: ...unter Appears when you replace the machine part PF Kit 2 appears only when the optional lower tray 6429909 is installed 172 178 0 Initial Setup 1 Receive Mode Fax Only Fax Tel External TAD Manual Choo...

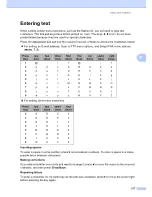
Страница 228: ...e between numbers To enter a space in a name press c twice between characters Making corrections If you entered a letter incorrectly and want to change it press d to move the cursor to the incorrect c...

Страница 229: ...0 then press d or c to move the cursor to the symbol or character you want Press OK to choose it The symbols and characters below will appear depending on your menu selection Press l for space l m Pr...

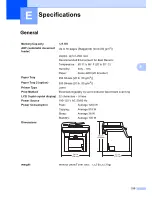
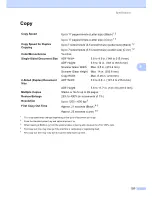
Страница 230: ...b Letter Paper Tray 250 Sheets 20 lb 80 g m2 Paper Tray 2 option 500 Sheets 20 lb 80 g m2 Printer Type Laser Print Method Electrophotography by semiconductor laser beam scanning LCD liquid crystal dis...

Страница 231: ...l Standby LWAd 4 4 Bell Sound pressure Operating Copying LpAm 54 5 dBA Standby LpAm 30 dBA Temperature Operating 50 F to 90 5 F 10 to 32 5 C Storage 41 F to 95 F 5 to 35 C Humidity Operating 20 to 80...

Страница 232: ...e Width 2 75 to 8 5 in 69 9 to 215 9 mm Length 4 57 to 16 in 116 0 to 406 4 mm Paper Weight 16 to 43 lb 60 to 163 g m2 Maximum paper tray capacity Up to 50 sheets of 20 lb 80 g m2 plain paper Up to 3...

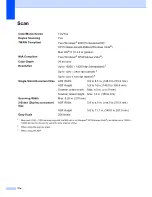
Страница 233: ...8 to 11 7 in 147 3 to 297 0 mm Scanning Width Max 8 2 in 208 mm Printing Width Max 8 2 in 208 mm Gray Scale 256 levels Polling Types Standard Sequential Contrast Control Automatic Light Dark manual s...

Страница 234: ...peed for Duplex Copying Up to 7 sides minute 3 5 sheet minute Letter size Black 1 2 Up to 7 sides minute 3 5 sheet minute Letter size Color 1 2 Color Monochrome Yes Yes Single Sided Document Size ADF...

Страница 235: ...OS X 10 2 4 or greater WIA Compliant Yes Windows XP Windows Vista Color Depth 24 bit color Resolution Up to 19200 19200 dpi interpolated 1 Up to 1200 2400 dpi optical 2 Up to 1200 x 600 dpi optical 3...

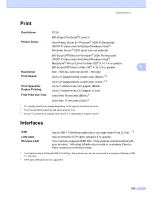
Страница 236: ...pt PPD file for Windows 2000 Professional XP XP Professional x64 Edition Windows Vista Macintosh Printer Driver for Mac OS X 10 2 4 or greater BR Script PPD file for Mac OS X 10 2 4 or greater Resolut...

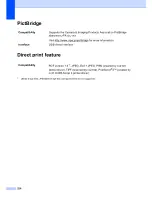
Страница 237: ...Supports the Camera Imaging Products Association PictBridge standard CIPA DC 001 Visit http www cipa jp pictbridge for more information Interface USB direct interface Compatibility PDF version 1 6 1 J...

Страница 238: ...rnet Wireless 802 11 b g Intel Pentium II or AMD equivalent 64 MB 256 MB 150 MB 310 MB Windows XP Home 1 4 Windows XP Professional 1 4 128 MB Windows XP Professional x64 Edition 1 AMD Opteron AMD Athl...

Страница 239: ...rinting on Letter size paper 4 When printing on Letter size paper at 5 print coverage for CMYK each Toner Cartridge Life 497 1 Black 5 000 pages 1 497 2 497 3 497 4 Cyan Magenta Yellow 4 000 pages 1 D...

Страница 240: ...IPP IPPS FTP server SSL TLS POP before SMTP SMTP AUTH Telnet SNMPv1 HTTP HTTPS server TFTP client and server SMTP client APOP LLTD responder Raw Port PC scanner FTP client LDAP POP3 TCP IP for IPv6 T...

Страница 241: ...100 IPP IPPS FTP server SSL TLS POP before SMTP SMTP AUTH Telnet SNMPv1 HTTP HTTPS server TFTP client and server SMTP client APOP LLTD responder Raw Port PC scanner FTP client LDAP POP3 TCP IP for IPv...

Страница 242: ...EAP Light Extensible Authentication Protocol has been developed by Cisco Systems Inc and enables the Oc wireless product to associate with access points using CKIP and CMIC encryptions Encryption meth...

Страница 243: ...ecimal Uses 10 digits of hexadecimal data e g 71f2234aba 128 104 bit ASCII Uses 13 text characters e g Wirelesscomms this is case sensitive 128 104 bit hexadecimal Uses 26 digits of hexadecimal data e...

Страница 244: ...ob and clears the machine s memory CNG tones The special tones beeps sent by fax machines during automatic transmission to tell the receiving machine that a fax machine is calling Coding method Method...

Страница 245: ...t use this mode if you are using a telephone answering device TAD Fine resolution Fine resolution is 203 196 dpi It is used for small print and graphs Gray scale The shades of gray available for copyi...

Страница 246: ...memory in numerical order Real Time Transmission When memory is full you can send faxes in real time Remaining jobs You can check which programmed fax jobs are waiting in the memory and cancel the job...

Страница 247: ...x transmission and copy without changing the default settings Tone A form of dialing on the telephone line used for Touch Tone telephones Transmission The process of sending faxes over the telephone l...

Страница 248: ...uide on the CD ROM ControlCenter3 for Windows See Software User s Guide on the CD ROM Copy brightness 79 color saturation 80 contrast 5 74 80 duplex 5 77 78 Enlarge Reduce key 75 enter copy mode 74 ke...

Страница 249: ...Fax codes changing 54 66 fax receive code 53 54 remote access code 66 telephone answer code 53 54 Fax forwarding changing at the machine 62 changing remotely 67 68 programming a number 62 Fax storage...

Страница 250: ...swering machine 50 Jams document 136 paper 137 Job Cancel key 6 113 L Labels 10 14 17 LCD liquid crystal display 4 199 contrast 25 Help List 72 LDAP See Network User s Guide on the CD ROM M Machine in...

Страница 251: ...PC Fax See Software User s Guide on the CD ROM Personalized Ring 48 PictBridge DPOF printing 86 specification 226 Polling polled transmit 70 polling receive 69 sequential polling 69 Power failure 199...

Страница 252: ...using 19 Scanning See Software User s Guide on the CD ROM Search Speed Dial key 55 56 60 Secure key 6 Security Secure function lock administrator password 28 Public user 28 restricted users 29 Secure...

Страница 253: ...y 114 117 printing 110 112 scanning 113 software 113 telephone line 128 paper jam 137 Two line telephone system 52 V Volume setting beeper 23 ring 23 speaker 23 W Waste toner box 183 Windows See Softw...

Страница 254: ...fications NOTICE The Ringer Equivalence Number is an indication of the maximum number of devices allowed to be connected to a telephone interface The termination on an interface may consist of any com...

Страница 255: ...Printing for Professionals Beyond the Ordinary Oc 100 Oakview Drive Trumbull CT 06611 www oceusa com Oc 2008 All Rights Reserved...

Отзывы: