17
7
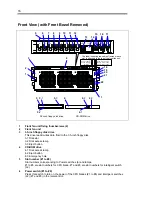
Power lamp (Green/Amber (#1 to #8)
Located at the top left of the lamp group of each slot.
The POWER lamp goes off when the relevant slot does not contain a CPU blade (slots #1 to
#6) or intelligent switch (L2) (slots #7 and #8). If the slot contains either of them, the lamp
indicates the power status of the device installed. The POWER lamp lights green while in DC
ON state after AC power is supplied. The lamp lights amber when AC power is turned off.
8
Status lamp (Green/Amber (#1 to #8)
Located at the middle left of the lamp group of each slot.
The Status lamp indicates the status of a CPU blade (slots #1 to #6) or intelligent switch (L2)
(slots #7 and #8) installed in the relevant slot. The lamp lights green in normal state, and
amber in abnormal state. The lamp indication is linked to the Status lamp on the CPU blade
or intelligent switch (L2). Refer to their specific User’s Guides.
9
ID lamp (Blue) (#1 to #8)
Located at the bottom left of the lamp group of each slot.
The ID lamp identifies the CPU blade (slots #1 to #6) or the intelligent switch (L2) (slots #7
and #8) installed in the relevant slot. The lamp goes when the ID switch is pressed or blinks
at the reception of a software command.
10
KVM Select lamp (Green) (#1 to #6)
Located at the top right of the lamp group of each slot.
The KVM Select lamp indicates the CPU blade (slot #1 to #6) currently selected by the KVM
Select switch. The lamp goes on while selected, and goes off when deselected.
11
Media Select lamp (Green) (#1 to #6)
Located at the middle right of the lamp group of each slot.
The Media Select lamp indicates the CPU blade (slot #1 to #6) currently selected by Media
Select switch. The lamp goes on while selected, and goes off when deselected. The selected
CPU blade can use the floppy disk drive, CD-ROM drive, and/or the USB device connected to
the USB connector.
12
Serial Select lamp (Green) (#1 to #8)
Located at the bottom right of the lamp group of each slot.
The Serial Select lamp indicates the CPU blade (slots #1 to #6) or the intelligent switch (L2)
(slots #7 and #8) currently selected by the Serial Select switch. The lamp goes on while being
selected, and goes off when deselected. The selected device is connected to the serial
connector at the front of the blade assembly unit.
13 USB
connector
Use this connector to connect with USB device. The USB device is connected to the CPU
blade in the slot that was selected by Media Select switch.
14 Serial
port
Use this connector to connect with any device equipped with a serial port. The serial device is
connected to the CPU blade in the slot that was selected by Serial Select switch. This serial
connector is of RJ45-typ, meaning that it is mandatory to use the serial port conversion cable
provided with the blade assembly unit to connect a device with a DB9-type of connector.
15
KVM Select switch (Left: +, Right: –)
The KVM Select switch is provided to select the slot to connect with the video (monitor), USB
keyboard, and USB mouse connected via the intelligent switch (L2).
The KVM Select lamp of the selected slot goes on.
Pressing the plus (+) button at the left side selects the slot one by one in ascending order
(#1
→
#2
→
#3
→
#4
→
#5
→
#6
→
#1).
Pressing the minus (–) button at the right side selects the slot one by one in descending order
(#6
→
#5
→
#4
→
#3
→
#2
→
#1
→
#6).
Содержание N8405-013F
Страница 2: ... This page is intentionally left blank ...
Страница 8: ......
Страница 12: ...iv This page is intentionally left blank ...
Страница 33: ...21 7 Cable tray The cable tray protects the cable connected with the CPU blade ...
Страница 94: ...82 5 When the driver is detected from the CD ROM click Next 6 Click Finish This completes the installation ...

