background image

Installing the Vacuum Pump

Gemini VII 2390 Confirm

20                                            Gemini VII 2390 Confirm Installation Instructions and Checklist


Feb 09

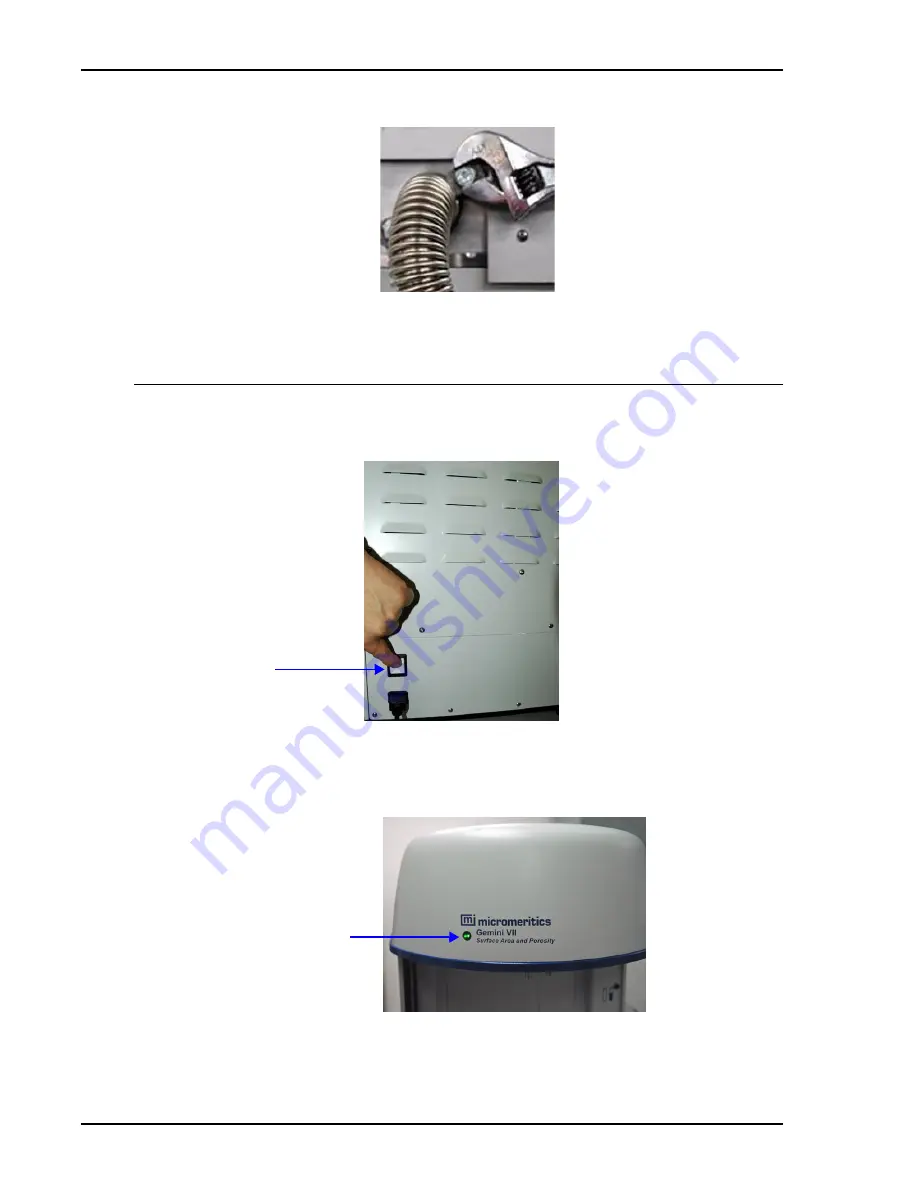
Place the hose flange in the Vacuum port; tighten the two retaining screws with a wrench.

3. Plug the vacuum pump power cord into an appropriate power source.

Applying Power to the Analyzer

1. Place the Gemini VII 2390 analyzer power switch, located on the lower rear panel of the 

instrument in the ON position.

2. Observe the Power indicator on the upper front portion of the instrument. The indicator 

will blink green to indicate that power is applied to the instrument. Once the embedded 
application is running, the indicator will stop blinking and remain on. 

Power switch

 Power indicator

Содержание GEMINI VII 2390

Страница 1: ...Gemini VII 2390 Confirm Installation Instructions and Checklist 239 42870 04 February 2009 ...

Страница 2: ...Windows is a registered trademark of Microsoft Corporation Copyright Micromeritics Instrument Corporation 2009 All rights reserved ...

Страница 3: ...ded to Install an Oil based Vacuum Pump with Alumina Trap 6 Preparing the Alumina 6 Preparing the Alumina Trap 8 Closing the Ballast Valve 9 Installing the Alumina Trap 10 Checking the Pump Oil Level 11 Installing the Exhaust Port Filter 13 Attaching the Hose 14 High Vacuum Oil Free Pump Combination 16 Attaching the Hose 16 Applying Power to the Pump 17 Non Micromeritics Provided Vacuum Pump 18 At...

Страница 4: ...y 37 Starting the Gemini Application 37 Part 3 Gas Connections 38 Instrument Preparation 38 Specify Units of Measure 38 Connecting Gases 39 What You Will Need 39 Micromeritics Supplied 39 User Supplied 39 Connecting a Gas Bottle 40 Connecting the Gas to the Instrument 42 Cleaning and Verifying the Gas Lines 44 Part 4 Operational Verification 48 Calibrating Transducers and Servo Valves 48 Calibrate...

Страница 5: ...he Liquid Nitrogen Level in the Dewar 65 Starting the Reference Analysis 66 Part 5 Installation Checklist 69 Checklist Description 69 Preparing for Installation 70 Connecting Cables 70 Installing the Vacuum Pump 70 Entering Ethernet Settings 70 Installing the Analysis Program 71 Connecting Gases 71 Cleaning and Verifying Gas Lines 71 Verifying Instrument Operation 72 Exceptions 73 Signatures 74 In...

Страница 6: ...Table of Contents Gemini VII 2390 Confirm iv Gemini VII 2390 Confirm Installation Instructions and Checklist Feb 09 ...

Страница 7: ... attach gas to the instrument Part 4 describes how to verify system operation Part 5 contains a checklist to be completed during installation Remove Part 5 and check off the items on the checklist as you install the system Conventions This document uses the symbols shown below to identify notes of importance and cautions Notes contain a tip or important information pertinent to the subject matter ...

Страница 8: ...e for extremely low temperature Do not use a glass or metal stirring rod unless it is coated with some type of soft protective coating Do not remove the mesh covering from a glass Dewar This covering enables you to maintain a more secure grip on the Dewar Do not handle heavy objects above a glass Dewar If unavoidable place a protective cover over the Dewar s opening If an object of sufficient weig...

Страница 9: ...e instrument Connecting the Power Cord 1 Insert the power cable into the connector on the lower rear panel of the analyzer 2 Plug the other end of the power cord into an appropriate power source Connecting Networking Cables Connecting One Analyzer 1 Plug the ethernet cable into the port labeled Ethernet on the side panel of the analyzer 2 Plug the other end of the cable into the Ethernet port on t...

Страница 10: ... an ethernet cable to the ethernet port on the computer and the other end to a numbered port on the ethernet switch Do not use the Uplink port 3 Connect one end of an ethernet cable to the Ethernet connector on the left side of the analyzer and the other end of the cable to a numbered port on the ethernet switch 4 Repeat Step 3 for each analyzer you are installing Be sure cables are not connected ...

Страница 11: ... or oil free pumps For oil based pumps an anti suckback valve is required to prevent oil from being admitted into the Gemini should there be a power failure A device to reduce oil vapor backstreaming is also recommended Two types of pumps are available from Micromeritics Use the appropriate instructions for the customer s vacuum pump Oil Based Pump on page 6 High Vacuum Oil Free Pump Combination o...

Страница 12: ...Oil based Vacuum Pump with Alumina Trap Preparing the Alumina 1 The activated alumina must be thoroughly dried before using Turn on a drying oven and set the temperature to 300 C to preheat Micromeritics Supplied User Supplied Vacuum pump Alumina Alumina trap Exhaust port filter Vacuum pump hose Clamps Pump oil Drying oven Flat blade screwdriver 10 mm screwdriver 300 C ...

Страница 13: ... grams of fresh alumina into a glass or metal container 250 mL if a graduated beaker is used Place the container into an oven preheated to 300 C 3 Bake the alumina for two hours Remove the baked alumina from the oven and allow it to cool until lukewarm Do not perform this procedure on used alumina Resultant oil vapors may cause a fire or explosion ...

Страница 14: ...crew one of the end fittings onto the trap body clockwise 3 Be sure the trap body is dry and the alumina pellets are cool Pour the pellets into the trap until they are level with the top of the trap body 4 Screw the other end fitting onto the trap and tighten securely by hand Be sure alumina pellets are cool Adding hot pellets to the trap body may warp the body and cause an improper seal of the O ...

Страница 15: ...s and Checklist 9 5 Lightly tap both ends of the trap body on the work surface This will remove any remaining dust from the pellets Closing the Ballast Valve The ballast valve should remain closed during the operation to obtain the best vacuum Make sure the valve is turned completely clockwise Ballast valve ...

Страница 16: ...centering ring on the intake port There are two types of centering rings use the one with the smaller opening 3 Place the trap on the centering ring Place an opened clamp around the flange of the intake port and the flange of the trap Swing the clamp fastening screw toward the intake port until it fits into the slot in the other half of the clamp Tighten the wing nut securely by hand Intake port C...

Страница 17: ...he oil level should be halfway between the indicator lines in the oil level window 2 If you need to add oil go to Step 3 If you do not need to add oil proceed to Installing the Exhaust Port Filter on page 13 3 Remove the plug from the oil fill port 4 Slowly add fresh oil to the port until the level is midway between the indicator lines in the oil level window on the front of the pump Oil level ...

Страница 18: ...ini VII 2390 Confirm Installation Instructions and Checklist Feb 09 5 Replace the oil fill plug turn clockwise to tighten Do not allow oil to rise above the midway position Doing so may cause oil to splash into the exhaust filter and contaminate it Oil level ...

Страница 19: ...ort and remove it 2 Make sure the centering ring remains on the port If the exhaust port is closed with a cap remove the cap 3 Place the filter on the centering ring There are two types of centering rings use the one with the larger opening 4 Open the clamp and place it around the flange of the exhaust port and the flange of the exhaust filter 5 Swing the clamp fastener screw toward the exhaust po...

Страница 20: ... below Then place a hose adapter on the centering ring 2 Place the clamp around the vapor trap Swing the clamp fastener screw around until it fits into the slot on the other half of the clamp and tighten the wing nut securely by hand Then attach the hose to the port 3 Place a hose clamp on the hose and tighten the retaining nut with a flat blade screwdriver 4 Loosen the screws on the Vacuum port o...

Страница 21: ... you removed in Step 4 on the vacuum adapter 6 Place the vacuum adapter in the Vacuum port then tighten the two port screws by turning them clockwise with a wrench 7 Place the vacuum hose over the Vacuum adapter Attach a clamp and tighten the retaining nut with a flat blade screwdriver 8 Plug the vacuum pump power cord into an appropriate power source ...

Страница 22: ...amp fastening screw around until it fits into the slot on the other half of the clamp then tighten the wing nut securely by hand 2 Loosen the screws on the Vacuum port on the rear panel of the instrument use a wrench if necessary Then remove the port cap and centering ring 3 Route the vacuum hose from the pump to the inlet port on the rear panel of the analyzer Place the centering ring removed in ...

Страница 23: ...crews with a wrench Applying Power to the Pump 1 Set the voltage on the pump to 115V or 230V to match your environment 2 Plug the vacuum pump power cord into an appropriate power source 3 Place the high vacuum pump power switch on the back of the pump enclosure in the ON position 4 Place the vacuum pump power switch on the front of the pump enclosure in the ON position Power switch Power switch ...

Страница 24: ...o the directions in the vacuum pump operator s manual Follow the instructions for the type of hose you are installing Rubber Metal Rubber Hose 1 Loosen the screws on the Vacuum port on the rear panel of the analyzer Then remove the port cap and centering ring 2 Place the centering ring you removed in Step 1 and the vacuum adapter in the Vacuum port 3 Tighten the two port screws by turning them clo...

Страница 25: ...retaining nut with a flat blade screwdriver 5 Plug the vacuum pump power cord into an appropriate power source Metal hose 1 Loosen the screws on the Vacuum port on the rear panel of the analyzer Then remove the port cap and centering ring 2 Route the vacuum hose from the pump to the inlet port on the rear panel of the analyzer Place the centering ring removed in Step 1 on the hose flange Centering...

Страница 26: ... an appropriate power source Applying Power to the Analyzer 1 Place the Gemini VII 2390 analyzer power switch located on the lower rear panel of the instrument in the ON position 2 Observe the Power indicator on the upper front portion of the instrument The indicator will blink green to indicate that power is applied to the instrument Once the embedded application is running the indicator will sto...

Страница 27: ...ing the Micromeritics software you must turn off the firewall option between the computer and the analyzer Refer to Technical Bulletin Gen 003 for for details You must also do this for any third party firewalls that may have been installed refer to the firewall software manual or contact the system administrator for instructions Installing the Micromeritics Software The installation CD shipped wit...

Страница 28: ...n screen If it doesn t perform the following steps a Select Start Run from the Windows menu bar b Enter the name of the drive designator followed by setup For example e setup c Click OK 2 This screen outlines the steps that should be completed before installing the software If all of the steps have not been completed click Cancel perform the steps and then restart the installation program Do not p...

Страница 29: ...oup box to add an icon to the desktop 5 The Micromeritics software icon is added to the Micromeritics folder by default If you prefer a different folder enter or select one from the drop down list 6 The Install this application for All Users check box enables you to allow or prohibit users other than the installer to access the application Select the check box to allow access for all users of this...

Страница 30: ...ocation to be specified If you wish to choose a location other than the default location use the Browse button to select the location 9 The Seat number field is used when the Micromeritics software is installed on more than one computer If this is the case you can enter a number representing the computer For example if this is the second computer on which the Micromeritics software is installed en...

Страница 31: ...this computer 12 In the Step 2 group box enter the serial number s for the analyzer s you are attaching to this computer If Then you are installing the analysis program at initial installation select the number of analyzers you are installing you plan to use the analysis program for offline data reduction select 0 you are moving an analyzer from another computer to this one select 0 Refer to Movin...

Страница 32: ...lled If Then the port you plan to use is listed select the port and proceed to the next step the port you plan to use has been config ured but is not listed Click Specify the Specify Ethernet Port dialog is displayed Enter the remaining portion of the IP address in the enabled fields then proceed to the next step If you are installing multiple analyzers a dialog prompting you to insert the media c...

Страница 33: ...ialog then click Finish to close it 17 Remove the program CD The customer should store the CD in a secure location The original program CD contains the calibration files specific to the instrument Upgrade CDs do not contain calibration files Therefore it is important that the customer maintains the original program CD in a secure location in the event calibration files need to be reinstalled 18 Yo...

Страница 34: ...ed the Devel oper profile in the Administrator Utility The Developer profile enables users to develop and enter analysis methods A Developer has access to all functions of the Micromeritics application The MicAnalysts user group is created to contain users who will be assigned the Analyst profile in the Administrator Utility The Analysts profile enables users to perform analyses using pre defined ...

Страница 35: ...and to the corresponding Administrator Utility profiles in the table below This table was also included in the Preinstallation Checklist and Instructions and may have already been completed User Name is the person s Windows User ID Service users should be added to the MicService Windows user group and assigned a Developer user profile in the Administrator Utility Function Developer Analyst Create ...

Страница 36: ...__ Full Name___________________________________________________ User Name _________________________________________________ Full Name___________________________________________________ User Name _________________________________________________ Full Name___________________________________________________ User Name _________________________________________________ Full Name_________________________...

Страница 37: ...__ Full Name___________________________________________________ User Name _________________________________________________ Full Name___________________________________________________ User Name _________________________________________________ Full Name___________________________________________________ User Name _________________________________________________ Full Name_________________________...

Страница 38: ...er password in the Password field then click OK The following message displays Your password has expired You will not be able to login without changing your password 4 Click OK the Set Password dialog displays 5 Enter a new password in the New password field The password must contain a minimum of six alphanumeric characters 6 Enter the password again in the Confirm new password field This is the p...

Страница 39: ...ssword parameters you enter in this dialog will apply for all Micromeritics software users Enter the number of days in which a user s password will expire in the Expire in field This number of days goes into effect any time a user changes his password If you enter zero 0 in this field users passwords will not expire 3 Enter the number of days prior to expiration that a user will be notified and as...

Страница 40: ...eans this function is not used 6 You may specify that the User ID must match the user s Windows ID and the user must be logged into the Windows application This ensures that only the current Windows user can operate the Micromeritics application Otherwise any user with the same access level Developer or Analyst can log into the application To specify the matching requirement click the Must match W...

Страница 41: ...pted to change it The password to which he changes it will then be stored in the password history file The password must contain a minimum of six alphanumeric characters 6 Select the user s application access level by clicking the appropriate button The user access level can be one of the following Administrator and Developer Developer only Analyst only 7 The Password change date field is blank an...

Страница 42: ...k the Users tab to display the User dialog 2 Click Add to display the Add User dialog 3 Enter a Windows User ID to be used by service personnel in the User Name field 4 Enter Service in the Full Name field 5 Enter a temporary password a service representative can enter to access the application in the Password field When a service representative enters this password he will be prompted to change i...

Страница 43: ...ity click the Close button in the title bar The application closes and the exit action is recorded in the log file Installation and setup of the software is complete Starting the Gemini Application To start the Gemini application click its icon on the desktop or select the Gemini application from the Windows program list The next step is Attaching and Preparing Gas for analysis Proceed to the next...

Страница 44: ...Installation Instructions and Checklist Feb 09 Part 3 Gas Connections Instrument Preparation Specify Units of Measure The software allows the user to set the units of measure to fit the laboratory s needs For the remainder of the installation the units will be set as follows ...

Страница 45: ... bottle may be user supplied Two 7 16 in 11 mm wrenches User Supplied Analysis gas Helium The Gemini uses pressure relief valves to return the instrument to a safe condition in the event of a power failure or loss of cryogen This protects the user from dangerous pressures on the sample tube However extra caution should be employed if toxic or flammable gases are used The pressure relief valves ven...

Страница 46: ...appropriate wrench to tighten an additional 3 4 turn 3 Check for leaks at the high pressure side of the regulator and in the connector a Turn the regulator control knob fully counterclockwise b Slowly open the gas bottle shut off valve then close it c Observe the pressure on the high pressure gauge If the pressure is stable proceed with the next step If the pressure decreases tighten the regulator...

Страница 47: ...r shut off valve counterclockwise to open c Open the gas bottle shut off valve to flow gas d Close the regulator shut off valve to stop flow e Close the gas bottle valve 5 Connect the gas line to the regulator a Connect the gas line to the regulator connector b Use two 7 16 in 11 mm wrenches to tighten the gas line connection one to hold the fitting steady and one to tighten the connector nut Regu...

Страница 48: ...ottle shut off valve Connecting the Gas to the Instrument The instructions below show how to attach the analysis gas to the instrument Repeat the steps using the He port to attach Helium to the instrument 1 Loosen then remove the plug from the port 2 Insert the gas line into the port and hand tighten the connector nut Regulator Control knob Regulator Shut Off valve Gas Bottle Shut Off valve Be sur...

Страница 49: ...ctions and Checklist 43 3 Use a 7 16 in 11 mm wrench to tighten the nut an additional 1 4 turn 4 Open the gas line then apply a leak test agent to the gas port connection to make sure there is no leak at the fitting Tighten if needed 5 Connect the helium to the instrument repeating steps 1 4 ...

Страница 50: ... Before beginning confirm that the state for valves and the low pressure gauge are as follows 1 Select Unit n and make sure that Manual Control is disabled there is no check mark next to Enable Manual Control 2 Select Unit n Diagnostics the Service Test dialog is displayed 3 Click the down arrow to the right of the Test field and select Clean and Verify Analysis Gas Line Rev latest revision letter...

Страница 51: ...ormative for example advising how long the test will take or how long before you will be required to open or close a valve Read the message and click OK to proceed Operator response for example you will be asked to open and close regulator and gas bottle valves Perform the task first then click OK 6 After the test is finished a dialog stating the test is complete is displayed click OK to close the...

Страница 52: ...wn a leak is indicated between this connection Check the connections from the instrument to the gas regulator valve Tighten as necessary then try the test again 8 Click the Instrument to Gas Bottle Shut off 2 tab to display its report Observe the Leak Rate field it should display Passed indicating that the gas line from the instrument to the gas bottle is clean and leak free Sample Port Pressure v...

Страница 53: ...valves are in the proper state for operation If Failed is shown one or more valves is not in the proper position set the valves as shown below and ensure the appropriate pressure is displayed on the low pressure gauge If you wish to run the test again be sure to close the gas bottle valve before starting the test 10 Click Close to close the test report 11 Click Close on the test dialog to close th...

Страница 54: ... instrument and the pressure is set to 15 psig 2 Pressurize the ports a Select Unit n Show Instrument Schematic Unit n Enable Manual Control b Close all valves double click a valve to open or close it c Open valves 4 b and 4 s Open valve 2 adsorptive for 15 seconds d Close all valves Verifying the 1000 Torr transducers accuracy requires the use of 004 09814 00 Paroscientific Pressure Calibration S...

Страница 55: ... g Select Unit n Enable Manual Control to disable manual control remove check mark 3 Install the vacuum gauge on the sample port 4 Ensure that a blank tube or plug is installed in the balance port refer to Installing Sample Tubes on page 57 5 Zero the pressure transducers a Select Options Service Test Mode b Enter the password then click OK c From the main menu select Unit n Calibration Zero Press...

Страница 56: ...3 minute evacuation then a message that asks if you want to save the calibration Generally you should select No 6 Scale the pressure transducers a Pressurize ports to 780 mmHg as described in step 2 above b Remove the vacuum gauge and install the pressure gauge c Connect the RS232 cable for data transfer d From the main menu for the unit number being operated select Calibration Pressure Scale The ...

Страница 57: ... type in the pressure reading from the pressure calibration standard h Press Enter i Click Close when the calibration terminates j Enable manual control and open valves 5 b and 5 s until the sample pressure is between 0 and 300 mmHg Close all valves k Repeat step 2 but change the servo setting in step 2e to 380 mmHg l Proceed if the values for the transducers and pressure gauge are within 2 mmHg o...

Страница 58: ...nk tubes on both ports refer to Installing Sample Tubes on page 57 c From the main menu Select Unit n Calibration Sample Servo d Press Start button to begin the calibration routine e When the calibration is complete a message is displayed Click OK 2 To calibrate the balance servo valve a From the main menu for the unit number being operated select Unit n Calibration Balance Servo b Press Start but...

Страница 59: ...d weigh samples Materials Required to Clean and Weigh Sample Tubes 1 Turn on the drying oven used for heating the sample tubes and set the temperature to 110 ºC 2 Check the reservoir of the ultrasonic cleaning unit to make sure it is clean Supplied by Micromeritics Supplied by User Sample tube Drying oven Sample tube brush Ultrasonic cleaning unit Stopper for sample tube Detergent Sample tube rack...

Страница 60: ...nt is used it may be difficult to rinse from the sample tubes 4 Fill the sample tubes with warm water and place them in the reservoir of the ultrasonic cleaning unit Turn on the ultrasonic cleaning unit Leave the glassware in the unit until the walls of the tubes are free of sample residue 5 Using rubber gloves remove the sample tubes from the reservoir 6 Clean the interior of the sample tubes wit...

Страница 61: ... the sample tubes on the sample tube rack until ready to place in the oven 9 Place the sample tubes in the drying oven which has been preheated to 110 C Bake in a vacuum oven for two hours 10 Remove the sample tubes from the oven and allow them to cool 11 Rinse stoppers with isopropyl alcohol 12 Wipe a rubber stopper with a lint free cloth ...

Страница 62: ...Confirm Installation Instructions and Checklist Feb 09 13 Label the sample tube and stopper for identification 14 Insert the stopper into the opening of the sample tube Cleaning the sample tube is complete The next step is performing a blank tube analysis Proceed to the next page ...

Страница 63: ... are present and in good condition Installing Sample Tubes The Balance port is located on the left as you face the instrument and the Analysis port is located on the right To attach a tube to a port follow the steps below 1 First remove the port plug Turn the connector nut on the port clockwise to loosen then remove the port plug connector nut and O ring If the O ring does not come out of the port...

Страница 64: ... it is fully in the port Secure it in place by screwing the connector nut counterclockwise onto the balance port Hand tighten the connector nut Attach a blank tube to the other port using the same procedure 4 For Model t slide the Dewar cover over the sample tubes Insert the Po tube if present into the center hole of the Dewar cover and slide the cover up For Models a p attach the 2 piece Dewar co...

Страница 65: ...Feb 09 Gemini VII 2390 Confirm Installation Instructions and Checklist 59 Preparing the Dewar Place a Dewar of water at ambient temperature on the elevator Starting the Blank Analysis 1 Select Unit n Blank Analysis the Blank analysis dialog is displayed ...

Страница 66: ...l of the appropriate values for performing a blank analysis into your sample file 4 Click Report after analysis and select Report after analysis Choose Preview as the destination then click OK 5 Click Start the User Log In dialog is displayed 6 Enter your password in the Password field and click Ok to begin the blank analysis 7 Review the analysis results to see if they are within the tolerances s...

Страница 67: ...lue is stored and will be used in the reference analysis 1 Make sure the blank tubes you installed in the previous procedure are still in place 2 Remove the Dewar and discard the water 3 Fill the Dewar with the analysis bath liquid to about 2 cm 3 4 in from the top for the small Dewar and 5 cm 2 in for the large Dewar 4 Place the analysis Dewar onto the elevator 5 Close the sample compartment door...

Страница 68: ...t b For Gemini VII 2390p and 2390t units click Po tube then click Start 8 The application measures the saturation pressure When the saturation pressure has been recorded the dialog closes Preparing for a Reference Material Analysis 1 Place the sample weighing support on the balance Tare the balance and allow it to stabilize at zero 0 2 Place the sample tube set empty sample tube and stopper on the...

Страница 69: ...e 4 Pour the reference material from the weighing container into the sample tube 5 Replace the rubber stopper Degassing the Sample Before analyzing reference material use a degassing unit to remove any contaminants which may have adsorbed to the surface or pores of the material If you are using the SmartPrep degasser a menu will display on the menu bar of the Gemini application You can degas the s...

Страница 70: ... the sample record the value as Sample tube set plus sample mass After Degas 2 Determine the sample mass as follows Enter the Sample tube set plus sample mass After Degas __________ Step 1 above Subtract Mass for empty sample tube set _________ Step 3 of the previous procedure Sample Mass _________ This is the mass you will enter when you create a sample information file for the reference material...

Страница 71: ...se shown on the label of the reference material bottle within the tolerance level Installing the Sample Tube with Sample Leave the blank sample tube installed earlier in the Balance port Remove the blank sample tube from the Analysis port then install the sample tube with the carbon reference material into the Analysis port Refer to Installing Sample Tubes on page 57 Checking the Liquid Nitrogen L...

Страница 72: ...e compartment door Starting the Reference Analysis 1 Create a sample file for the reference analysis a Select New Sample Information the Create a Sample File dialog is displayed b Click the template named Carbon Reference Material then Create This template contains the appropriate conditions for analyzing the carbon reference material all values will be copied into the file you are creating ...

Страница 73: ...Sample Information dialog g Click Close to close the dialog 2 Select Unit Start Analysis the Analysis dialog is displayed 3 Click Browse and select the file you created for this analysis then click Open to return to the Analysis dialog a Enter the sample s mass in the Sample Mass field b Click Report After Analysis Ensure that Report after analysis is selected and that Be sure the sample compartme...

Страница 74: ...face Area shown on the reference material bottle If your results are within tolerance your instrument is operating properly If your results are not within tolerance refer to the following table for possible causes and actions After performing the action perform the reference analysis again Cause Action The sample was not degassed properly Degas the sample again The gas lines are not clean Clean an...

Страница 75: ...uation Code Circle an evaluation code for each procedure according to the follow ing criteria P Pass Indicates that this procedure has been successfully completed without error F Fail Indicates that this procedure has been unsuccessful and prevents the instrument from being installed for use N A Not Applicable Indicates that this procedure does not apply to your system Initial Date Enter your init...

Страница 76: ...all equipment has been unpacked and verified using the packing list P F N A Procedure Evaluation Code Initial Date Connect the power cord to the analyzer and to a power source P F N A Connect the ethernet cable to the analyzer and to the computer P F N A Procedure Evaluation Code Initial Date Install the components of the vacuum pump including oil if applicable P F N A Connect the vacuum pump to a...

Страница 77: ...lication P F N A Procedure Evaluation Code Initial Date Specify units of measure P F N A Connect the analysis gas to the instrument P F N A Connect the helium to the instrument P F N A Procedure Evaluation Code Initial Date Make sure the analysis gas line valves are in the correct state Gas bottle shut off valve Closed Regulator shut off valve fully Open Pressure control knob fully Open P F N A Pe...

Страница 78: ...A Prepare the Dewar with water P F N A Perform the blank analysis Review the analysis results They must be within the tolerances shown below in order for this procedure to pass P Po Tolerance in cm3 0 1 0 008 0 2 0 010 0 3 0 012 0 4 0 014 0 5 0 016 0 6 0 018 0 7 0 020 0 8 0 022 0 9 0 024 P F N A Fill Dewar with LN2 P F N A Measure the Po P F N A Prepare for a Reference Material Analysis P F N A De...

Страница 79: ...be explained below Procedure Evaluation Code Initial Date Analyze the reference material Expected results shown on reference material bottle _________ ____ Actual results__________________________ The Actual results must match the Expected results within the specified tolerance range in order for this procedure to pass P F N A Procedure Comments Initial Date ...

Страница 80: ...es of Micromeritics who install instruments are required to send the documents listed below to Micromeritics for inclusion in the customer s instrument history The documents to be sent to the Micromeritics Service Support Center are Completed Field Service Report Completed and signed Gemini VII 2390 Installation Checklist Blank Tube Analysis Sample Files Reference Material Analysis Sample Files Ca...

Отзывы: